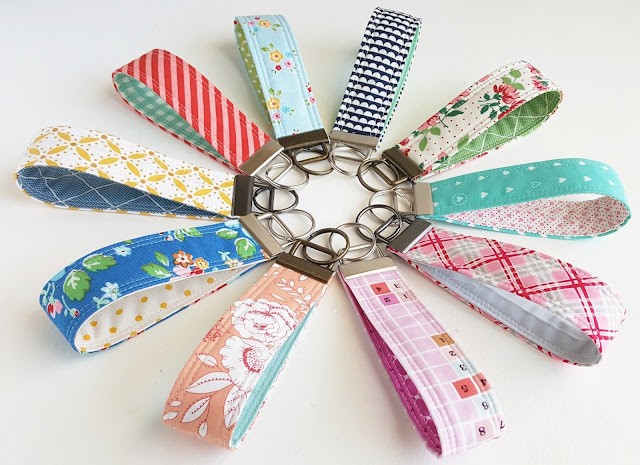
Key fobs are incredibly handy accessories, and making them yourself is a rewarding and simple project. Whether you’re looking to keep your keys organized, create personalized gifts, or just enjoy a quick crafting session, this DIY key fob tutorial is perfect for you. Using readily available 1.25″ key fob hardware, you can craft durable and fashionable key fobs in no time. Let’s dive into how to make your own custom key fobs!
Supplies You’ll Need
To get started on your key fob project, gather these essential supplies:
- Fabric Strips: You’ll need two strips of fabric, each measuring approximately 2.5″ wide and 10-11″ long. The length can vary slightly depending on your hand size preference – longer strips for larger hands. Cotton fabric scraps, leftover binding pieces, or jelly roll strips work wonderfully for this project.
- Batting Strip: Cut a strip of batting that is 1.25″ wide and slightly longer than your fabric strip. A brand like Warm and White batting is a great choice for adding a bit of cushion and structure to your key fob.
- 1.25″ Key Fob Hardware: This is the most crucial component! You’ll need 1.25 inch wide key fob hardware. These metal pieces come in various finishes and colors to match your fabric and style. You can find quality 1.25″ key fob hardware at craft stores or online retailers like Everything Ribbon on Etsy.
- Key Fob Pliers: While you might be able to close the key fob hardware with regular pliers, using key fob pliers specifically designed for this purpose makes the process much easier and protects the hardware finish.
- Sewing Machine: A sewing machine will make stitching the fabric strips together quick and even. A walking foot is recommended for even fabric feed.
- Iron: For pressing and folding fabric neatly.
- Scissors or Rotary Cutter: For accurate fabric cutting.
- Thread: Coordinating thread to match your chosen fabric.
- Optional: Ruler, cutting mat, clips or pins.
Step-by-Step Guide to Making Your Key Fob
Follow these simple steps to create your own stylish and functional key fob:
Step 1: Prepare Your Fabric Strips
- Select two coordinating fabric strips. An “inside” and “outside” fabric can add visual interest.
- For hand size considerations, cut your fabric strips to the following lengths:
- Large hands: 11″ x 2.5″
- Medium hands: 10.5″ x 2.5″
- Tiny hands: 10″ x 2.5″
Step 2: Prepare the Batting Strip
- Cut a strip of batting 1.25″ wide and slightly longer than your fabric strip. This batting will provide padding and structure to your key fob.
Step 3: Press the “Inside” Fabric Strip
- Take the fabric strip designated as the “inside” of your key fob.
- Using a hot iron, press both long sides of the fabric strip lengthwise towards the middle. Aim for a uniform width after folding, rather than a perfectly exact center fold.
Step 4: Press the “Outside” Fabric Strip with Batting
- Lay the “outside” fabric strip wrong side up.
- Place the batting strip on top of the wrong side of the “outside” fabric.
- Press the long sides of the “outside” fabric up and over the batting, folding them towards the middle. The fabric edges won’t meet in the center, and this piece will be slightly wider than the “inside” piece – which is exactly what you want for a snug fit.
Step 5: Stitch the Fabric Strips Together
- Place the “inside” fabric piece and the “outside” fabric piece wrong sides together, with the “inside” piece on top.
- Using a sewing machine with a walking foot, stitch 1/4″ from all edges. A walking foot helps feed both layers of fabric evenly.
- Sew along both long sides first, then the short ends.
- For added durability and a decorative touch, flip the strap over and stitch again, approximately 1/8″ from the edge, between the previous stitch line and the edge of the strap.
Step 6: Secure the Ends
- Trim any excess fabric at the short ends of the strap to neaten them.
- Fold the strap in half, bringing the short ends together.
- Using a zig-zag stitch on your sewing machine, sew across the two ends together. For extra security, stitch back and forth several times (3 passes recommended) to ensure a strong and durable join. Trim any loose threads.
Step 7: Attach the 1.25″ Key Fob Hardware
- This step requires a bit of pressure, and practice makes it easier!
- Take your key fob pliers and gently begin to close the clamp of the 1.25″ key fob hardware part-way.
- Slide the folded end of your fabric strap into the partially closed hardware clamp.
- Position the fabric evenly and then fully clamp down the hardware using the key fob pliers. Ensure it is firmly closed to securely grip the fabric. The designed shape and rubber coverings of the pliers will help protect the hardware finish while providing the necessary leverage.
Tips for Success and Customization
- Batch Sewing: Once you’ve gathered your supplies, consider making several key fobs at once. Assembly-line crafting is efficient!
- Fabric Choices: Experiment with different fabric patterns and colors to create key fobs for every style and occasion.
- Gift Giving: Handmade key fobs make thoughtful and personalized gifts for teachers, friends, family, or anyone who appreciates a touch of handmade charm.
- Hardware Variety: Explore different finishes and colors of 1.25″ key fob hardware to match your fabric choices and personal preferences.
- Durability: To prolong the life of your key fob, hang your keys by the metal ring when not in use to minimize stress on the fabric strap and clamp.
Enjoy your newly crafted key fobs! They are not only practical for keeping your keys accessible but also add a handmade touch to your everyday carry. Happy crafting!