Programming your key fob for your 1999 Honda CRV can seem like a daunting task, but it’s actually a straightforward process you can complete right at home. No need to visit a dealership and spend unnecessary money – with these simple steps, you can program your key fob and regain the convenience of remote locking and unlocking in minutes. This guide will walk you through each step to get your 1999 Honda CRV key fob programmed quickly and efficiently.
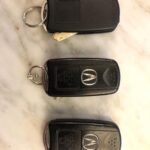
Before you begin, it’s important to understand a couple of key points. When you enter programming mode on your Honda CRV, the system will erase all previously programmed remotes. This means you’ll need to reprogram all of your key fobs, not just the new one. Also, the system is time-sensitive, and you must complete each step within 5 seconds of the previous one to remain in programming mode. Having all your remotes ready and understanding the steps beforehand will ensure a smooth programming experience.
Step-by-Step Programming Instructions for Your 1999 Honda CRV Key Fob
Follow these steps carefully to program your 1999 Honda CRV key fob:
-
Turn the Ignition to ON (II): Insert your key into the ignition and turn it to the “ON” position (II). This is the position just before you would crank the engine to start. Make sure the engine is not started.
-
Press the LOCK or UNLOCK Button: Take one of your key fobs (it can be a new, unprogrammed remote or one that was previously working) and press either the “LOCK” or “UNLOCK” button.
-
Turn the Ignition to LOCK (0): Turn the ignition key back to the “LOCK” (0) position. This is the position where you can remove your key.
-
Repeat Steps 1-3 Two More Times: Repeat the sequence of turning the ignition to “ON” (II), pressing the “LOCK” or “UNLOCK” button on the same key fob, and then turning the ignition back to “LOCK” (0) two more times. You will be performing steps 1, 2, and 3 a total of three times in a row, using the same remote each time.
-
Turn the Ignition to ON (II) Again: Turn the ignition switch to the “ON” (II) position one last time.
-
Press the LOCK or UNLOCK Button (Same Remote): Press the “LOCK” or “UNLOCK” button on the same remote you have been using throughout these steps. At this point, the power door locks should cycle (lock and then unlock) automatically. This confirms that you have successfully entered programming mode. If the door locks do not cycle, you will need to repeat steps 1-5 more quickly.
-
Program Additional Remotes: If you have additional key fobs to program (including any previously working ones), now is the time to program them. Press the “LOCK” or “UNLOCK” button on each remote you want to program. After pressing a button on each remote, you should hear the door locks cycle again, confirming that the system has accepted the signal from that remote.
-
Turn the Ignition to LOCK (0): Once you have programmed all desired remotes, turn the ignition switch to the “LOCK” (0) position to exit programming mode.
-
Test Your Remotes: Remove the key from the ignition and test each of your newly programmed key fobs to ensure they are working correctly. Press the “LOCK” and “UNLOCK” buttons on each remote to verify they control the door locks as expected.
By following these instructions, you should have successfully programmed your 1999 Honda CRV key fob. Enjoy the convenience of your working remote! If you are still experiencing issues, double-check each step and ensure you are completing them within the 5-second time limit. For replacement remotes, you can visit Keylessentryremotefob.com for a wide selection.