Experiencing issues with your 2011 BMW key fob, especially when the weather turns cold? It’s a common problem where the key fob becomes unresponsive, failing to lock or unlock your car. You might also notice your personalized car settings, like radio presets, resetting after starting the engine. This often points to a simple culprit: a dying key fob battery. Replacing it yourself is a straightforward process that can save you time and money compared to dealership service. This guide will walk you through each step of replacing the battery in your 2011 BMW key fob, ensuring you get back to enjoying the full functionality of your key.
Understanding the Issue: Why Your BMW Key Fob Battery Needs Replacement
Like any battery, the one in your BMW key fob has a limited lifespan. Over time, and especially with exposure to temperature extremes, its ability to hold a charge diminishes. Cold weather can exacerbate this issue, leading to noticeable performance drops. Symptoms of a weakening key fob battery in your 2011 BMW often include:
- Reduced Range: You need to be much closer to your car for the key fob to work.
- Intermittent Functionality: The key fob works sometimes but not others, particularly in cold conditions.
- Settings Reset: Your BMW may lose personalized settings after starting, indicating low power from the key fob during vehicle initialization.
- No Response: In the most severe cases, the key fob might become completely unresponsive.
The battery type commonly used in 2011 BMW key fobs is the VL2020 lithium-ion battery. Knowing this is crucial for purchasing the correct replacement.
Gathering Your Tools and Materials
Before you begin, ensure you have everything you need for a smooth and efficient battery replacement. This DIY task requires only a few simple tools:
- Replacement Battery: A VL2020 lithium-ion rechargeable battery. Ensure you purchase a high-quality battery from a reputable source to guarantee performance and longevity. You can find these online or at electronics retailers.
- Sharp X-Acto Knife or Precision Knife: This is necessary to carefully open the glued key fob casing.
- Non-Metallic Pry Tool: A credit card or plastic pry tool will help to gently lift the battery without damaging the internal components. Avoid using metal tools to prevent short circuits.
- Soldering Iron and Solder: Essential for desoldering the old battery and soldering in the new one. If you are not comfortable with soldering, consider practicing beforehand or seeking assistance.
- Optional: Cyanoacrylate Glue (Gel Type): For re-sealing the key fob casing after the battery replacement. Gel type glue is recommended to prevent running and accidental gluing of internal parts.
- Optional: New Key Fob Housing: If your existing key fob housing is damaged or you prefer a fresh look, you can purchase a new housing online.
Having these tools ready will make the replacement process faster and less stressful.
Step-by-Step Guide to Replacing Your 2011 BMW Key Fob Battery
Now, let’s get into the actual battery replacement process. Follow these steps carefully:
Step 1: Procure the Correct VL2020 Battery
The first and most crucial step is to obtain the correct replacement battery. For a 2011 BMW key fob, you’ll need a VL2020 rechargeable lithium-ion battery. When purchasing, pay close attention to the battery terminals and ensure they match the orientation of your original battery. Note the terminal placement, as they are offset at approximately 90 degrees.
Step 2: Carefully Open the Key Fob Casing
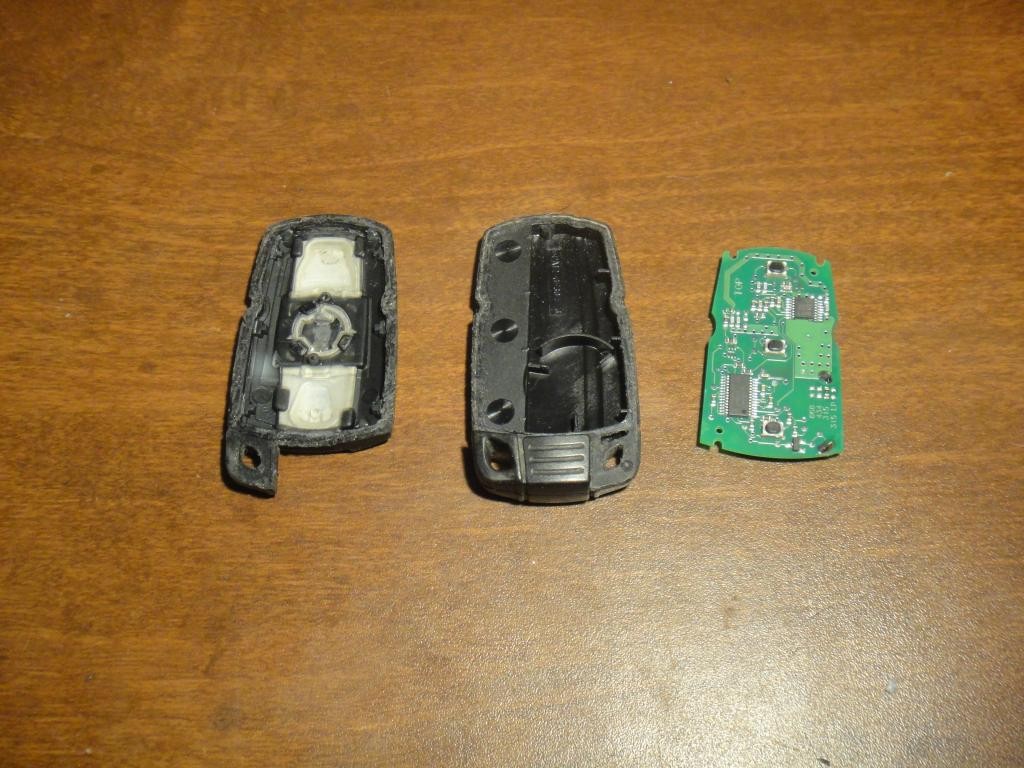
The BMW key fob is designed to be sealed, meaning you’ll need to carefully cut it open. This is the trickiest part, requiring patience and a steady hand.
- Take your sharp X-Acto knife.
- Locate the seam where the two halves of the key fob casing meet.
- Gently begin cutting along the seam. Apply consistent, light pressure. Multiple shallow passes are better than trying to cut through in one go.
- Work your way around the entire perimeter of the key fob. Be extremely cautious not to cut too deep, as you risk damaging the internal printed circuit board (PCB).
- Once you’ve cut around the entire seam, carefully pry the two halves of the casing apart. You may need to gently wiggle the knife in the seam to help separate the glued sections.
Step 3: Desoldering the Old Battery
With the key fob open, you’ll see the PCB with the battery soldered in place. Now, you need to remove the old battery.
- Use your non-metallic pry tool (like a credit card) to gently apply a small amount of upward pressure to the side of the battery. This creates a slight gap and tension on the solder joints.
- Identify the corner terminal of the battery. It’s generally easier to start with this one because the middle terminal’s lead is longer and harder to access initially.
- Heat the solder joint of the corner terminal with your soldering iron. Once the solder melts, the corner of the battery should lift slightly due to the pressure you’re applying with the pry tool.
- Repeat this process for the remaining terminal(s) of the battery.
- Carefully remove the old battery from the PCB once all solder joints are desoldered.
Step 4: Soldering in the New VL2020 Battery
Now it’s time to install the new VL2020 battery.
- Position the new battery into the battery holes on the PCB, ensuring the terminals align correctly.
- Hold the PCB by its edges and apply gentle downward pressure onto the battery to ensure good contact with the PCB pads.
- Apply heat to the middle terminal pad on the PCB with your soldering iron. The heat will transfer to the battery terminal and melt the existing solder, securing the middle terminal.
- Repeat this process for the corner terminal pad, soldering it securely in place. Ensure both terminals are firmly soldered to the PCB.
Step 5: Testing and Reassembly
Before permanently sealing the key fob, it’s crucial to test if the new battery is working correctly.
- Carefully place the PCB with the new battery into the key fob housing halves.
- Press the lock and unlock buttons on the key fob to test its functionality with your BMW.
- Also, start your car to ensure the key is recognized and the personalized settings are retained.
- If everything works as expected, congratulations! You’ve successfully replaced your 2011 BMW key fob battery. If not, double-check your soldering and battery orientation.
Step 6: Closing the Key Fob Casing
Once you’ve confirmed everything is working, you can reassemble the key fob.
- If you have a new key fob housing, carefully transfer the PCB into the new housing and snap it shut.
- If reusing the old housing, apply a small amount of gel-type cyanoacrylate glue to the edges of the casing. Be sparing with the glue to avoid getting it on the PCB or buttons.
- Carefully press the two halves of the casing together and hold them firmly until the glue sets.
Tips for a Smooth Battery Replacement
- Work in a well-lit and clean workspace. This will help you see the small components clearly and avoid contamination.
- Take your time and be patient, especially when opening the key fob and soldering. Rushing can lead to mistakes and damage.
- Use a sharp knife for clean cuts when opening the casing, but always cut away from yourself and your fingers.
- Ensure your soldering iron is clean and properly heated for efficient solder melting.
- Double-check the polarity of the battery before soldering it in place. Incorrect polarity can damage the key fob.
- Test the key fob functionality immediately after soldering the new battery and before gluing the case shut.
Conclusion
Replacing the battery in your 2011 BMW key fob is a manageable DIY task that can resolve common key fob issues, especially those related to cold weather. By following these steps and taking your time, you can successfully revive your key fob and avoid unnecessary trips to the dealership. Enjoy the restored functionality of your BMW key and the satisfaction of a job well done!