Lost your key fob or need to program a new one for your 2008 Acura TL? Dealerships often charge a premium for this service, but the good news is, programming your Acura TL key fob can be easily done at home, saving you both time and money. This guide provides a simple, step-by-step process to program your key fob yourself. You can purchase new key fobs online from retailers like eBay or Amazon. Once you have your new key fob, just follow these instructions carefully, ensuring you complete each step within the given time limits. Before you begin, make sure all doors, the hood, and the trunk of your Acura TL are securely closed. We’ll also cover how to replace your key fob battery, ensuring your remote is always functioning.
Materials You’ll Need
- New Key Fob for your 2008 Acura TL
- Small Phillips head screwdriver
- Replacement battery (CR1620 or CR2025, check your old battery for the exact type)
How to Program Your 2008 Acura TL Key Fob
This process needs to be completed relatively quickly, so read through the steps once before starting to familiarize yourself with them.
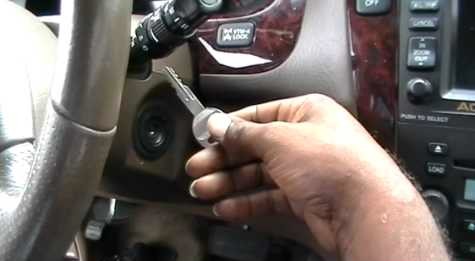
Step 1 – Ignition Cycle Initiation
Insert your Acura TL key into the ignition. Turn the ignition to the “ON” position, and within four seconds, press the “lock” or “unlock” button on your key fob. Ensure you are pointing the remote towards the driver’s side dashboard area. Immediately turn the ignition back to the “OFF” position within another four seconds. Repeat this “ON,” press button, “OFF” cycle two more times, for a total of three cycles. It’s crucial to keep each step within the four-second time frame for the programming sequence to initiate correctly.
Step 2 – Key Fob Programming Activation
Within four seconds after the third ignition cycle ends in the “OFF” position, turn the ignition back to the “ON” position. Then, immediately press either the “lock” or “unlock” button on the key fob you are programming. Listen carefully for the sound of the door lock actuators. Once you hear the doors lock and unlock, press the “lock” or “unlock” button on the same remote again within four seconds. This confirms the programming of the key fob.
Step 3 – Adding Additional Key Fobs (Optional)
If you have additional key fobs you wish to program for your 2008 Acura TL, you can add up to three remotes in total. Within 10 seconds of completing Step 2 and hearing the door lock actuator sound for the first programmed fob, take your next key fob and press the “lock” or “unlock” button on it, again aiming towards the driver’s side dashboard. When you hear the door lock actuator sound again, it indicates that the new remote has also been successfully programmed. Repeat this step for any other key fobs you need to program, up to a maximum of three. After programming all desired fobs, turn the ignition “OFF.” Test each key fob to ensure they are working correctly by locking and unlocking your Acura TL. If a key fob does not work, repeat the entire programming process for that specific fob.
Replacing the Battery in Your Acura TL Key Fob
If your key fob is no longer working reliably, or the range has decreased, replacing the battery is a simple fix. Here’s how:
Step 1 – Accessing the Screw
Locate the small Phillips head screw on the underside of your Acura TL key fob. Use your small Phillips head screwdriver to carefully remove this screw. Keep the screw in a safe place so you don’t lose it.
Step 2 – Separating the Key from the Remote
Gently press down on the chrome section, or button area, of your key fob. This should release the remote portion from the physical key blade. Carefully separate these two parts.
Step 3 – Removing the Trim Piece
Once the remote is separated from the key, you’ll see a trim piece around the remote casing. Carefully pull this trim piece apart from the main remote body to remove it. This will expose the seam of the key fob casing.
Step 4 – Battery Replacement
With the trim removed, you can now gently pull apart the two halves of the key fob remote casing. Inside, you will find the battery. Note the orientation of the old battery before removing it. Take out the old battery and replace it with a new battery of the same type (CR1620 or CR2025). Ensure the positive (+) side of the battery is facing the correct way, as indicated by markings in the battery compartment. Carefully snap the two halves of the remote casing back together, re-attach the trim piece, and then slide the remote portion back onto the key blade. Finally, re-install and tighten the Phillips head screw.
After replacing the battery, test your key fob to ensure it is working correctly. If you are still experiencing issues after battery replacement, you may need to reprogram the key fob following the steps outlined in the “Reprogramming Car Keys” section.