For 2006 Jetta TDI owners looking to boost engine performance and longevity, an EGR (Exhaust Gas Recirculation) delete can be a significant upgrade. While it might seem like a complex task, removing the EGR cooler pipe and installing a delete kit is actually quite straightforward with the right guidance. This article provides a practical, step-by-step approach based on real-world experience to help you confidently tackle the EGR delete on your 2006 Jetta TDI.
Understanding the EGR Delete on a 2006 Jetta TDI
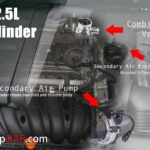
The EGR system recirculates exhaust gases back into the intake manifold to reduce NOx emissions. However, this system can lead to carbon buildup in the intake and potential issues with the EGR cooler and valve over time, especially in diesel engines like the TDI. Deleting the EGR system in a 2006 Jetta TDI can result in improved throttle response, reduced carbon buildup, and potentially better fuel economy. While EGR deletes are often performed for off-road use, understanding the process is crucial for informed maintenance and performance enhancement.
Essential Tools and Components: 2006 Jetta TDI EGR Delete Kit
Before starting the EGR delete, ensure you have the necessary tools and components. A typical 2006 Jetta Tdi Egr Delete Kit will include block-off plates and gaskets. You will also need common tools such as:
- Allen wrench set (5mm and 6mm likely needed)
- Ratchet with extensions (3″ and 6″ recommended)
- Penetrating oil
- Coolant hose clamps
- 90-degree metal elbow fitting (approximately 1″ diameter)
- Replacement metal gaskets (if not included in the kit)
Having these tools and the correct EGR delete kit for your 2006 Jetta TDI will streamline the process.
Step-by-Step EGR Cooler Pipe Removal Guide for 2006 Jetta TDI
This guide focuses on the removal of the EGR cooler pipe, a key step in installing an EGR delete kit.
Disconnecting the Turbo Oil Drain Pipe & Downpipe
The first step involves accessing and disconnecting components around the turbocharger to create space for EGR cooler pipe removal. Locate the “U” shaped pipe, often referred to as the turbo oil drain pipe, connected to the EGR cooler pipe and turbo. This connection needs to be separated.
Next, you’ll need to address the downpipe or catalytic converter (cat) connection to the turbo. This is typically secured with a band clamp, often a single bolt style requiring a 5mm or 6mm Allen wrench. Access to this clamp can be tight, either from above, reaching between the ASV/EGR valve and firewall, or from underneath the vehicle. Using an Allen tool with a ratchet base and extensions can be very helpful.
Important Tip: Generously apply penetrating oil to the band clamp bolt well in advance. These bolts are prone to stripping, which can complicate removal significantly. If the bolt strips, cutting the clamp might be necessary. Replacement clamps are readily available online if needed.
Removing the EGR Cooler Pipe
With the turbo oil drain pipe and downpipe connections addressed, you can now focus on removing the EGR cooler pipe itself. The catalytic converter, welded to a flex pipe, allows for some movement, which is helpful in maneuvering the EGR cooler pipe for removal. However, expect this step to still be somewhat challenging due to limited space.
Coolant Hose Management
Dealing with the coolant hoses connected to the EGR cooler can be tricky. Accessing the hose clamps is often difficult, and space is restricted. Be prepared for a potentially tiring task when removing these clamps. In some cases, cutting a coolant line close to the cooler might be necessary to facilitate removal.
Crucial Precaution: Before disconnecting any coolant lines, clamp them off to minimize coolant loss. Even with precautions, expect some coolant spillage from the cooler itself, possibly around a quart.
Once the hoses are disconnected, you’ll need to bypass the coolant lines that originally went to the EGR cooler. Do not use plastic plumbing fittings commonly included in some cheaper block-off kits. These plastic fittings are not designed for the high temperatures of the engine bay and can melt, deform, and eventually fail, leading to significant problems.
Instead, use a 90-degree METAL elbow fitting with an approximate 1″ diameter to connect the coolant lines. A straight fitting is likely to cause the hoses to kink, restricting coolant flow. A suitable and affordable option is a 90-degree heater hose fitting, often available at auto parts stores. These fittings may use O-rings for sealing instead of barbed ends, which can work effectively if properly sized and installed.
Gasket and Fitting Considerations
When reinstalling components or using block-off plates from your EGR delete kit, always prioritize metal gaskets over paper gaskets. Metal gaskets provide a superior seal and are more durable in the high-temperature environment. If you are reusing your original metal gaskets, consider applying a copper coat sealant to enhance their sealing properties, especially if they are in older condition.
By following these steps and using the correct components, performing an EGR delete on your 2006 Jetta TDI can be a manageable DIY project, leading to potential performance benefits and preventative maintenance for your vehicle. Remember to consult your vehicle’s service manual and local regulations regarding emissions modifications.