Is your 2002 Audi TT MK1 sounding more like a jet engine than a sports car on startup? A loud, persistent whistling noise that eventually fades away is a common symptom of a failing secondary air pump. If this sounds familiar, and especially if you’re also seeing a P1432 Diagnostic Trouble Code and a check engine light, you’re likely dealing with a secondary air injection pump issue. Fortunately, replacing this pump is a task you can tackle yourself with the right tools and a bit of patience. This guide will walk you through the process of replacing the secondary air pump on your Audi Tt Mk1 2002, helping you silence that annoying noise and get your car running smoothly again.
The secondary air pump is located in a somewhat cramped spot at the bottom front of your engine bay. It’s designed to inject air into the exhaust system during cold starts to help reduce emissions. When it fails, it can cause that jet engine-like noise and trigger the P1432 code, which indicates an open circuit in the secondary air injection solenoid valve. While sometimes the issue might be a simple air leak, often the pump itself needs replacement.
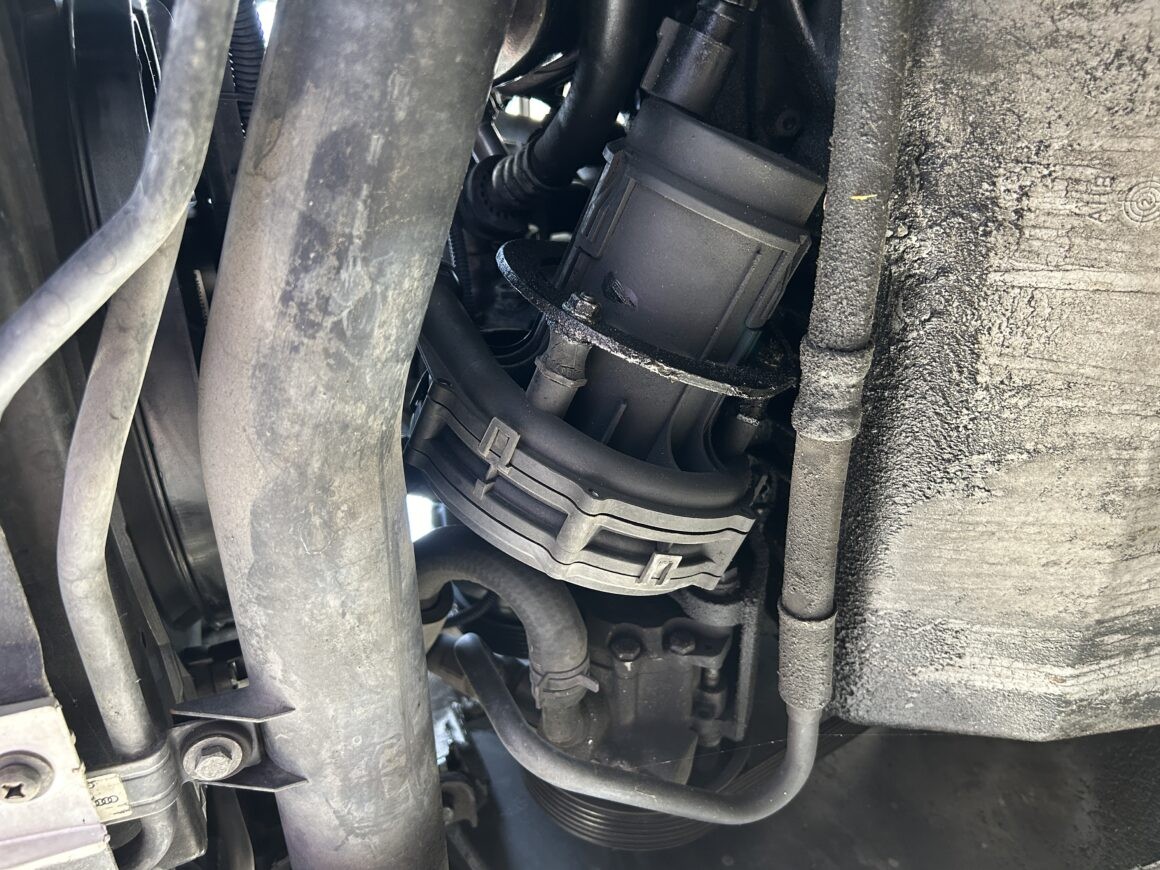
Before diving in, it’s helpful to understand how the secondary air pump assembly is mounted. As shown in the diagram, the pump (#1) is secured to a mounting ring (#2). This mounting ring is bolted to the engine frame, and accessing these bolts can be tricky. There are also vibration dampers and air hoses connected to the pump, adding to the complexity in this tight space.
While replacing the secondary air pump on your 2002 Audi TT MK1 isn’t inherently complicated, the limited access makes it a challenging job. You’ll be working in tight quarters and need to maneuver tools carefully. The key is understanding the mounting system and using the right combination of tools to reach those difficult bolts. You’ll be essentially removing the old pump from the mounting ring and installing the new one in its place. To create enough room to remove the pump, you’ll need to loosen the mounting ring by manipulating its bolts strategically.
To successfully complete this replacement, you’ll need a ratchet, a breaker bar for stubborn bolts, and a comprehensive set of sockets, including swivel sockets and extensions, along with Allen (hex) wrenches. A ball-end hex key will also prove invaluable for reaching bolts at awkward angles.
Parts and Tools for Audi TT MK1 Secondary Air Pump Replacement
Before you start, gather all the necessary parts and tools. Having everything on hand will make the job smoother and prevent frustrating interruptions.
Parts Needed:
- Secondary Air Pump (Part #: 078906601M): Ensure this part number is compatible with your 2002 Audi TT MK1. You can find aftermarket options like the Bapmic Air Pump (used in this guide) or the URO Parts Air Pump. It’s always recommended to double-check part compatibility with your specific vehicle.
Tools Required:
- Ratchet and Socket Set: A comprehensive set like the EPAuto 40 Pieces 1/4-Inch & 3/8-Inch Drive Socket Set is essential for various bolt sizes.
- Breaker Bar: For loosening tight bolts, the Capri Tools 3/8 in. Drive 18 in. Extended Leverage Breaker Bar provides extra leverage.
- Swivels and Extensions: A set like the 4-Piece 3/8 Inch Drive Extension Bar Set is crucial for accessing bolts in confined spaces.
- Allen Wrench (Hex Key) Set with Ball End: The Disen 13 Piece Hex Metric Ball End Set is particularly helpful for reaching bolts at angles.
- Nitrile Gloves: Protect your hands with MedPride Nitrile Exam Gloves.
- Shop Towels: Keep things clean with Scott Shop Towels Original, Blue.
- Vehicle Ramps or Jack Stands: To safely access the underside of your Audi TT MK1. FloTool RhinoRamps or BIG RED Torin Heavy Duty Steel Jack Stands are good options.
- Wheel Chocks: For added safety when working under your vehicle. MAXXHAUL Heavy Duty Black Wheel Chocks are recommended.
- Super Glue (Optional): Gorilla Super Glue can be helpful if you break the plastic hose clips.
Step-by-Step Guide to Replacing Your Audi TT MK1 Secondary Air Pump
With your parts and tools ready, let’s get started on replacing the secondary air pump in your 2002 Audi TT MK1. Remember to prioritize safety throughout this process.
Step 1: Vehicle Preparation and Safety
Begin by safely raising your Audi TT MK1. You’ll need access from both the engine bay and underneath the car. Use vehicle ramps or jack stands to lift the front of the vehicle. Always use wheel chocks behind the rear wheels for extra safety and ensure the vehicle is stable before proceeding.
Step 2: Disconnecting Electrical and Air Connections
First, disconnect the electrical connector from the secondary air pump. Use a flathead screwdriver to gently press the release clip on the connector while pulling it off. If it’s stuck, you can use a second screwdriver for gentle prying while depressing the release.
Alt Text: Disconnecting the electrical connector of the secondary air pump on a 2002 Audi TT MK1 using a flathead screwdriver.
Alt Text: Close-up view of the disconnected electrical connector from the secondary air pump in an Audi TT MK1, highlighting the release mechanism.
Next, disconnect the two air hoses connected to the pump. These have plastic release clips that are notoriously fragile. Press the releases and gently pull the hoses off. Be extra careful as these clips can easily break. If a clip breaks, retrieve the broken piece; you might be able to glue it back later or you may need to replace the entire hose.
Alt Text: Disconnecting one of the air hoses from the secondary air pump of a 2002 Audi TT MK1, showing the plastic release clip.
Alt Text: Close-up view of the disconnected air hose, emphasizing the fragile plastic release clip mechanism on an Audi TT MK1 secondary air pump.
Step 3: Removing Pump Mounting Nuts and Dampers
Now, locate the three washers and 10mm nuts that secure the air pump to the mounting ring. These are generally accessible and can be removed using a wrench or ratchet. Also, remove the threaded dampers at this stage. Removing these will provide more maneuverability when you remove the pump later.
Alt Text: Location of the 10mm nuts and washers securing the secondary air pump to the mounting ring in an Audi TT MK1 engine bay.
Alt Text: Close-up view of removing a 10mm nut from the secondary air pump mounting in a 2002 Audi TT MK1, highlighting the accessibility.
Step 4: Loosening and Removing Mounting Ring Bolts
Refer back to the parts diagram to identify the location of the three 8mm hex bolts that secure the mounting ring to the engine. The top bolt should only be loosened, not removed completely. The mounting ring will pivot around this top bolt, creating space to remove the pump. Completely removing the top bolt can make reinstallation more difficult later.
Accessing the top bolt is the most challenging part. You can try reaching it from above or below the engine bay, but it’s generally more accessible from above. Experiment with different combinations of socket extensions and swivel attachments on your ratchet or breaker bar to reach this bolt.
Alt Text: Accessing the top hex bolt of the secondary air pump mounting ring from above the engine bay of a 2002 Audi TT MK1 using extensions and a breaker bar.
Alt Text: Another angle showing the tool configuration to reach the top hex bolt of the Audi TT MK1 secondary air pump mounting ring from above the engine.
The other two hex bolts on the mounting ring, located lower down, need to be either loosened or removed. One of these may only need to be loosened as the mounting ring is designed to swing open once this and the top bolt are manipulated correctly. The other will likely need to be fully removed. Use your ratchet, extensions, swivels, and hex socket to access and remove these two bolts, working from underneath the vehicle or potentially from above if accessible.
Step 5: Removing the Old Secondary Air Pump
With the top mounting hex bolt loosened and the lower mounting hex bolts manipulated as described, you should now be able to maneuver and swing the mounting ring outwards enough to create space for the secondary air pump to be removed. In practice, you might find it necessary to remove both lower hex bolts completely and only loosen the top one to get sufficient clearance.
Alt Text: Demonstrating the swing of the mounting ring after loosening bolts to create space for secondary air pump removal in a 2002 Audi TT MK1.
Alt Text: Close-up view of the mounting ring swung open, providing access to remove the secondary air pump from a 2002 Audi TT MK1.
Alt Text: Further view of the space created by swinging the mounting ring, allowing for removal of the Audi TT MK1 secondary air pump.
Alt Text: Angle showing the accessibility to remove the secondary air pump after manipulating the mounting ring bolts on a 2002 Audi TT MK1.
Alt Text: Final view of the opened mounting ring, ready for the old secondary air pump to be taken out of the 2002 Audi TT MK1.
Double-check that the air hoses and electrical connector are completely disconnected before attempting to remove the pump. Carefully maneuver the old pump out of its position.
Alt Text: Removing the old secondary air pump from the mounting ring within the engine bay of a 2002 Audi TT MK1.
Alt Text: Side view of the old secondary air pump being removed, showcasing the limited space in a 2002 Audi TT MK1.
Alt Text: The old secondary air pump completely removed from the 2002 Audi TT MK1, ready for replacement.
Step 6: Installing the New Secondary Air Pump
Your new secondary air pump should come with new threaded dampers. Install these onto the new pump and tighten them securely with a wrench. Position the new pump near the mounting ring, ready for installation, but first, you’ll need to remount the mounting ring itself to the engine.
Alt Text: New secondary air pump with threaded dampers installed, ready for installation in a 2002 Audi TT MK1.
Alt Text: Close-up of the new threaded dampers securely fitted to the replacement secondary air pump for a 2002 Audi TT MK1.
Alt Text: Preparing to install the new secondary air pump into the mounting ring of a 2002 Audi TT MK1 after remounting the ring.
Step 7: Reinstalling the Mounting Ring
Reinstalling the mounting ring can be even more challenging than removing it due to the tight spaces and awkward angles. You’ll need to use a combination of socket extensions and swivels on your ratchet to reach and tighten the hex bolts properly. Ensure all bolts are snug to securely mount the ring back to the engine.
Alt Text: Reinstalling the mounting ring to the engine of a 2002 Audi TT MK1, showing the tight space and tool maneuvering.
Alt Text: Close-up view of tightening the hex bolts to remount the secondary air pump mounting ring in a 2002 Audi TT MK1 engine bay.
Alt Text: Another angle showing the tool setup needed to access and tighten the mounting ring bolts on an Audi TT MK1.
Alt Text: Mounting ring fully reinstalled and secured to the engine of a 2002 Audi TT MK1, ready for the new secondary air pump.
Step 8: Reconnecting Hoses and Electrical Connector
With the mounting ring back in place and the new pump positioned within it via the threaded dampers, reconnect the two plastic air hoses and the electrical connector to the new secondary air pump.
Alt Text: Reconnecting the plastic air hoses to the new secondary air pump in a 2002 Audi TT MK1 engine bay.
Alt Text: Close-up of the air hoses being reattached to the secondary air pump, highlighting the fragile plastic clips on a 2002 Audi TT MK1.
Alt Text: Reconnecting the electrical connector to the newly installed secondary air pump in a 2002 Audi TT MK1.
Alt Text: Ensuring a secure electrical connection to the secondary air pump of a 2002 Audi TT MK1 after replacement.
If you broke any plastic clips on the air hoses, and you managed to salvage the broken pieces, clean the broken surfaces with rubbing alcohol and carefully apply super glue, holding the pieces together until the glue cures completely. If super glue doesn’t hold, you might need to purchase new hoses to ensure a proper connection.
Alt Text: Using super glue to repair a broken plastic clip on an air hose for the secondary air pump of a 2002 Audi TT MK1.
Alt Text: Close-up of the super-glued air hose clip, repaired and ready for reconnection to the Audi TT MK1 secondary air pump.
Step 9: Securing the New Pump to the Mounting Ring
Finally, reinstall the three washers and 10mm nuts to secure the new secondary air pump to the mounting ring. Tighten these nuts snugly to complete the installation.
Alt Text: Final step of securing the new secondary air pump to the mounting ring using washers and 10mm nuts in a 2002 Audi TT MK1 engine bay.
Step 10: Final Checks and Start-Up
Before lowering your Audi TT MK1, double-check all connections to ensure everything is secure. Lower the vehicle and start the engine. Listen carefully for the jet engine noise – it should be gone! If you had a P1432 DTC code, it should also be resolved.
Replacing the secondary air pump on your 2002 Audi TT MK1 can be a challenging job due to the limited access, but with patience and the right tools, it’s definitely achievable. The satisfaction of silencing that annoying startup noise and resolving the check engine light makes it all worthwhile. Now that you’ve tackled this issue, you can move on to enjoying your Audi TT MK1 to its fullest!