Experiencing issues with sending emails from your Nextcloud instance after an upgrade? You’re not alone. Many users encounter problems where emails fail to send after updating their Nextcloud server, particularly to version 26.0.0. This guide will walk you through verifying your basic email settings in Nextcloud to resolve these issues and ensure smooth email communication.
One common problem reported by users after upgrading to Nextcloud 26.0.0 is the sudden failure of email notifications and system emails. Even with previously working email configurations, the upgrade process can sometimes disrupt these settings, leading to emails not being sent. Users often find themselves in a situation where test emails fail, and important notifications are not delivered, impacting user experience and system administration.
To address this, the first and most crucial step is to meticulously review and verify your basic email settings within Nextcloud. These settings act as the foundation for all email communication from your server. Incorrect or outdated settings are the primary culprits behind email sending failures.
Let’s delve into the key Basic Settings you need to check:
1. Accessing Your Email Settings
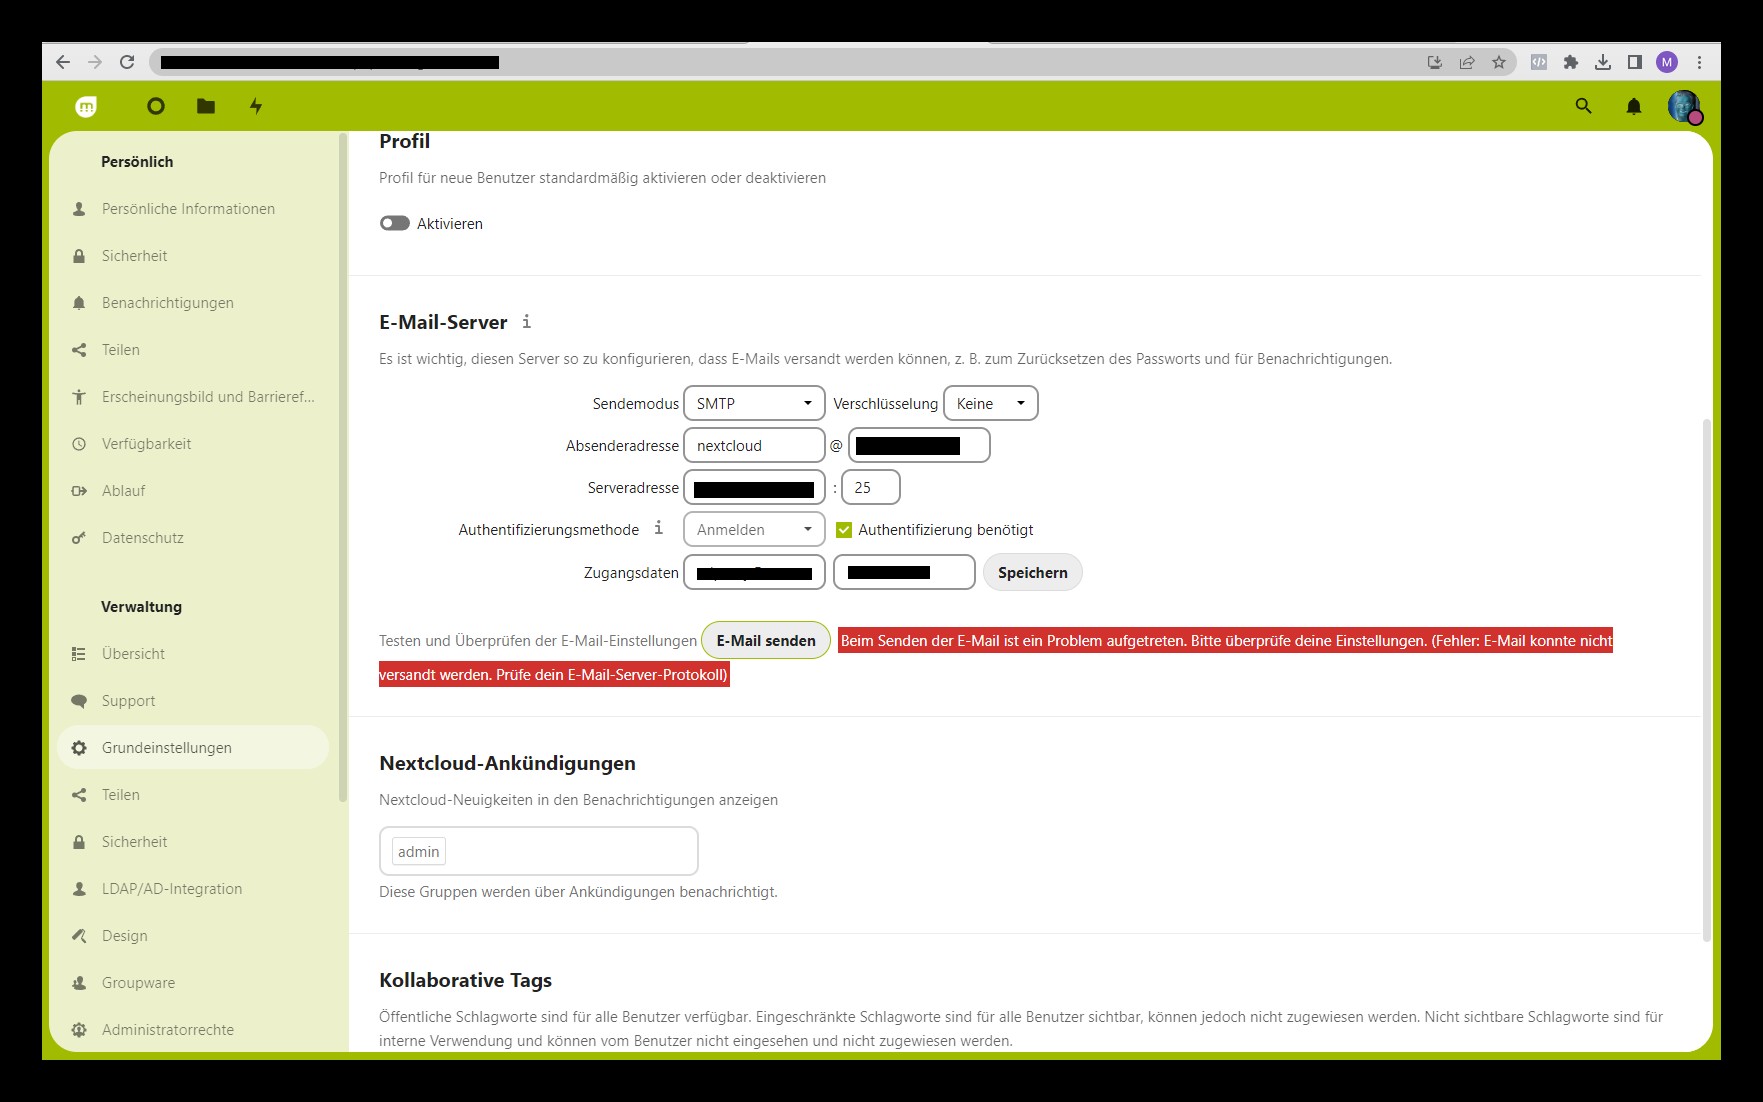
First, navigate to your Nextcloud admin settings. You can typically find the email configuration panel under “Settings” -> “Administration” -> “Mail Server”. This section houses all the essential parameters for configuring your Nextcloud instance to send emails.
2. Verifying SMTP Settings
The most common method for sending emails from Nextcloud is through an SMTP (Simple Mail Transfer Protocol) server. Ensure that you have selected “SMTP” as the “Send mode”. Then, carefully check the following SMTP settings:
- SMTP host: This is the address of your SMTP server. It’s crucial to enter this correctly. Common examples include
smtp.example.comormail.example.com. Consult your email provider or system administrator for the correct SMTP host address. - SMTP port: The standard SMTP port is often 25, but secure SMTP connections frequently use port 465 (SMTPS) or 587 (STARTTLS). Verify the correct port number with your email provider.
- Encryption: Choose the appropriate encryption method. “None” is unencrypted, while “SSL/TLS” or “STARTTLS” provide secure connections. “SSL/TLS” is typically used with port 465, and “STARTTLS” with port 587. Select the encryption that matches your SMTP server’s requirements.
- Authentication: If your SMTP server requires authentication, ensure “Authentication required” is enabled. You will then need to provide:
- Authentication method: Choose the appropriate method, often “Login” or “Plain”.
- Username: Your SMTP username, usually your email address or a specific username provided by your email service.
- Password: Your SMTP password. Ensure this is entered correctly. Double-check for typos and consider resetting your SMTP password if you are unsure.
 Nextcloud Email Server Settings Screenshot
3. Sender Address and Domain
- From address: This is the email address that will appear as the sender of Nextcloud emails. It’s recommended to use a valid email address associated with your domain.
- Domain: Enter your domain name here. This is often the domain of your Nextcloud instance.
4. Debug Mode for Troubleshooting
For troubleshooting purposes, enabling “SMTP Debugging” can provide valuable insights. When enabled, Nextcloud will log detailed information about the email sending process, which can help identify specific errors. Remember to disable debug mode once you have resolved your email issues.
5. Testing Your Settings
After verifying all your basic settings, use the “Send test email” function within the Nextcloud email settings panel. Enter your email address in the “Send email to” field and click “Send email”.
- Successful Test Email: If the test email is sent successfully, it indicates that your basic settings are likely configured correctly. If you were experiencing issues, try sending a test notification from Nextcloud (e.g., sharing a file) to confirm that emails are now working as expected.
- Failed Test Email: If the test email fails, review the error message displayed by Nextcloud. Check your Nextcloud logs for more detailed error information. Common error messages can point to incorrect SMTP credentials, server address, port, or encryption settings. Double-check each setting against your email provider’s instructions.
Common Issues and Solutions
- Incorrect Credentials: Double-check your SMTP username and password. Ensure there are no typos and that you are using the correct credentials for your SMTP server.
- Wrong Port or Encryption: Verify the correct SMTP port and encryption method required by your email provider. Using the wrong combination is a common cause of connection failures.
- Firewall or Network Restrictions: Ensure that your firewall or network configuration is not blocking outgoing connections on the SMTP port you are using.
- Server Issues: In rare cases, there might be temporary issues with your SMTP server. Check the status of your email provider’s services.
Conclusion
Verifying your basic email settings in Nextcloud is the first and most critical step in troubleshooting email sending problems, especially after an upgrade. By carefully reviewing your SMTP settings, sender information, and utilizing the test email function, you can often identify and resolve the root cause of email delivery failures. If you continue to experience issues after verifying these basic settings, consult your Nextcloud logs and consider seeking further assistance from Nextcloud community forums or your email provider’s support. Ensuring correct basic settings is fundamental for reliable email communication from your Nextcloud server.