As seasoned automotive experts at keyfobprog.com, we specialize in vehicle maintenance and performance enhancement. Drawing upon years of hands-on experience in automotive repair, particularly in braking systems, we’ve developed this comprehensive guide on Brake Caliper Bleeding. This crucial procedure is essential for maintaining peak braking efficiency and safety. In this article, we’ll delve into why bleeding your brake calipers is necessary, how to identify when it’s needed, and provide a detailed, step-by-step guide to perform this task effectively.
Why Brake Caliper Bleeding is Essential
Brake fluid is the lifeblood of your vehicle’s braking system. It’s responsible for transmitting the force you apply to the brake pedal directly to the brake calipers, which in turn engage the brake pads against the rotors to slow or stop your vehicle. However, brake fluid lines can accumulate air or moisture over time. Brake caliper bleeding is the process of removing these unwanted contaminants from the brake lines, specifically at the calipers, ensuring that only clean, incompressible brake fluid remains. This process is vital because air and vapor are compressible, unlike brake fluid. The presence of air in the system leads to a spongy brake pedal feel and reduced braking effectiveness. Regular brake caliper bleeding is not just maintenance; it’s a safety imperative, ensuring consistent and reliable braking performance.
The Detrimental Effects of Air in Brake Lines
When air finds its way into the brake lines and, critically, around the brake calipers, it introduces a significant problem: compressibility. Unlike brake fluid, which is designed to be incompressible to effectively transmit hydraulic pressure, air compresses easily. This compressibility drastically reduces the efficiency of your braking system. When you press the brake pedal, instead of the force being immediately transferred to the calipers to clamp the brake pads onto the rotors, some of that force is wasted compressing the air within the lines. This results in a soft or mushy brake pedal, a telltale sign that your brake system’s integrity is compromised. Furthermore, this spongy pedal translates directly to diminished braking power and increased stopping distances. In severe cases, excessive air in the system can lead to brake fade or even complete brake failure, situations that are incredibly dangerous, especially in emergency braking scenarios. Therefore, understanding and performing brake caliper bleeding is paramount for vehicle safety.
How Air and Vapor Infiltrate Brake Calipers and Lines
Several factors can lead to air and vapor contamination within your brake system, necessitating brake caliper bleeding:
- Component Replacement: Anytime you open the hydraulic system, such as during the replacement of brake lines, hoses, or brake calipers themselves, air can be introduced. Even seemingly minor repairs can create openings for air to enter the system.
- Brake Fluid Boil-Over: During aggressive driving or under heavy braking conditions, particularly in performance vehicles or when descending steep hills, brake fluid temperatures can spike dramatically. If the brake fluid’s boiling point is exceeded, it can vaporize and create gas bubbles within the system. This is more prone to happen with older brake fluid that has absorbed moisture, lowering its boiling point.
- Low Brake Fluid Level: If the brake fluid reservoir level drops too low, it can allow air to be drawn into the master cylinder and subsequently into the brake lines and calipers. This is why it’s essential to regularly check and maintain the proper brake fluid level.
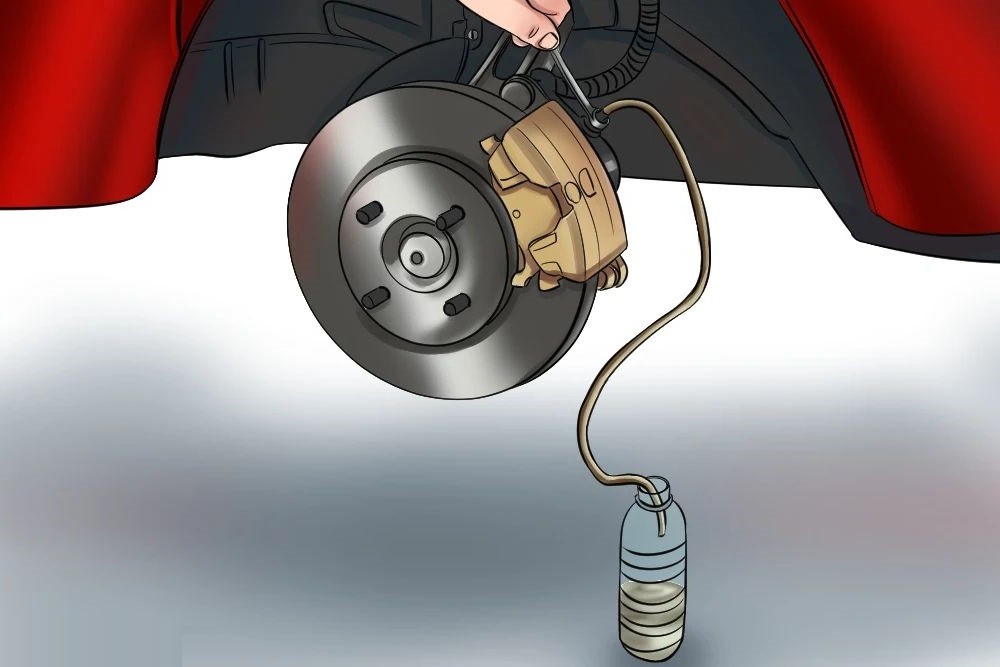 Bleeding Process
Alt text: Brake caliper bleeding process shown with a clear tube attached to the bleeder screw and draining into a bottle, illustrating the removal of air and old brake fluid.
Understanding Brake Fluid Types and Temperature Sensitivity
The type of brake fluid you use is a critical factor in your braking system’s performance and directly relates to the frequency and necessity of brake caliper bleeding. Brake fluid is engineered to withstand high temperatures and remain incompressible. However, different types of brake fluid have varying performance characteristics, particularly concerning boiling points and moisture absorption.
The Department of Transportation (DOT) classifies brake fluids into categories like DOT 3, DOT 4, and DOT 5.1. While these ratings don’t explicitly state boiling points, higher DOT ratings generally indicate higher dry and wet boiling points. Dry boiling point refers to the boiling point of fresh, unused fluid, while wet boiling point is the boiling point after the fluid has absorbed a certain percentage of moisture (typically 3.7% water by volume), which is more representative of fluid in a vehicle over time.
Glycol-based fluids, commonly used in DOT 3, DOT 4, and DOT 5.1 specifications, are hygroscopic, meaning they readily absorb moisture from the atmosphere. This moisture absorption is the primary reason why brake fluid needs periodic replacement and why brake caliper bleeding is a crucial maintenance task. As brake fluid absorbs moisture, its wet boiling point decreases, making it more susceptible to boiling and vaporizing under high temperatures, leading to brake fade and a spongy pedal feel.
Silicone-based DOT 5 fluid is hydrophobic and does not absorb moisture, mitigating the issue of wet boiling point reduction. However, DOT 5 fluid is not compatible with ABS systems in many vehicles and is generally not recommended for street vehicles unless specifically designed for it. For most vehicles, DOT 3, DOT 4, or DOT 5.1 are appropriate, with DOT 4 often being recommended for vehicles that experience more demanding braking conditions or have ABS. High-performance DOT 4 and DOT 5.1 fluids often boast higher boiling points, both dry and wet, offering improved resistance to brake fade, but they may also absorb moisture more readily than standard DOT 3 fluids, potentially requiring more frequent brake caliper bleeding and replacement.
Step-by-Step Guide to Brake Caliper Bleeding
Performing brake caliper bleeding is a straightforward process that can be done at home with basic tools. Here’s a detailed step-by-step guide:
Required Tools and Supplies:
- Box-end wrench: Select the correct size to fit your vehicle’s bleeder screws. An offset wrench provides better access in tight spaces.
- Fresh Brake Fluid: Have at least 500ml for a bleed, and 1.5 liters if you plan to completely flush and replace the brake fluid. Use the DOT specification recommended for your vehicle.
- Clear Plastic Tubing: Choose tubing with an inner diameter that fits snugly over the bleeder screw.
- Collection Bottle: A disposable bottle to collect the old brake fluid. You can use a specialized brake bleeder bottle or simply a plastic bottle with a hose inserted into the lid.
- Brake Cleaner: For cleaning up any spilled brake fluid, as it can damage paint.
- Assistant: Having someone to pump the brake pedal makes the process significantly easier.
Vehicle Preparation:
- Loosen Lug Nuts: Slightly loosen the lug nuts on all wheels.
- Raise and Secure Vehicle: Safely lift your vehicle using a jack and securely support it on jack stands. Ensure the vehicle is stable before proceeding.
- Remove Wheels: Take off all wheels to access the brake calipers.
- Install Lug Nuts (Optional): Thread one lug nut backward on each wheel stud to prevent caliper flex, which can affect pedal feel during bleeding.
- Check Brake Fluid Reservoir: Open the hood and locate the brake fluid reservoir. Check the fluid level and ensure it’s at or near the “MAX” line. It’s crucial to never let the reservoir run dry during the bleeding process, as this will introduce more air into the system.
Bleeding Procedure:
- Bleeding Order: Start with the brake caliper furthest from the master cylinder. Typically, this is the right rear, followed by left rear, right front, and finally left front. This sequence helps to purge the old fluid and air effectively.
- Locate Bleeder Screw: Find the bleeder screw on the rear side of the brake caliper. Remove the rubber dust cap covering the bleeder screw and set it aside.
- Attach Wrench and Tubing: Place the box-end wrench securely on the bleeder screw. Attach one end of the clear plastic tubing to the bleeder screw nipple. Place the other end of the tubing into your collection bottle, ensuring the end of the tube is submerged in a small amount of fresh brake fluid in the bottle. This prevents air from being drawn back into the caliper during the process.
- Signal Assistant: Instruct your assistant to pump the brake pedal slowly and steadily three to five times, then hold it down firmly and say “Pedal down.”
- Open Bleeder Screw: While your assistant holds the pedal down, quickly loosen the bleeder screw about ¼ to ½ turn. You will see old brake fluid and potentially air bubbles flowing through the clear tubing into the bottle. The brake pedal will likely drop towards the floor as the pressure is released. Important: Tell your assistant to keep the brake pedal held down until you close the bleeder screw.
- Close Bleeder Screw: Immediately after fluid starts flowing and before your assistant releases the pedal, tighten the bleeder screw securely but gently. Do not overtighten, as bleeder screws can be fragile and break.
- Signal Pedal Release: Instruct your assistant to “Release pedal.”
- Inspect Fluid and Repeat: Check the fluid in the clear tubing for air bubbles. Repeat steps 4-7 until you see a steady stream of fresh, bubble-free brake fluid flowing into the bottle. This may take several repetitions.
- Monitor Reservoir: Continuously check the brake fluid reservoir level and top it off with fresh brake fluid as needed throughout the bleeding process. Never allow the reservoir to empty.
- Move to Next Caliper: Once you have successfully bled one caliper, move on to the next in the correct order (left rear, right front, left front), repeating steps 2-9 for each caliper.
- Final Inspection: After bleeding all four calipers, ensure the bleeder screws are tightened to the correct torque, and replace the rubber dust caps. Clean any spilled brake fluid with brake cleaner.
- Test Brake Pedal: With the vehicle still raised, pump the brake pedal several times. It should feel firm and consistent.
- Check for Leaks: Inspect all bleeder screws and brake line connections for any signs of leaks. Tighten as needed.
Vehicle Reassembly and Road Test:
- Reinstall Wheels: Put the wheels back on and hand-tighten the lug nuts.
- Lower Vehicle and Torque Lug Nuts: Lower the vehicle to the ground and torque the lug nuts to the manufacturer’s specified torque.
- Final Brake Pedal Test: Pump the brake pedal firmly several times again to confirm a firm pedal feel.
- Road Test: Perform a careful road test in a safe area to ensure proper braking function. Be cautious during the first few stops as the brakes may feel slightly different initially.
Brake Caliper Bleeding Frequency
The interval for brake caliper bleeding depends on your driving habits and vehicle use:
- Normal Driving: For typical daily driving, bleeding is usually only necessary when the system is opened for repairs or brake fluid replacement. However, brake fluid should be replaced according to your vehicle manufacturer’s recommendations, typically every two to three years, regardless of mileage.
- Performance Driving (Autocross, Sport Driving): For enthusiasts who engage in autocross or spirited driving, annual brake fluid bleeding and replacement is a good practice to maintain optimal braking performance.
- Track Day/High-Performance Driving: For track day events or high-performance driving, more frequent bleeding is recommended, ideally before each event to ensure the highest level of brake performance and safety.
- Dedicated Race Cars: Race cars operating under extreme braking conditions should have their brakes bled after every track session to maintain peak braking efficiency and pedal feel.
Conclusion: Mastering Brake Caliper Bleeding for Safety and Performance
At keyfobprog.com, we emphasize the critical role of regular maintenance, especially brake caliper bleeding, in ensuring both the safety and performance of your vehicle. Understanding how to properly bleed your brake calipers and knowing the importance of fresh, high-quality brake fluid are essential skills for any vehicle owner, especially those who value optimal braking performance. By following this comprehensive guide, you can confidently perform brake caliper bleeding and maintain a responsive and safe braking system. Remember, a firm brake pedal and reliable braking are paramount for your safety and the safety of others on the road.