Encountering difficulties connecting your STM32-based flight controller to your computer? A common culprit is often incorrect or outdated drivers. If you’re seeing error messages like “failed to open serial port” when attempting to connect to your flight controller or flash new firmware, you’ve likely stumbled upon a driver issue. This guide will walk you through the essential steps to resolve these problems and get your flight controller communicating smoothly with your PC.
Understanding STM32 Drivers
STM32 microcontrollers are the brains behind many popular flight controllers in the drone and RC hobby. To communicate with these controllers from your Windows, macOS, or Linux computer, you need specific drivers. These drivers act as translators, allowing your operating system to understand and interact with the STM32 chip on your flight controller via USB. Without the correct drivers, your computer simply won’t recognize the flight controller, leading to connection errors.
Common STM32 Driver Problems
The dreaded “failed to open serial port” message is a telltale sign of driver trouble. This error typically arises because Windows has either installed a generic driver that isn’t compatible with your STM32 flight controller or no driver at all. This is especially common after Windows updates or when connecting a new flight controller for the first time. Another scenario is when you need to put your flight controller into DFU (Device Firmware Upgrade) mode for flashing firmware, which sometimes requires a different driver configuration.
Solution 1: Installing STM Virtual COM Port (VCP) Drivers
For standard connection and firmware flashing (outside of DFU mode), the STM Virtual COM Port (VCP) drivers are usually necessary. These drivers create a virtual serial port that your flight controller software (like Betaflight or Cleanflight configurator) can use to communicate with the board.
You can download the official STM VCP drivers directly from the STMicroelectronics website, the manufacturer of STM32 chips.
Ensure you download the correct version for your operating system (Windows, macOS, or Linux) and follow the installation instructions provided by STMicroelectronics. After installation, restart your computer and try connecting your flight controller again.
Solution 2: Utilizing Zadig for DFU Mode Driver Replacement
Certain operations, particularly firmware flashing in DFU mode, might necessitate replacing the standard VCP driver with a WinUSB driver. DFU mode is a special bootloader mode that allows direct firmware uploading, often requiring a different driver interface. Zadig is a free and open-source Windows application designed to easily replace USB drivers.
Here’s how to use Zadig to install the WinUSB driver for DFU mode:
-
Enter DFU Mode: Locate the boot button on your flight controller (refer to your flight controller’s manual if needed). Press and hold the boot button while connecting your flight controller to your computer via USB. Keep holding the button for a few seconds after connecting.
-
Open Zadig and List All Devices: Launch Zadig. In the Zadig menu, click “Options” and then select “List All Devices”.
-
Select STM32 Bootloader: From the device dropdown list in Zadig, choose “STM32 Bootloader”. If you don’t see it, ensure your flight controller is correctly in DFU mode.
-
Choose WinUSB Driver: On the right side of the Zadig window, ensure that “WinUSB” is selected as the driver to install.
-
Install or Replace Driver: Click the “Install Driver” or “Replace Driver” button. Zadig will then install the WinUSB driver for the STM32 Bootloader interface.
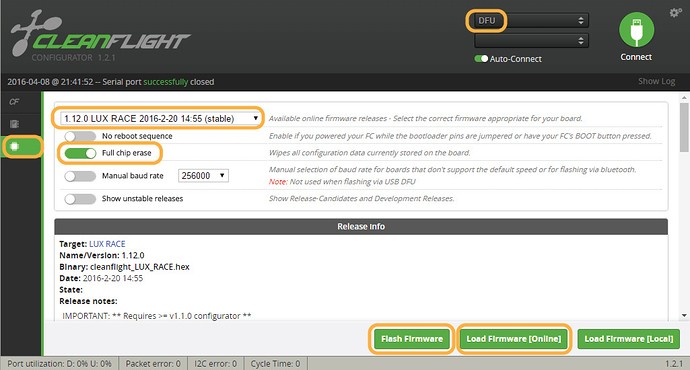
Once Zadig completes the driver installation, you should be able to select DFU mode in your flight controller configuration software (like Betaflight Configurator) and proceed with flashing firmware.
Alternative Solution: ImpulseRC Driver Fixer
For a simpler approach, especially for Betaflight and Cleanflight users, the ImpulseRC Driver Fixer tool is highly recommended. This tool automates the driver installation process for DFU mode and can resolve common driver conflicts quickly. It’s often the fastest and easiest first step in troubleshooting STM32 driver issues.
Further Troubleshooting
If you’ve tried these driver solutions and are still facing connection problems, consider these additional troubleshooting steps:
- Bricked Flight Controller: In rare cases, incorrect firmware flashing can brick your flight controller. Attempt firmware recovery by shorting the boot pins while flashing or using the STM32 Flash Loader tool. Consult online guides specific to your flight controller model for detailed instructions.
- Damaged Hardware: If all software-based solutions fail, there’s a possibility of a damaged flight controller or USB cable. Try a different USB cable and, if possible, test your flight controller on another computer. If you suspect hardware damage, contact the retailer where you purchased the flight controller for support or replacement options.
Conclusion
Resolving STM32 driver issues is crucial for seamless flight controller setup and firmware management. By following this guide and systematically trying the STM VCP driver installation, Zadig driver replacement for DFU mode, or the ImpulseRC Driver Fixer, you can effectively diagnose and fix most driver-related connection problems. Remember to always download drivers from official sources and consult your flight controller’s documentation for specific instructions. With the right drivers in place, you’ll be back in the air in no time.