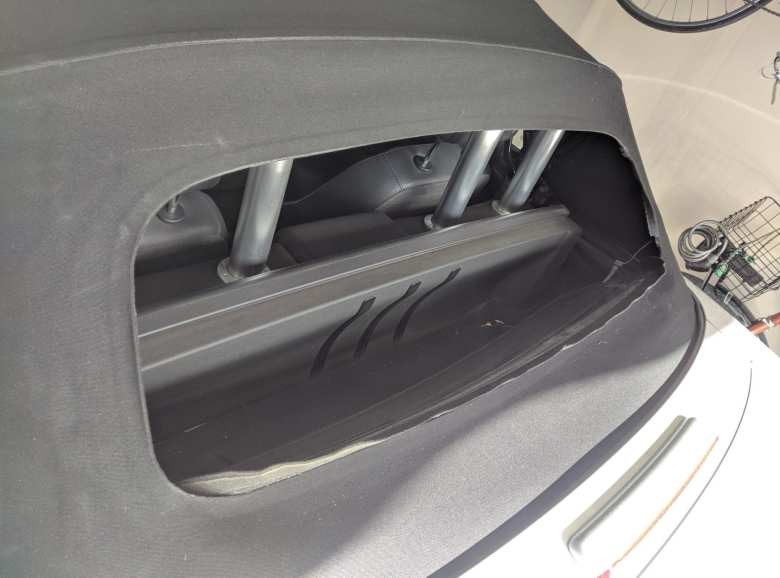
For owners of a Drop Top Audi, the thrill of open-air driving is a key feature. However, like any car component, the convertible top can face issues over time. One common problem, especially for older models, is the detachment of the rear glass window from the fabric top. If you find yourself facing this exact issue with your Audi TT Roadster or similar drop top Audi model, don’t immediately assume you need an expensive professional replacement. With some careful work, the right materials, and a bit of patience, you can tackle this repair yourself. This guide, based on my own experience, will walk you through the process of reattaching your drop top Audi’s rear window, saving you potentially thousands of dollars.
The rear glass window of my Audi TT Roadster convertible top became detached from the fabric. Here’s how you can reattach your drop top Audi’s rear glass yourself.
Materials and Tools Needed
Before you begin, gather these materials and tools to ensure a smooth repair process for your drop top Audi:
- 3M Window Weld Urethane Adhesive: This is a crucial component for creating a strong and lasting bond between the glass and fabric.
- 3M Single Step Primer: This primer promotes adhesion and is essential for proper bonding.
- Hyde Tools Heavy-Duty Glass Scraper: For removing old adhesive from the glass.
- Caulk Gun: To apply the 3M Window Weld adhesive evenly and precisely.
- Suction Clamps (6): To hold the glass firmly in place while the adhesive cures.
- Masking Tape: To protect surrounding areas from primer and adhesive.
- 1/2-inch Wide Paintbrush: For applying the primer.
- Razor Blade or X-Acto Knife: For trimming excess adhesive.
- Nitrile Gloves: Essential for safety and preventing messy hands.
- Drop Cloths: To protect your car’s interior and exterior.
- Box (optional): To support the glass during the curing process.
- Glass Cleaner and Microfiber Cloth: For cleaning the glass.
Procedure: Step-by-Step Guide to Reattaching Your Drop Top Audi Rear Window
Follow these detailed steps to successfully reattach the rear glass to your drop top Audi convertible top.
Step 1: Preparation is Key
Begin by preparing the area for repair on your drop top Audi. First, disconnect the heating element (rear defroster) wire from the passenger-side middle edge of the glass. Carefully remove the entire glass assembly, including the glass and any remaining cloth “bezel”, from the convertible top.
Next, using the Hyde Tools Heavy-Duty Glass Scraper, meticulously remove as much of the old, brittle adhesive from the rear glass as possible. The more thorough you are in this step, the stronger and cleaner your final bond will be. While the glass needs thorough cleaning, you might find that the fabric bezel doesn’t require the same level of meticulousness.
With your drop top Audi’s convertible top secured in the fully upright position, use masking tape to carefully mask off the inside of the fabric top, right next to where the new urethane adhesive will be applied. Do the same for the outside of the top. Additionally, mask off the glass itself, bordering the area that will be bonded to the fabric top. This masking will protect these areas from unwanted primer and adhesive.
Proper masking of the glass on your drop top Audi is crucial to prevent primer or adhesive from getting on unwanted areas.
Step 2: Prioritize Safety
Before handling the 3M Single Step Primer and 3M Window Weld for your drop top Audi repair, it’s absolutely essential to put on nitrile gloves. Latex gloves can also work, but nitrile gloves are more resistant to tearing and are generally more durable for this type of project. You will need to change gloves frequently throughout the process, so keep several pairs readily available. Both the primer and the Window Weld are black and incredibly sticky, easily transferring to anything they touch if you are not careful.
It’s also highly recommended to wear old clothes that you wouldn’t mind discarding afterward. These products are very difficult, if not impossible, to remove from fabric once they set. Both the 3M primer and Windo-Weld can quickly ruin clothing.
Step 3: Primer Application
Using a small, ½-inch wide paintbrush, carefully apply the 3M Single Step Primer to the areas of the glass that will be bonded to the fabric of your drop top Audi. This primer has a very thin, almost watery consistency, so handle it with care during application. It can easily flick and drip, so double-check that you’ve securely taped off all areas you want to protect. Using drop cloths for additional protection of your car’s interior and exterior is also a wise precaution.
Step 4: Reattaching the Glass to Your Drop Top Audi
Reattaching the glass to your drop top Audi’s convertible top is definitely easier with two people. Ideally, have one person positioned inside the car holding the window securely in place, while the other person works outside to position the glass and tighten the suction clamps.
However, if you’re working alone, like I was, you can still achieve a successful repair by approaching it methodically, section by section:
- Top Edge First: Begin with the top edge of the glass. To provide support to the glass from below while the adhesive cures, place a box or similar support on the opposite side of the window. Apply the 3M Window Weld urethane adhesive to the top edge of the glass using the caulk gun, ensuring an even bead. Then, carefully position the glass against the convertible top fabric and secure it firmly in place using all six suction clamps along the top edge. According to 3M’s product information, you’ll have approximately 10-20 minutes of working time before the Windo-Weld starts to become tacky. It’s crucial to let the clamps remain undisturbed for a full 24 hours to allow the urethane adhesive to fully cure and form a strong bond.
Bonding the glass to the convertible top of your drop top Audi one section at a time ensures a secure and precise fit.
- Sides Next: Once the top edge is securely bonded and cured, move on to the sides of the glass. Repeat the same process: apply adhesive, position the glass, and use suction clamps to hold it in place. Again, allow the adhesive to cure for a full 24 hours for each side.
- Bottom Edge Last: Finally, address the bottom edge of the glass using the same method as the top and sides. Working section by section ensures a strong and even bond all around the perimeter of the rear window of your drop top Audi.
Step 5: Trimming Excess Adhesive
One important lesson I learned is that it’s best to trim any excess adhesive with a razor blade or X-Acto knife within a few hours after application. If you wait longer, the adhesive will become significantly harder and more difficult to manage and clean up neatly. Trimming it while it’s still somewhat pliable will result in a cleaner, more professional-looking finish for your drop top Audi repair.
After allowing a full 24 hours for the final section of adhesive to cure, carefully remove all the suction clamps and masking tape. You should find that the rear glass is now firmly and securely holding in place, effectively repaired.
Step 6: Reconnect the Heating Element
Finally, reconnect the wire for the rear defroster to the terminal on the glass. If, like in my case, the terminal for the wire has become separated from the glass edge, you may need to resolder it. Ensure a solid connection for proper defroster function in your drop top Audi.
Final Thoughts on Your Drop Top Audi Convertible Top Repair
The combination of 3M Window Weld and Single Step Primer proved to be exceptionally effective for this repair. Even as someone relatively new to auto body work, the result was a repair that looks and feels professional.
This is the completed DIY repair of the drop top Audi convertible top rear window, showcasing a professional-grade result achieved at home.
If you are experiencing the same frustrating issue with your drop top Audi TT Roadster or similar model, I wholeheartedly recommend using these 3M products and following these steps. Just take your time, adhere to each step meticulously, and you’ll successfully reattach your rear window securely. This DIY approach will save you the significant expense of replacing the entire convertible top at a dealership, allowing you to continue enjoying your drop top Audi for years to come.
Update June 2024
It’s been five years since this repair, and the rear glass is still completely secure, with absolutely no signs of separation. This long-term durability is a testament to the quality of both the repair process and 3M products!