As a content creator for keyfobprog.com and an automotive repair specialist, I understand the challenges of upgrading your vehicle’s features, especially when it comes to aftermarket parts. One common and desirable upgrade is installing an auto-dimming rearview mirror, and the Gentex 453 is a popular choice. However, finding clear and accurate wiring diagrams for these mirrors can be frustrating. This guide aims to provide you with a comprehensive understanding of the Gentex 453 wiring diagram, making your installation process smoother and more successful. We’ll delve into the pinouts, plug information, and practical steps to wire this mirror into your vehicle, drawing on real-world experience and factory service manual data.
Understanding Gentex 453 Mirror Wiring
The Gentex 453 auto-dimming mirror is a fantastic upgrade, offering enhanced nighttime driving visibility by automatically reducing glare from headlights behind you. These mirrors were factory equipment on various vehicles, including the 2006-2007 Nissan Pathfinder and some 2006-2009 Nissan Frontier models. If you’ve sourced a Gentex 453 mirror, perhaps from eBay or a junkyard, you might be facing the common hurdle: wiring it up without a dedicated harness or clear instructions.
Pinout Diagram for Gentex 453
One of the biggest obstacles DIY installers face is the lack of readily available pinout information for the Gentex 453 mirror plug. Online searches often lead to forums filled with questions, but lacking definitive answers. Through research and referencing factory service manuals, we can clarify the pin assignments.
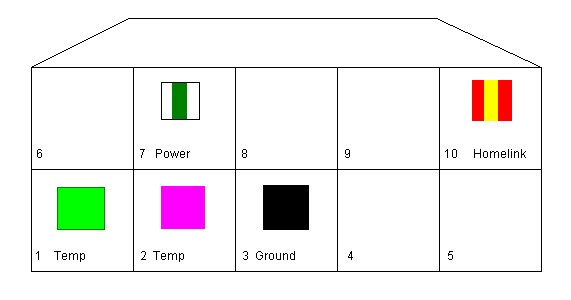
The following diagram illustrates the pinout for the Gentex 453 plug, based on the 2007 Nissan Pathfinder factory service manual, along with the corresponding wire colors:
- Pin 1: Not specified in this diagram (check your specific vehicle’s manual for potential use)
- Pin 2: Not specified in this diagram
- Pin 3: Ground (Black)
- Pin 4: Reverse Signal (typically for disabling auto-dimming when in reverse – wire color varies)
- Pin 5: Ignition Switched Power (for auto-dimming function – wire color varies)
- Pin 6: Constant Power (for mirror operation – Red/Blue) – Note: Some sources indicate Pin 7 as power, but Pin 6 has been observed as functional.
- Pin 7: Constant Power (Red/White) – Potentially redundant power input, or vehicle specific. May not be necessary.
- Pin 8: Temperature Sensor Signal (+) (for external temperature display if equipped – wire color varies)
- Pin 9: Temperature Sensor Signal (-) (wire color varies)
- Pin 10: Homelink Power (for integrated garage door opener – wire color varies)
Identifying the Plug and Connectors
Finding a compatible plug for the Gentex 453 mirror can also be a challenge. Purchasing a new wiring harness solely for the plug can be expensive and unnecessary. A practical solution is to source plugs from junkyard vehicles. Cars that commonly have similar mirror connectors include Maximas and other Nissan/Infiniti models.
When extracting plugs from a junkyard, ensure to cut a generous length of wire attached to the plug to provide ample working room during your installation. You’ll likely find that the pre-wired connectors within these salvaged plugs aren’t in the exact positions needed for the Gentex 453. Repurposing these plugs involves carefully removing and rearranging the wire connectors.
Removing these connectors requires a delicate touch and a very small, rigid tool. By inserting the tool into the small hole above each connector, you can depress a tiny tab that secures the connector in place, allowing it to be pulled out from the back of the plug.
Step-by-Step Gentex 453 Mirror Wiring Guide
With the pinout diagram and a repurposed plug, you can proceed with wiring your Gentex 453 mirror. Here’s a step-by-step guide based on a practical installation approach:
Preparing the Plug and Wires
- Connector Removal and Re-arrangement: As demonstrated earlier, carefully remove the necessary wire connectors from your salvaged plug. You might need to sacrifice one plug to fully understand the connector removal process without damaging the one you intend to use.
- Insert New Wires for Temp Sensor (if needed): If you’re adding the temperature sensor feature, you’ll need to insert new wires into the plug for pins 8 and 9. You can salvage wires and connectors from the sacrificed plug, as shown in the original example.
- Secure Connectors: Before inserting the connectors into the correct positions in your Gentex 453 plug, you’ll need to slightly lift the white locking section within the plug. This is done by gently pushing inwards and upwards through the square holes on each side of the plug using a small screwdriver. This action allows the connectors to be inserted and locked into their new positions. You may also need to slightly bend the small tab on top of each connector upwards to ensure a secure fit.
- Final Plug Assembly: Insert the prepared wire connectors into the correct pin locations on your plug according to the Gentex 453 wiring diagram. Cut off any unnecessary wires from the salvaged plug to reduce clutter.
- Testing: Before final installation in your vehicle, test the plug and mirror functionality using a junkyard temperature sensor (if applicable) and a power source to confirm your wiring is correct.
Connecting to Your Vehicle’s Wiring
- Temperature Sensor Location: Locate the square hole on the support in front of your vehicle’s radiator. This is the designated mounting point for the temperature sensor.
- Sensor Clip Installation: The temperature sensor clip should fit snugly into this square hole.
- Factory Mirror Plug Access: To integrate the Gentex 453 mirror while retaining the option to revert to your factory mirror, you can tap into the existing factory mirror plug wiring. Locate the factory plug and use a small screwdriver to gently press down on the tabs securing the female pins within the plug. This will allow you to carefully pull the pins out from the back of the plug.
- Male Pin Adapters: Utilize male pins that are compatible with your factory female pins. These can often be sourced from electronic component suppliers or salvaged from other wiring projects.
- Ground Wire Connection: Connect the ground wire from your Gentex 453 plug to the appropriate pin in your factory plug using a male pin adapter.
- Secure Connections: Insulate all connections using heat shrink tubing. This provides a clean, professional finish and ensures reliable connections while allowing for easy removal if you wish to reinstall your original mirror in the future.
-
Homelink Wiring (If Applicable): If your Gentex 453 mirror has Homelink functionality, locate a constant power source in your vehicle’s overhead console or fuse box. Connect the Homelink power wire from your Gentex 453 plug to this constant power source.
-
Final Connections and Testing: Make all remaining wire connections based on the Gentex 453 wiring diagram and your vehicle’s wiring schematics. Thoroughly tape up all connections for insulation and protection.
- Mirror Installation and Wire Management: Mount the Gentex 453 mirror in place and neatly conceal the wiring using the mirror wire cover.
Wiring Diagrams and Pinouts for Gentex 453 and Similar Models
For clarity and reference, here are the wiring diagrams discussed in this guide, including an additional diagram for the Gentex 313 mirror, which is similar and may be encountered:
Gentex 453 Wiring Diagram (2007 Pathfinder)
Wiring Diagram Example (Illustrative)
Gentex 313 Wiring Diagram (2004 Titan)
Disclaimer: While these diagrams are based on factory service manual information and practical experience, always verify wiring information with your specific vehicle’s service manual and proceed with caution. Use this information at your own risk.
Conclusion
Upgrading to a Gentex 453 auto-dimming mirror is a worthwhile enhancement for driving safety and convenience. By understanding the Gentex 453 wiring diagram and utilizing readily available resources like junkyard plugs, you can confidently tackle this DIY project. This guide, along with the provided diagrams, aims to demystify the wiring process and empower you to successfully install your Gentex 453 mirror. Remember to always double-check your connections and prioritize safety throughout the installation.