Is your car key fob becoming less responsive? Do you have to press the buttons multiple times to lock, unlock, or start your vehicle? Before you consider replacing the entire key fob, you might be able to restore its functionality by cleaning and, if necessary, repairing the circuit board and buttons. This guide will walk you through the process of cleaning your key fob’s circuit board and offer a fix for worn-out button contacts, ensuring your key fob works like new again.
Understanding Key Fob Button Issues
Over time, the internal components of your key fob, especially the circuit board and the conductive pads on the buttons, can degrade. Dirt, debris, and even natural wear can interfere with the electrical contact needed for your key fob to communicate with your car. While cleaning the circuit board can often resolve issues caused by dirt and grime, sometimes the carbon pads on the rubber buttons themselves wear out. In these cases, simply cleaning might not be enough, and a minor repair is needed to restore proper function. This guide covers both cleaning and a simple repair for worn buttons.
Materials Needed for Cleaning and Repair
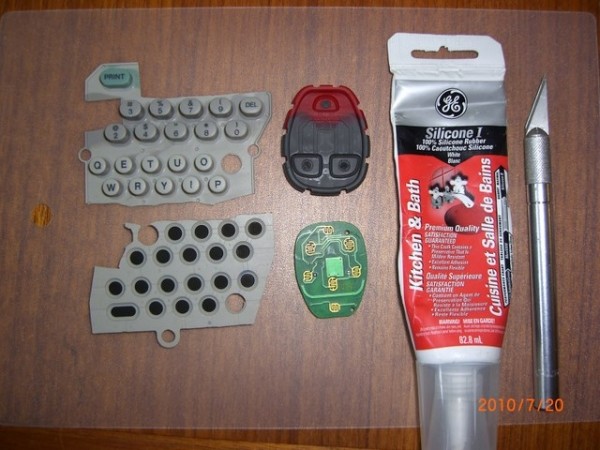
Before you begin, gather these materials:
- Your key fob
- A small Phillips head screwdriver (check your key fob screws)
- A sharp razor blade or Exacto knife
- 100% Silicone sealant (GE Silicone 1 or similar recommended)
- Toothpick or fine applicator
- Silicone keypad from a spare remote (TV remote or similar)
- Isopropyl alcohol (for cleaning)
- Lint-free microfiber cloth or cotton swabs
Step-by-Step Guide to Cleaning and Repairing Your Key Fob
Follow these steps to disassemble, clean, and repair your key fob:
Step 1: Disassemble the Key Fob
Carefully take apart your key fob. Usually, this involves removing small screws on the back of the fob. Once the screws are removed, gently pry the two halves of the fob casing apart. Be cautious not to damage the plastic housing. Lay out all the components, including the circuit board, rubber button pad, and casing.
Step 2: Prepare Replacement Button Material
If you suspect worn buttons are the issue, prepare a replacement. Take your salvaged silicone keypad and select a button that is similar in size to your key fob buttons. Using the razor blade or Exacto knife, carefully cut out the button.
Step 3: Trim the “Carbon” Button Contact
Now, trim the conductive “carbon” contact from the back of the replacement button you just cut. You want to slice off a thin piece, ensuring you have a layer of the gray/white silicone backing still attached to the carbon. This will be your new button contact.
This image provides a closer view to help you gauge the desired thickness of the trimmed carbon contact:
Step 4: Remove Old Buttons and Prepare the Keypad
Using your razor blade, carefully remove the old “carbon” buttons from the inside of your key fob’s rubber keypad. To do this cleanly, push the button from the component side to make it protrude, then carefully cut it off from the keypad. After removing the old button, slightly deepen the indentation where the button was located. This makes space for the new, potentially thicker, replacement button. Trim your new replacement button to fit snugly into this indentation.
Step 5: Attach the New Button Contacts
Apply a very small drop of 100% Silicone sealant into the button indentation on the rubber keypad using a toothpick. Place one of your replacement button contacts into the silicone. Press it down firmly and squarely. Immediately clean off any excess silicone that squeezes out to prevent it from getting on the conductive surface. Crucially, avoid getting silicone on the conductive side of the new carbon button contact or the circuit board contact area. Let the silicone set for a few minutes before moving on to the next button to avoid disturbing the first one.
Step 6: Clean the Circuit Board and Reassemble
While the silicone is drying, clean the circuit board contacts. Use isopropyl alcohol and a lint-free cloth or cotton swab to gently clean the gold contact points on the circuit board where the rubber buttons make contact. Ensure the alcohol evaporates completely before reassembling.
Let the silicone dry completely – ideally for a couple of hours or even overnight – to ensure a strong bond. Once dry, carefully reassemble the key fob, making sure all components are correctly aligned before screwing the casing back together.
Step 7: Test Your Key Fob
Go to your car and test the buttons on your key fob. If it works, congratulations! You’ve successfully cleaned and repaired your key fob.
If it’s still not working, disassemble the key fob again and inspect for any silicone residue on the circuit board contacts or the new button contacts. Double-check that all connections are clean and properly aligned.
Conclusion
Cleaning your key fob circuit board and replacing worn button contacts can significantly extend the life of your remote and save you the expense of a new key fob and reprogramming. By following these steps, you can often restore your key fob to optimal working condition. If this repair doesn’t fully resolve the issue, remember that you always have the option to replace the silicone keypad from another remote into your original fob as a further troubleshooting step before considering a complete replacement and reprogramming.