Is your Windows 7 PC running slower than it used to? Over time, your computer accumulates temporary files that can clog up your system and hinder performance. These files, while initially helpful, often become unnecessary junk, eating away at your precious disk space and slowing down your machine. The good news is that removing these temporary files in Windows 7 is a straightforward process that can significantly improve your computer’s speed and responsiveness.
In this comprehensive guide, we, at keyfobprog.com, will walk you through various methods to safely and effectively remove temporary files in Windows 7. Whether you’re a tech novice or a seasoned user, you’ll find clear, step-by-step instructions to reclaim disk space and breathe new life into your Windows 7 system.
Understanding Temporary Files in Windows 7
Before we dive into the “how-to,” let’s understand what temporary files are and why they exist.
What are Temporary Files?
Temporary files, often referred to as “temp files,” are exactly what their name suggests: files created temporarily by programs and the operating system to store information needed for short-term tasks. Think of them as digital scratch paper used by applications to manage data while they are running.
These files can contain various types of data, including:
- Cache files: Stored data for faster access in the future. Web browsers, for example, store images and web page elements as temporary files.
- Backup files: Temporary copies of documents or data created as a safety measure during operations.
- Installation files: Files extracted or downloaded during software installations.
- System files: Temporary files created by Windows for various system processes.
Why Do Temporary Files Accumulate?
Ideally, applications should delete their temporary files once they are no longer needed. However, this isn’t always the case. Sometimes, programs crash or are improperly closed, leaving behind these temporary files. Over time, these orphaned temp files accumulate, taking up valuable disk space and potentially causing performance issues.
Where are Temporary Files Stored in Windows 7?
Windows 7 stores temporary files in several locations. Knowing these locations is helpful for manual removal. The most common locations include:
- User Temp Folder:
C:Users[YourUsername]AppDataLocalTempor accessible by typing%TEMP%in the Run dialog. This folder is specific to your user profile. - System Temp Folder:
C:WindowsTempor accessible by typingTEMPin the Run dialog. This folder is for system-wide temporary files. - Older Windows Versions Locations: For older systems or specific application behaviors, you might find temporary files in
%USERPROFILE%Local SettingsTemp(though less common in Windows 7).
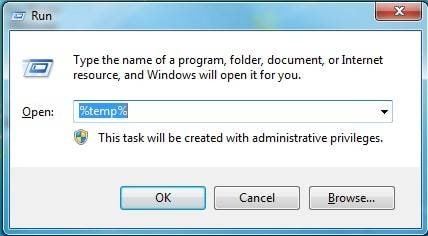
To quickly access these folders, you can use the Run dialog. Press the Windows key + R simultaneously, type either TEMP or %TEMP%, and press Enter.
Why is Removing Temporary Files Important?
Regularly removing temporary files in Windows 7 is crucial for several reasons:
- Improved Performance: Excessive temporary files can slow down your computer. Deleting them frees up resources, leading to faster application loading times and smoother overall performance.
- Free Disk Space: Temporary files can consume significant disk space, sometimes reaching gigabytes. Removing them reclaims valuable storage, especially important if you have a smaller hard drive or SSD.
- Reduced System Clutter: Cleaning up temporary files helps maintain a cleaner and more organized system, which can contribute to better system stability and easier troubleshooting.
Now that you understand the importance of removing temporary files, let’s explore the different methods available in Windows 7.
Method 1: Using Disk Cleanup in Windows 7
Disk Cleanup is a built-in Windows 7 utility designed to help you remove various types of unnecessary files, including temporary files. It’s a safe and user-friendly method for cleaning up your system.
Steps to Use Disk Cleanup:
-
Access Disk Cleanup via Command Prompt (Quick Method):
- Click the Start button (Windows icon).
- In the search box, type
cmdand press Enter to open Command Prompt. - In the Command Prompt window, type
cleanmgrand press Enter.
-
Access Disk Cleanup via Start Menu (Long Method):
- Click the Start button (Windows icon).
- Navigate to All Programs > Accessories > System Tools > Disk Cleanup.
-
Select Drive: Disk Cleanup will prompt you to select the drive you want to clean. Typically, you’ll want to clean your main system drive, usually (C:). Select the drive and click OK.
-
Calculate Disk Space: Disk Cleanup will scan your selected drive and calculate how much space you can free up. This may take a few moments.
-
Choose Files to Delete: In the Disk Cleanup dialog box, you’ll see a list of file categories that can be cleaned up. Temporary files should be listed and checked by default.
-
Review File Types: Carefully review the list and ensure that “Temporary files” is checked. You can also choose to clean up other categories like “Downloaded Program Files,” “Recycle Bin,” and “Temporary Internet Files” to free up even more space.
-
Clean Up System Files (Optional): For more thorough cleaning, click the “Clean up system files” button. This option requires administrator privileges and will scan for system-related junk files.
-
Confirm and Delete: Once you’ve selected the file categories, click OK. Disk Cleanup will ask for confirmation. Click “Delete Files” to proceed with the cleanup.
Disk Cleanup will then remove the selected temporary files and other junk files, freeing up disk space and potentially improving your system’s performance.
Method 2: Deleting Temp Files via Run Command
Using the Run command is a direct and quick way to access and delete temporary files stored in the user and system temp folders.
Steps to Delete Temp Files Using Run Command:
-
Open Run Dialog: Press the Windows key + R simultaneously to open the Run dialog box.
-
Access User Temp Folder: Type
%temp%in the Run dialog box and click OK. This will open your user-specific temporary files folder in File Explorer. -
Select and Delete Files: In the Temp folder, you’ll see various files and folders. You can:
- Selectively Delete: Examine the folders and files and delete specific items you recognize as temporary. Many applications create folders named after themselves to store temp files.
- Delete All: To delete all temporary files, press Ctrl + A to select all items, then press the Delete key (or right-click and select “Delete”).
-
Handle “File in Use” Errors: You might encounter a “File in Use” error message if some temporary files are currently being used by running applications.
- Skip: If you encounter this error, check the “Do this for all current items” box and click “Skip“. This will skip deleting the files currently in use and continue with the rest. It’s generally safe to skip these files as they are likely important for running applications.
-
Access System Temp Folder (Optional): To also clean the system-wide temporary folder, repeat steps 1-4, but in step 2, type
TEMP(without percentage signs) in the Run dialog box. Be more cautious when deleting files from the system temp folder, as it may contain files crucial for system stability. Deleting files from the user%TEMP%folder is generally safer for less experienced users.
After deleting the files, empty your Recycle Bin to permanently remove them and reclaim the disk space.
Method 3: Removing Temp Files Using Command Line
For users comfortable with command-line interfaces, the Command Prompt offers a quick way to delete temporary files using commands.
Steps to Delete Temp Files via Command Line:
-
Open Command Prompt:
- Click the Start button (Windows icon).
- In the search box, type
cmdand press Enter to open Command Prompt.
-
Navigate to Temp Folder (Optional): While not strictly necessary for deletion, you can navigate to the temp folder in Command Prompt using the
cdcommand:- For user temp folder:
cd %temp% - For system temp folder:
cd %windir%temp
- For user temp folder:
-
Delete Temp Files Command: Use the
rdcommand (Remove Directory) with specific parameters to delete the contents of the temp folder:- To delete all files and subdirectories in the user temp folder (use with caution):
rd %temp% /s /q - To delete all files and subdirectories in the system temp folder (use with caution and administrator privileges):
rd %windir%temp /s /qExplanation of Command Parameters:
rd: Remove directory command.%temp%or%windir%temp: Specifies the path to the temporary folder./s: Deletes the specified directory and all subdirectories and files within it./q: Quiet mode; does not prompt for confirmation.
- To delete all files and subdirectories in the user temp folder (use with caution):
-
Execute Command: Type the desired
rdcommand in the Command Prompt window and press Enter. The command will execute silently (due to/q) and delete the temporary files.
Caution: Using the rd command with /s /q is powerful and permanently deletes files without confirmation. Double-check the command before execution to ensure you are targeting the correct temporary file folder.
Method 4: Creating a Batch File for Quick Temp File Removal
For even faster and repeated temporary file cleaning, you can create a batch (.bat) file containing the command-line instructions. This allows you to simply double-click the file to run the cleanup process.
Steps to Create a Batch File for Temp File Removal:
-
Open Notepad: Open Notepad or any plain text editor.
-
Enter Command: Type the following command into the Notepad file:
rd %temp% /s /qor, for system temp folder (with caution):
rd %windir%temp /s /q -
Save as .bat File:
- Click File > Save As.
- In the “Save As” dialog box:
- Choose a location to save the file (e.g., Desktop).
- In the “File name” field, type a name for your batch file, such as
cleantemp.bat. Important: Ensure you use the.batextension. - In the “Save as type” dropdown, select “All Files (.)“.
- Click Save.
-
Run Batch File: Locate the
cleantemp.batfile you saved. Double-click the file to run it. A command prompt window may briefly flash as the command executes, and the temporary files will be deleted.
Now, whenever you want to quickly clear temporary files, simply double-click your batch file.
Method 5: Searching and Deleting .tmp Files
Another approach is to search for files with the .tmp extension, which is commonly used for temporary files. Windows 7’s search functionality allows you to easily find these files.
Steps to Search and Delete .tmp Files:
-
Open Windows Search: Click the Start button (Windows icon) and in the search box, type
ext:.tmpor*.tmp. -
Wait for Search Results: Windows Search will scan your system for files with the
.tmpextension. This may take some time depending on the size of your hard drive and the number of files. -
Select and Delete Files: Once the search is complete, you will see a list of
.tmpfiles.- Review Files (Recommended): Carefully review the list of files before deleting. While most
.tmpfiles are temporary, ensure you are not deleting any important data. Sort by “Date modified” to identify older files that are more likely to be safe to delete. - Select All (If Confident): If you are confident that you want to delete all
.tmpfiles, press Ctrl + A to select all files in the search results. - Delete Selected Files: Press the Delete key (or right-click and select “Delete”) to delete the selected
.tmpfiles.
- Review Files (Recommended): Carefully review the list of files before deleting. While most
-
Empty Recycle Bin: Empty your Recycle Bin to permanently remove the deleted
.tmpfiles and reclaim disk space.
Conclusion
Removing temporary files in Windows 7 is a simple yet effective way to maintain your computer’s performance and free up valuable disk space. By regularly employing one or more of the methods outlined in this guide – using Disk Cleanup, Run commands, Command Line, batch files, or searching for .tmp files – you can keep your Windows 7 system running smoothly and efficiently. Make temporary file cleanup a part of your routine computer maintenance to enjoy a faster and more responsive Windows 7 experience.