Dealing with a malfunctioning ABS (Anti-lock Braking System) module in your Jeep can be frustrating. While some may dislike ABS, it’s a crucial safety feature. If you’re facing issues, this guide will walk you through a DIY repair process. This project, which might seem daunting, is achievable with some basic tools and patience. The motivation behind this repair was to ensure the ABS system was fully functional, especially when planning steering and suspension overhauls, where brake bleeding using a DRB tool might be necessary. This guide outlines the process of removing and accessing the ABS Control Module (CAB) for inspection and potential repair, similar to common online fixes like resoldering motor connections.
First and foremost, safety is paramount. Begin by disconnecting the negative battery terminal. To gain access to the ABS module, you’ll need to clear some space. Start by removing the windshield washer fluid reservoir, typically held by two 10mm screws. Simply detach these and carefully move the reservoir aside. Next, remove the airbox. This usually involves three 13mm screws. Removing these components will provide you with ample room to work on the ABS module.
With the area cleared, you can now focus on the Hydraulic Control Unit (HCU) bracket. Locate the three nuts securing the HCU bracket. Be aware that the lower stud has two nuts. The upper nut secures the steering box cover, while the lower one beneath it holds the bracket’s lower leg. Carefully remove all three nuts to free the bracket.
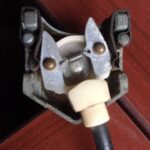
Next, disconnect the main CAB connector. Find the tab release handle on the connector, positioned towards the firewall. Pull this handle towards the firewall to unlock the connector. Once unlocked, you should be able to pull the connector straight up. It might require a gentle wiggle, but avoid excessive force as the pins are delicate, similar to PCM pins, and can be damaged easily. If the release handle is stiff, use a small screwdriver to gently pry it out completely. In the upper right corner, you’ll see the HCU motor connections. Squeeze the sides of this connector and pull upwards to detach it.
The wiring harness is secured to the vehicle body by two fasteners. These are squeeze-type fasteners. Squeeze the ends of each fastener together and gently push them out of the holes in the body. This will allow you to move the harness aside, providing more working space.
Now, you can proceed to detach the CAB from the HCU. There are four 4mm screws securing the CAB to the HCU. Initially, attempting to remove these without loosening the HCU bracket can be challenging. Using a 1/4 drive socket wrench, you can likely access and remove three of these screws. However, the fourth screw, typically at the right rear, can be difficult to reach. A helpful tip is to first loosen the three 13mm bracket screws that hold the HCU. This provides some wiggle room, making it easier to access the fourth 4mm screw. Remember that the brake lines have some flexibility, but avoid excessive bending. Remove the bracket completely before wrestling with the fourth screw. Once the bracket is off and the screws are removed, carefully detach the CAB from the HCU. It’s wise to support the HCU/CAB assembly with a tie or prop to prevent its weight from straining the brake lines.
With the CAB removed, you can inspect it for any visible damage or corrosion, particularly around the motor connections. Before reinstalling, take the opportunity to clean the area. Using a degreaser like purple power, thoroughly clean the HCU and surrounding area. After cleaning, consider masking off certain parts and applying paint to prevent future corrosion and improve the appearance.
Finally, reassemble everything in reverse order. Ensure all connections are secure and all screws and nuts are tightened appropriately. After reassembly, reconnect the negative battery terminal. In a follow-up step, you can then test the ABS system to confirm the repair was successful. This DIY repair can potentially save you significant costs and ensure your Jeep’s ABS system is functioning correctly.