Having issues with your computer? Before you panic, running a diagnostic on your PC is the first step to identifying and resolving problems. Windows offers a suite of built-in diagnostic tools, and various hardware manufacturers provide their own utilities to help you pinpoint issues. This guide will walk you through how to run a diagnostic on your PC using these readily available resources, ensuring your system runs smoothly and efficiently.
Understanding Windows Diagnostic Tools
Windows 10 and Windows 11 come equipped with several diagnostic tools designed to help you troubleshoot a variety of computer problems. These tools range from general troubleshooters that address common issues to more specific utilities like memory diagnostics. In addition to these built-in options, many PC manufacturers and hardware component providers offer their own diagnostic software, often providing deeper insights into hardware performance and potential failures.
Let’s explore the primary diagnostic tools available on your Windows PC:
Using the Windows Troubleshooter
The Windows Troubleshooter is a great starting point when you’re facing general PC problems but aren’t sure of the exact cause. It’s designed to automatically identify and fix a wide range of common issues related to internet connectivity, hardware, and system performance.
Here’s how to access and use the Windows Troubleshooter in both Windows 10 and Windows 11:
-
Accessing Troubleshoot Settings:
- For Windows 11: Navigate to Settings by clicking the Windows Start Menu and selecting the gear icon. Then, go to System and click on Troubleshoot.
- For Windows 10: Open Settings from the Start Menu. Click on Update & Security, and then select Troubleshoot from the left-hand menu.
:max_bytes(150000):strip_icc()/E1-GetHelpinWindows10-annotated-9d5a9f65d4e7467c9bf03e3c39fc2a97.jpg)
Navigating to the Troubleshoot settings in Windows 10, the initial step to access built-in diagnostic tools.
-
Windows 11 Additional Step: If you are using Windows 11, you will see a page with “Recommended troubleshooters” and “Troubleshoot history”. Click on Other troubleshooters to see the full list of available troubleshooters.
:max_bytes(150000):strip_icc()/other-troubleshooters-windows-11-64a5b3e6bebf4db4b8be398993792286.png)
Accessing the full list of troubleshooters in Windows 11 by clicking on “Other troubleshooters”.
-
Selecting a Troubleshooter: You will now see a list of troubleshooters categorized by the type of issue they address. Common options include:
- Internet Connections: Diagnoses and repairs network and internet connectivity problems.
- Bluetooth: Troubleshoots issues related to Bluetooth devices and connections.
- Keyboard: Identifies and fixes problems with your keyboard input.
- Printer: Helps resolve issues with printer connections and functionality.
- Windows Update: Diagnoses and repairs problems preventing Windows updates from installing.
- Hardware and Devices: Troubleshoots general hardware issues and device conflicts.
:max_bytes(150000):strip_icc()/Windows-Troubleshooter-Options-c030f54795ca49ebaf1a243f3512d519.jpg)
A variety of troubleshooters available in Windows 10 settings, ready to diagnose and fix specific PC problems.
-
Running the Troubleshooter: Click on the troubleshooter that best matches the problem you are experiencing and then click “Run the troubleshooter”. Windows will then automatically attempt to detect and resolve the issue. Follow any on-screen prompts and instructions provided by the troubleshooter.
If the troubleshooter successfully identifies and fixes a problem, it will display a message indicating the issue and the resolution applied. In some cases, it might provide you with further options or recommendations to fully resolve the problem.
Using the Windows Memory Diagnostic Tool for RAM Issues
If you notice your PC is running slower than usual, programs are frequently freezing or crashing, or you are experiencing the dreaded Blue Screen of Death (BSOD), faulty RAM (Random Access Memory) could be the culprit. Windows Memory Diagnostic is a built-in tool designed to test your computer’s RAM for errors.
Here’s how to run a memory diagnostic on your PC:
-
Open Windows Memory Diagnostic: Click on the search bar in your taskbar (or press the Windows key + S) and type “Windows Memory Diagnostic”. Select the “Windows Memory Diagnostic” app from the search results to open it.
:max_bytes(150000):strip_icc()/001_how-to-run-diagnostics-on-windows-5214801-65e8c77664e14b60902693f3d4212e54-487af6cecc584f32b3a5ecc2118fea70.jpg)
Locating and launching the Windows Memory Diagnostic tool through Windows search to begin RAM testing.
-
Choose a Testing Option: A small window will pop up with two options:
- Restart now and check for problems (recommended): This option immediately restarts your computer and starts the memory diagnostic test before Windows fully loads. This is the recommended option for immediate testing.
- Check for problems the next time I start my computer: This option schedules the memory test to run the next time you restart your PC.
Select your preferred option. It is generally recommended to choose “Restart now and check for problems” for immediate diagnosis.
:max_bytes(150000):strip_icc()/002_how-to-run-diagnostics-on-windows-5214801-46ca226e813647f39e628875fb28e03b-f2d324fe9c8f4e7490ba266bfc79ec4e.jpg)
Selecting the “Restart now and check for problems” option to initiate an immediate RAM diagnostic test on Windows.
-
Memory Test Execution: Your computer will restart, and the Windows Memory Diagnostic tool will automatically launch in a blue screen environment. It will perform a series of tests on your RAM to identify any potential issues. This process may take several minutes, depending on the amount of RAM and the complexity of the tests. You will see a progress bar and status information during the test.
-
Viewing Results in Event Viewer: Once the memory test is complete, your computer will automatically reboot back into Windows. The test results are not displayed immediately on the screen. To view the results, you need to use the Event Viewer:
- Right-click on the Start button and select “Event Viewer”.
- In the Event Viewer window, expand “Windows Logs” in the left-hand pane.
- Right-click on “System” and select “Filter Current Log…”.
- In the Filter Current Log window, under the “Event sources” dropdown menu, check the box for “MemoryDiagnostics-Results” and click “OK”.
- Look for an event with the source “MemoryDiagnostics-Results”. Double-click on this event to see the details of the memory test results.
If the Windows Memory Diagnostic tool finds errors, the event details will indicate that hardware problems were detected. You may need to replace your RAM modules if errors are found. If no errors are detected, the event details will confirm that no memory errors were found during the test.
Leveraging Windows Reliability and Performance Monitor
For a broader overview of your PC’s health and performance, Windows includes the Reliability Monitor and Performance Monitor. These tools provide insights into system stability and resource usage, helping you identify trends and potential bottlenecks.
Reliability Monitor: This tool tracks software and hardware problems, application failures, and other events that can impact system stability over time. It presents a “Reliability History” graph, visually displaying your system’s stability on a daily basis.
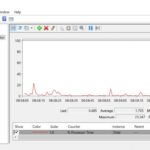
Performance Monitor: This tool provides real-time and historical data on various performance metrics, such as CPU usage, memory utilization, disk activity, and network performance. It allows you to monitor resource consumption and identify processes that might be causing performance issues.
Here’s how to access and use these tools:
-
Accessing Reliability and Performance Monitor:
- Click on the search bar in your taskbar and type either “Performance Monitor” or “View reliability history”.
- Select the respective app from the search results to open it.
:max_bytes(150000):strip_icc()/003_how-to-run-diagnostics-on-windows-5214801-d4aed29ecb864623b7f6d918faaaf044.jpg)
Launching the Windows Reliability Monitor to review system stability history and identify potential issues.
-
Using Reliability Monitor: Once opened, the Reliability Monitor will display the “Reliability History” graph. Each day is represented by a column, and icons indicate events like application failures, Windows failures, miscellaneous failures, warnings, and informational events. Click on a specific day’s column to view detailed information about the events that occurred on that day. This can help you pinpoint when problems started and what might have triggered them.
-
Using Performance Monitor: Performance Monitor is a more complex tool, but it offers powerful diagnostic capabilities. By default, it displays real-time CPU, disk, network, and memory usage graphs. You can customize the monitoring by adding or removing counters to track specific metrics relevant to your troubleshooting needs. Performance Monitor can also be used to create data collector sets to log performance data over time for in-depth analysis.
Exploring Other PC Diagnostic Tools
Beyond the built-in Windows tools, remember that your PC manufacturer and component vendors may offer their own diagnostic utilities.
-
Manufacturer-Specific Tools: Brands like Dell, HP, Lenovo, etc., often pre-install diagnostic software or offer downloadable tools on their support websites. These tools are tailored to their specific hardware and can provide more detailed hardware-level diagnostics. Check your PC manufacturer’s website for “support” or “downloads” sections to find diagnostic tools for your specific model.
-
Hardware Component Diagnostic Tools: Manufacturers of components like processors, graphics cards, and hard drives frequently provide their own diagnostic software. For example:
- Intel Processor Diagnostic Tool: For Intel CPUs, this tool can verify processor functionality, identify issues, and stress-test the CPU.
- NVIDIA and AMD Driver Software: Graphics card drivers from NVIDIA GeForce Experience and AMD Radeon Software often include basic diagnostic capabilities and performance monitoring features for your GPU.
- Hard Drive/SSD Diagnostic Utilities: Companies like Western Digital, Seagate, and Samsung provide diagnostic tools (often downloadable from their support sites) to check the health and identify potential issues with their hard drives and SSDs.
When using third-party diagnostic tools, especially those downloaded from the internet, always exercise caution. Ensure you download software from reputable sources and scan downloaded files for malware before running them.
FAQ: Common Questions About PC Diagnostics
How do I run Windows diagnostics on startup for advanced troubleshooting?
For more advanced startup diagnostics, you can use the System Configuration tool (msconfig). Type “msconfig” in Windows Search, right-click “System Configuration” and select “Run as administrator”. In the “General” tab, choose “Diagnostic startup”. This starts Windows with minimal drivers and services, which can help isolate issues caused by startup programs or services. To revert to normal startup, return to System Configuration and select “Normal startup”.
How do I access system BIOS/UEFI for hardware settings?
Accessing the BIOS or UEFI firmware settings (modern BIOS replacement) is usually done during system startup. In Windows 10, you can access UEFI settings through the Recovery options. Go to Settings > Update & Security > Recovery. Under “Advanced startup”, click “Restart now”. After restarting, choose Troubleshoot > Advanced options > UEFI Firmware Settings > Restart to enter the UEFI BIOS. Alternatively, during boot-up, you often need to press a specific key (like Delete, F2, F12, or Esc – check your motherboard manual) to enter BIOS/UEFI setup.
How do I run hard drive diagnostics on Windows?
Windows includes a built-in error-checking tool for hard drives. Open “File Explorer” (This PC), right-click the drive you want to check, and select “Properties”. Go to the “Tools” tab and click “Check” under “Error checking”. You can choose to “Scan drive” to check for file system errors. For more comprehensive hard drive diagnostics, consider using manufacturer-specific tools mentioned earlier or dedicated third-party hard drive testing programs.
Conclusion: Proactive PC Diagnostics for Optimal Performance
Regularly running diagnostics on your PC is a proactive approach to maintaining system health and preventing potential problems. By utilizing the built-in Windows tools and exploring manufacturer-provided utilities, you can effectively monitor your PC’s performance, identify issues early, and ensure a smoother and more reliable computing experience. Whether it’s troubleshooting a specific problem or performing routine checks, knowing how to run a diagnostic on your PC is an essential skill for every computer user.