Electrical short circuits can be a frustrating and potentially dangerous issue, especially in your car. As a common problem in automotive electrical systems, understanding how to test for an electrical short is a crucial skill for any car owner or DIY enthusiast. A short circuit, if left unchecked, can lead to battery drain, component damage, and even fire hazards. This guide, brought to you by the auto repair experts at keyfobprog.com, will walk you through the process of testing for an electrical short effectively and safely.
Understanding and addressing electrical shorts promptly can save you time, money, and potential safety risks. Let’s dive into how you can accurately test for an electrical short and get your vehicle back in top shape.
Understanding Electrical Shorts
Before we get into the testing process, it’s important to understand what an electrical short circuit actually is and why it occurs in vehicles.
What is an Electrical Short Circuit?
An electrical short circuit happens when electricity finds an unintended, low-resistance path in a circuit. Instead of flowing through the intended components, the current takes a shortcut, often bypassing the load. This surge of electricity can cause excessive heat, damage components, and drain your car battery rapidly.
Think of it like water flowing down a river. Normally, the water flows through the riverbed (the intended circuit). A short circuit is like a channel that bypasses a large section of the river, taking a quicker, unintended route. This “shortcut” for electricity is what we call a short circuit.
Common Causes of Electrical Shorts in Cars
Several factors can lead to electrical shorts in vehicles. Being aware of these causes can help you prevent shorts and diagnose them more effectively:
- Damaged Wire Insulation: Over time, the protective insulation around wires can wear down due to heat, vibration, or age. This exposes the bare wire, allowing it to contact metal parts of the car or other wires, creating a short.
- Frayed or Cracked Wires: Physical damage to wires, such as fraying or cracking, can occur due to movement, accidents, or rodent damage. These damaged areas are prime locations for short circuits.
- Moisture and Corrosion: Water and moisture are excellent conductors of electricity. If water gets into electrical connectors, wiring, or components, it can create a conductive path, leading to a short circuit. Corrosion on terminals and connectors can also disrupt the intended path and cause shorts.
- Faulty Components: Internal failures within electrical components like switches, relays, or motors can sometimes cause a short circuit.
- Overloading Circuits: Although less directly a cause of shorts, overloading a circuit can stress wiring and insulation, making it more susceptible to shorts over time.
Understanding these common causes helps in targeted troubleshooting when you suspect a short circuit in your vehicle.
Why Testing for Shorts is Crucial
Testing for electrical shorts is not just about fixing a problem; it’s about ensuring safety and preventing further damage. Here’s why it’s crucial:
- Prevent Battery Drain: A common symptom of a short circuit is a mysteriously draining battery. Even when the car is off, a short can allow current to leak, depleting your battery.
- Avoid Component Damage: The excessive current flow in a short circuit can damage sensitive electrical components, including control modules, sensors, and even the car’s computer (ECU/PCM).
- Reduce Fire Risk: Overheating wires due to a short circuit can become a significant fire hazard. Promptly identifying and fixing shorts minimizes this risk.
- Ensure System Reliability: Electrical shorts can cause intermittent or complete failure of various car systems, from lights and wipers to critical engine and safety systems. Testing helps maintain the overall reliability of your vehicle.
By testing for and resolving electrical shorts, you are taking proactive steps to protect your vehicle and ensure your safety on the road.
Tools You’ll Need to Test for Electrical Shorts
To effectively test for electrical shorts, you’ll need a few essential tools. These tools are readily available and relatively inexpensive, making it feasible for DIYers to perform these tests at home.
Multimeter: Your Primary Tool
The most crucial tool for testing electrical shorts is a multimeter. A multimeter is a versatile device that can measure voltage, current, and resistance. For testing shorts, we will primarily use its continuity and resistance measurement capabilities.
- Continuity Testing: This function helps determine if a circuit is complete or broken. In the context of short circuits, it helps identify unintended paths of low resistance.
- Resistance Measurement (Ohms): By measuring resistance, you can pinpoint short circuits by detecting very low resistance where there should be high resistance (or no continuity at all).
A digital multimeter is recommended for ease of reading and accuracy. Ensure your multimeter is in good working condition and that you are familiar with its basic operation.
Other Helpful Tools
While a multimeter is the star of the show, a few other tools can make the testing process easier and more effective:
- Insulation Tester (Megohmmeter – Optional): For more advanced testing, an insulation tester can measure the insulation resistance of wires. While not always necessary for basic short circuit testing, it’s invaluable for detecting insulation breakdown that could be causing a short.
- Wire Strippers: If you need to access bare wire for testing or repair, wire strippers are essential for safely removing insulation without damaging the wire itself.
- Spare Fuses: When dealing with electrical shorts, fuses can blow. Having spare fuses of the correct amperage on hand is crucial for testing and troubleshooting without repeated trips to the auto parts store.
- Wiring Diagrams (Vehicle Specific): A wiring diagram for your specific vehicle is an invaluable resource. It shows the correct paths for circuits and helps you understand where to test and what readings to expect. You can usually find these in your car’s repair manual or online databases.
- Gloves and Safety Goggles: Safety should always be a priority when working with electrical systems. Gloves and goggles protect you from potential shocks and debris.
Having these tools ready will streamline the process of testing for electrical shorts and ensure you can diagnose the problem efficiently and safely.
Step-by-Step Guide: How to Test for an Electrical Short
Now that you understand what a short circuit is and have the necessary tools, let’s go through the step-by-step process of testing for an electrical short in your vehicle.
1. Safety First: Disconnect Power!
Crucially, before you begin any electrical testing on your car, disconnect the negative terminal of your car battery. This single step is the most important safety precaution. It prevents accidental shorts, electrical shocks, and damage to your car’s electrical system during testing.
- Locate the negative battery terminal (usually marked with a “-” sign and often black).
- Use a wrench to loosen the nut on the negative terminal clamp.
- Carefully remove the negative cable from the terminal and tuck it away so it cannot accidentally make contact again.
With the power safely disconnected, you can proceed with the testing process.
2. Visual Inspection for Obvious Signs
Before using any tools, start with a careful visual inspection. You might be able to spot obvious signs of a short circuit that can quickly lead you to the problem area:
- Check for Burn Marks or Melted Wires: Look along wiring harnesses and near electrical components for any signs of burning, melting, or discoloration. These are clear indicators of overheating due to excessive current flow.
- Sniff for Burning Smell: A distinct burning plastic or electrical smell can often accompany a short circuit. If you notice such a smell, try to pinpoint its source.
- Look for Frayed or Damaged Insulation: Inspect wires for cracked, frayed, or worn insulation. Pay close attention to areas where wires might rub against metal or sharp edges.
- Check for Loose or Corroded Connections: Examine connectors and terminals for looseness or corrosion. Corrosion can create unintended conductive paths.
If you find any of these visual signs, you’ve likely narrowed down the area where the short circuit is located. Make a note of these areas for closer testing with the multimeter.
3. Using a Multimeter for Continuity Testing
Continuity testing with a multimeter is the primary method for identifying electrical shorts. Here’s how to do it:
-
Set Your Multimeter to Continuity Mode: Turn on your multimeter and select the continuity test setting. This is often indicated by a diode symbol or a sound wave symbol. In continuity mode, the multimeter will beep or produce a visual signal when there is a low-resistance path (continuity).
-
Identify the Circuit to Test: Use your vehicle’s wiring diagram to identify the circuit you suspect might have a short. Common circuits to check include lighting circuits, accessory circuits (like radio or power windows), or any circuit associated with a blown fuse or battery drain issue.
-
Isolate the Circuit: To accurately test for a short, you need to isolate the circuit you’re testing. This usually involves disconnecting connectors or removing components along the circuit path. For example, if testing a headlight circuit, you might disconnect the headlight bulb and the headlight switch.
-
Perform the Continuity Test:
-
Touch one probe of your multimeter to a known ground point on the vehicle’s chassis or body (bare metal is best).
-
Touch the other probe to a wire or terminal in the circuit you are testing.
-
Interpreting the Results:
- Beep or Low Resistance Reading (close to 0 ohms): If the multimeter beeps or shows a very low resistance reading, this indicates continuity to ground where there shouldn’t be. This is a strong indication of a short circuit to ground.
- No Beep or High Resistance Reading (OL or infinity): If there is no beep and the multimeter shows a high resistance reading (often displayed as “OL” or infinity), there is no continuity to ground, which is the expected reading in many cases when testing for shorts to ground.
-
-
Test Different Points in the Circuit: Systematically test different points along the circuit, moving further along the wiring and components. This process of elimination helps you pinpoint the exact location of the short.
Example Scenario: Let’s say your car’s interior lights stay on, even when all doors are closed, and you suspect a short.
- Identify the interior light circuit using your wiring diagram.
- Disconnect the interior light fixture.
- Set your multimeter to continuity mode.
- Touch one probe to a known ground.
- Touch the other probe to the positive wire of the interior light circuit (the wire that should not be grounded).
- If you get a beep, there’s a short to ground in that circuit.
- Continue testing along the circuit, disconnecting switches, connectors, and wiring segments until the beep stops. The short is likely in the last section you disconnected.
4. Isolating Sections to Find the Short
Once you’ve confirmed a short circuit, the next step is to isolate it to a specific area or component. This systematic approach saves time and frustration:
- Divide and Conquer: Break down the circuit into smaller sections. Use connectors and component locations as natural dividing points.
- Sequential Disconnection: Start by disconnecting components or connectors furthest from the power source (battery or fuse box) in the suspected circuit.
- Re-test After Each Disconnection: After disconnecting a section, re-perform the continuity test to ground.
- If the short is still present (multimeter beeps), the short is further upstream in the circuit.
- If the short disappears (no beep), the short was in the section you just disconnected.
- Narrowing it Down: Continue disconnecting sections and testing until you isolate the short to a very small portion of the circuit or a specific component.
This methodical process of elimination is key to finding elusive short circuits.
5. Advanced Testing (Insulation Tester – Optional)
For particularly stubborn shorts or when you suspect insulation breakdown, an insulation tester (megohmmeter) can be beneficial. This tool applies a higher voltage than a standard multimeter to test the insulation resistance of wires.
- How it Helps: An insulation tester can detect subtle insulation failures that a multimeter might miss. It’s especially useful for older vehicles or in situations where wires have been exposed to harsh conditions.
- Using an Insulation Tester: Follow the manufacturer’s instructions for your specific insulation tester. Generally, you will connect the tester between the conductor and ground and apply a test voltage. A low insulation resistance reading indicates insulation breakdown and a potential short.
- When to Use It: Insulation testers are typically used when you suspect widespread insulation degradation or when standard continuity tests are inconclusive but you still suspect a short.
While not always necessary, an insulation tester is a valuable tool for in-depth electrical diagnostics.
Fixing Electrical Shorts (Brief Overview)
Once you have located the electrical short, the final step is to fix it. The repair method will depend on the cause and location of the short. Here are some common fixes:
Basic Fixes
- Repair or Replace Damaged Wires: If the short is due to damaged insulation or frayed wires, repair or replace the affected section of wire. Use appropriate connectors and ensure proper insulation of the repaired area.
- Clean Corroded Connections: If corrosion is the culprit, clean terminals and connectors thoroughly using a wire brush or electrical contact cleaner. Apply dielectric grease to prevent future corrosion.
- Replace Faulty Components: If a component (like a switch, relay, or sensor) is causing the short, replace it with a new, compatible part.
- Secure Loose Wiring: Ensure wiring is properly routed and secured away from sharp edges and moving parts to prevent future damage.
When to Call a Professional
While many basic short circuit repairs can be DIY, there are situations where it’s best to seek professional help:
- Complex or Elusive Shorts: If you’ve spent considerable time testing and can’t locate the short, or if the problem is intermittent and hard to trace, a professional automotive electrician has specialized tools and expertise to diagnose and repair complex electrical issues.
- Safety Concerns: If you are uncomfortable working with electrical systems or unsure about any step, it’s always safer to consult a professional. Electrical repairs done incorrectly can create further problems or safety hazards.
- Extensive Damage: If the short circuit has caused significant damage, such as melted wiring harnesses or component burnout, professional repair is often necessary to ensure all affected parts are correctly addressed.
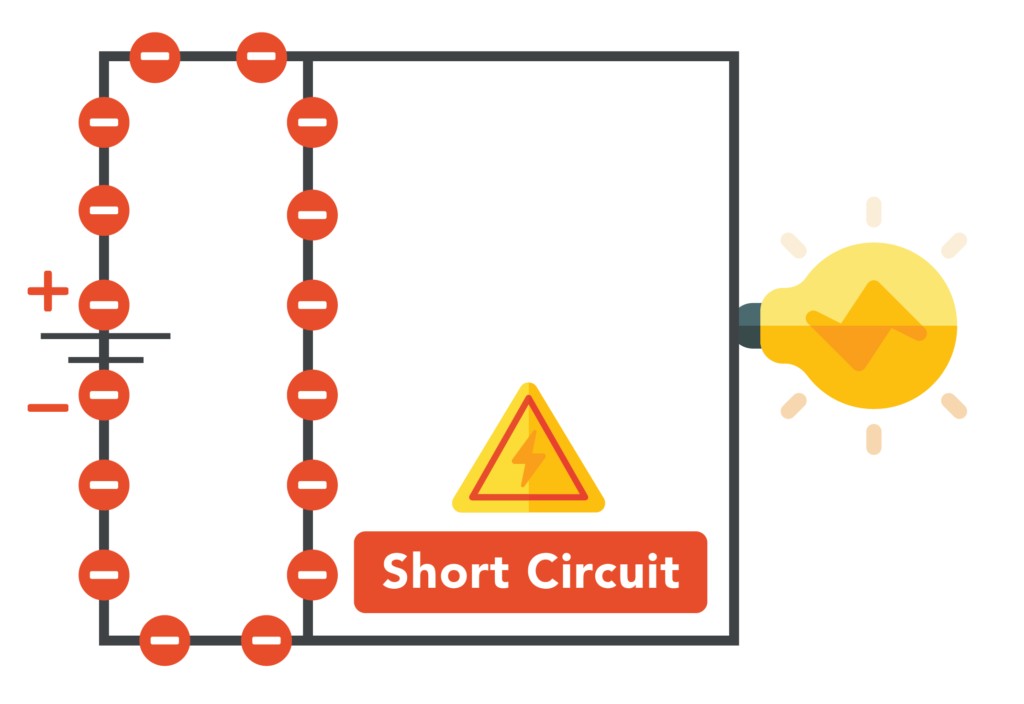 Diagram illustrating an electric short circuit, highlighting the unintended path of current flow.
Remember, when in doubt, consulting a professional ensures the job is done correctly and safely.
Conclusion
Testing for electrical shorts is a critical skill for maintaining your vehicle and ensuring its safety and reliability. By understanding what short circuits are, learning how to use a multimeter for testing, and following a systematic approach to diagnosis, you can effectively identify and address these issues.
Always prioritize safety by disconnecting the battery before testing and taking your time to perform each step carefully. With the knowledge and techniques outlined in this guide, you’ll be well-equipped to tackle electrical short circuit problems in your car, keeping you on the road with confidence. For more automotive repair tips and guides, keep visiting keyfobprog.com – your trusted resource for auto expertise.