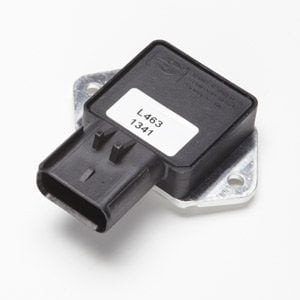
Is your car’s radiator fan not kicking in when it should? Before you jump to conclusions about a faulty fan motor, a simple component called the radiator fan relay could be the culprit. This relay is crucial because it manages the high current needed to power your electric radiator cooling fans. Without a properly functioning relay, your engine could overheat. Testing the radiator fan relay is a straightforward diagnostic step you can perform at home before seeking professional help.
The first step in diagnosing a cooling fan issue is to check the fuse associated with the radiator fan. If the fuse is blown, replacing it might solve your problem. However, if the fuse is intact or continues to blow, the next component to investigate is the radiator fan relay. This article will guide you through the process of testing your radiator fan relay to determine if it’s functioning correctly.
To test the radiator fan relay, begin by safely accessing the fan connectors. Unplug the electrical connectors leading to the radiator fans. Next, you’ll need to simulate a condition where the cooling fans should be activated. A common method is to turn your car’s air conditioning to the maximum setting and start the engine. This action often triggers the cooling fans to engage, regardless of engine temperature.
Now, using a multimeter, check for power at the unplugged fan connectors. Set your multimeter to read DC voltage and probe the terminals on the connector that supplies power to the fan motor. You should be looking for approximately 12 volts. If you don’t detect voltage at the fan connectors, it indicates that the fans are not receiving power from the relay, suggesting a potential relay issue.
The radiator fan relay is typically located in the engine compartment, often near the bottom on a metal frame member. This metal frame acts as a heat sink to dissipate heat generated by the relay during operation, which is essential for the relay’s longevity and reliable performance. Locate the radiator fan relay in your vehicle, which is usually identified in your car’s owner’s manual or by diagrams on the fuse box cover.
Once you’ve located the relay, unplug the electrical connector at the relay itself. Repeat the voltage check you performed at the fan connectors, but this time, check for power at the connector leading into the relay. If you find 12 volts at this point, but not at the fan connectors in the previous step, it strongly indicates a faulty radiator fan relay. In this case, replacing the relay is likely to solve your cooling fan problem.
However, if you do not find power at the relay connector, the issue might be more complex, possibly involving wiring problems or the vehicle’s computer system. These more intricate issues often require professional diagnostic equipment and expertise to resolve. If you’ve confirmed power to the relay but no power output, replacing the radiator fan relay is a simple DIY fix.
When replacing the relay, take a moment to clean the mounting surface. Corrosion can build up over time and hinder the thermal transfer needed for the relay to operate efficiently. Before installing the new relay, remove any corrosion from the metal mounting surface, sanding down to bare metal for good contact. Apply a generous amount of thermal grease to the back of the new relay. This thermal grease is crucial for transferring heat away from the relay and into the metal frame, preventing overheating and future corrosion. Secure the new relay to the frame, ensuring the thermal grease makes good contact and squishes out slightly on all sides.
By following these steps, you can effectively test your radiator fan relay and determine if it’s the cause of your cooling fan malfunction. Replacing a faulty relay is a relatively inexpensive and straightforward repair that can save you from potential engine overheating and more costly repairs down the line. If you’re still experiencing issues after replacing the relay, it’s advisable to consult a qualified mechanic for further diagnosis and repair.
