Experiencing trouble with your Volvo’s on-board diagnostics (OBD) system can be incredibly frustrating, especially when the check engine light illuminates, but your OBD reader refuses to communicate. Many Volvo owners with older models encounter a situation where the OBD light comes on, but the diagnostic function remains inactive. Before you assume a complex electrical issue or an expensive repair, consider a surprisingly simple solution that you can tackle yourself.
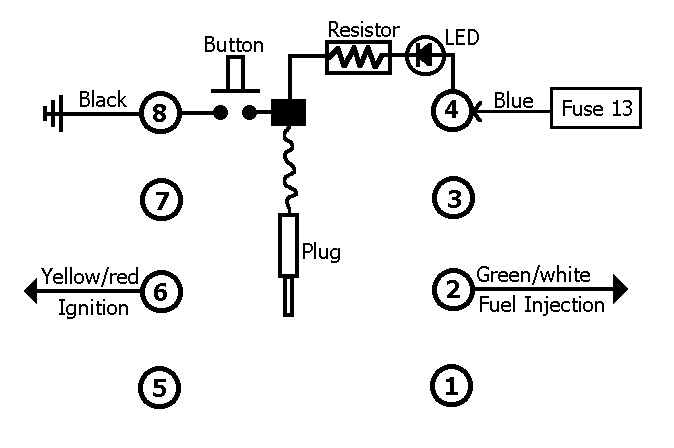
It turns out, a common culprit behind a non-functional OBD system in these vehicles is often overlooked: dirty contacts within the OBD module itself. The OBD module, despite its crucial role, operates on a straightforward circuit. Power flows through a fuse to a terminal, then through an LED and resistor. This circuit is completed when you insert the diagnostic plug into the designated pin for systems like ignition or fuel injection. A lit LED indicates a successful initial connection when the ignition is turned on.
The diagnostic code display is initiated by pressing a button. This action grounds the pad located between the LED and resistor via another terminal. The car’s computer recognizes this shift from power to ground and begins to output diagnostic codes through blinking signals.
However, if the contacts within this button mechanism are corroded or dirty – a frequent occurrence over time – a reliable ground connection cannot be established. Consequently, pressing the button yields no code display, leading you to believe your OBD is not working.
The solution? Attempt cleaning these contacts. You have a couple of options. For the more hands-on approach, carefully disassemble the OBD module to directly access and clean the button contacts. Alternatively, you can try a less invasive method by spraying contact cleaner around the button retainer, hoping it penetrates and cleans the necessary contact points.
For those who want to quickly test this theory without disassembly, you can even bypass the button entirely. By using a nail or similar conductive object inserted into the plug, you can make the initial connection. Then, take a wire connected to a reliable ground and briefly touch it to the nail. This simulates pressing the button and directly grounds the circuit, potentially triggering the diagnostic code display.
Before concluding that you have a major OBD malfunction, try this simple DIY fix of cleaning the contacts. It could save you time and money, resolving the issue of your “Obd Not Working” and getting your Volvo’s diagnostics back online.