The On-Board Diagnostics II (OBD2) connector is a crucial interface in every modern vehicle manufactured from 1996 onwards. This standardized 16-pin port allows mechanics and car owners to access a wealth of data about a vehicle’s health using a generic OBD2 scanner. While the OBD2 standard ensures basic data accessibility across all makes and models, manufacturers often include additional proprietary data beyond the standard, accessible with more specialized tools.
OBD2 Connector Pin Layout: Understanding the Configuration
For those delving into OBD2 systems, understanding the pin layout is essential. Here’s a breakdown:
- Pin 1: Manufacturer’s discretion
- Pins 2 & 10: SAE J1850 network communication
- Pin 3: Manufacturer’s discretion
- Pin 4: Chassis ground
- Pin 5: Signal ground
- Pins 6 & 14: CAN bus high and low network communication
- Pins 7 & 15: ISO9140 K-Line network communication
- Pins 8, 9, 11, 12, 13: Manufacturer’s discretion
- Pin 16: Battery positive power (always on)
Common Causes of OBD2 Connector Damage
Pin 16, the battery positive pin, is frequently the victim of damage. There are primary reasons for this vulnerability.
Firstly, the fuse protecting pin 16 can sometimes blow. This might be triggered by poorly designed aftermarket accessories drawing power from the OBD2 port or an overload in a shared circuit. While a blown fuse itself doesn’t harm the connector, misguided attempts to test for power using probes incorrectly can severely damage the terminals and the connector housing. In fact, damage from careless testing is a leading cause requiring OBD2 connector repair.
Secondly, the increasing popularity of aftermarket OBD2 devices contributes to connector wear and tear. These include insurance tracking devices, performance monitors, and data loggers. The issue often stems from subpar engineering and quality control in some aftermarket products. Overly large male pins on these devices can stretch and deform the delicate female terminals within the OBD2 connector. Additionally, some devices draw excessive current from pin 16, continuously demanding more power than the connector was designed to supply long-term, potentially leading to overheating and damage. The OBD2 port is intended for intermittent power supply to diagnostic tools, not constant high-current draw for extended periods.
The Myth of Universal OBD2 Connectors
Despite the OBD2 standard, connectors are far from universally interchangeable at the component level. While any standard male OBD2 connector can physically plug into any female OBD2 port in a vehicle, the method of securing the connector to the car’s structure and the specific terminals used within the connector vary significantly across manufacturers and models. A quick browse through connector supplier catalogs reveals a vast array of different connector housings (the plastic part) and terminals (the metal contacts), highlighting the lack of true standardization beyond basic interface compatibility.
The Pitfalls of Cheap Aftermarket OBD2 Connectors
The allure of inexpensive OBD2 connectors found on online marketplaces is understandable, especially when facing a repair. However, these budget options often come with significant drawbacks. A primary issue is the mounting mechanism. These generic connectors rarely fit the original vehicle’s mounting brackets, necessitating makeshift solutions like self-tapping screws for dashboard attachment. This not only looks unprofessional but also compromises long-term durability and stability.
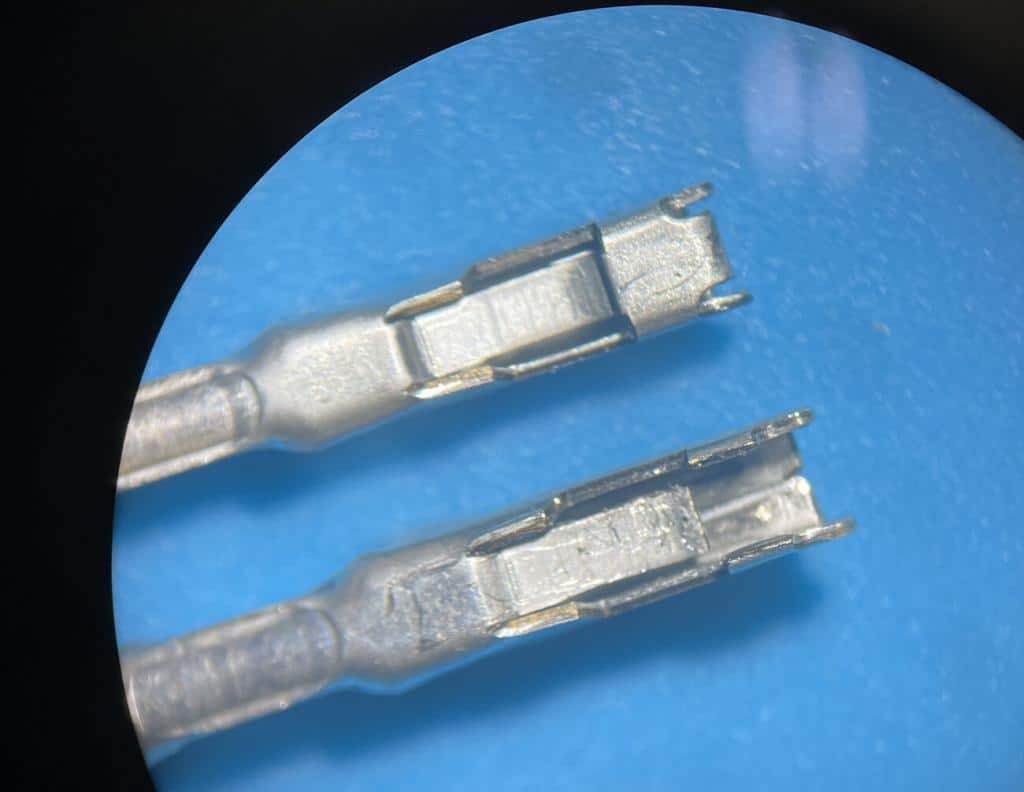
However, the most critical issue lies in the substandard quality of the terminals themselves. The metal used in cheap aftermarket terminals is often too soft and lacks the necessary springiness of OEM-quality parts. While these connectors might initially restore functionality, their longevity is questionable.
Consider the labor involved in replacing an OBD2 connector properly. Each terminal requires crimping onto a wire pigtail, typically taking around 3 minutes per terminal. Accessing the wiring often involves removing lower dashboard panels, adding at least 15 minutes to the job, including reassembly. Soldering and heat-shrinking each of the wires can take another 5 minutes per wire. For a 10-terminal connector, this sums up to a minimum of 1.5 hours of labor. At current labor rates, this translates to a significant cost.
This labor cost underscores the importance of using high-quality replacement parts. Employing substandard components to save a few dollars on the connector itself is false economy. It increases the risk of premature failure, leading to warranty claims for professional repair shops and repeat repairs for DIYers, ultimately costing more in the long run.
The OEM Advantage: Sourcing OBD2 Connectors from Dealerships
Opting for genuine OEM parts from dealerships is generally the best approach for Obd2 Connector Replacement, though it can sometimes be challenging. Toyota serves as a good example, representing a significant portion of vehicle repairs.
While Toyota dealerships might initially state that replacement OBD2 connectors are not available as standalone parts, this is not entirely accurate. While not listed as a complete assembly in parts catalogs, individual components, including the plastic connector housing and terminals, can be sourced separately. The key to finding the correct part numbers lies in consulting the vehicle’s electrical wiring diagrams, accessible through Toyota’s Technical Information System (TIS). By clicking on the OBD2 connector in the wiring diagram and selecting the information box, the part number for the plastic connector housing is revealed.
Interestingly, this connector part number information is also found in older, pre-electronic Toyota service manuals. Searching for “part number of connectors” on TIS can lead to documents listing connector part numbers categorized by wiring diagram codes.
However, identifying the plastic housing is only half the solution. The metal terminals also need to be sourced. A recent OBD2 connector repair on a Gen3 Prius illustrates this challenge. Contacting a Toyota dealer with the connector housing part number and vehicle application might not immediately yield the terminal part number. Dealership parts departments may require further investigation, sometimes even consulting with shop foremen who might have accumulated used terminals or possess specialized knowledge.
Toyota OBD2 Repair Terminals: A Specific Part Number
Through persistence and dealer support, the correct terminal part number for Toyota OBD2 connector repair, specifically for a Gen3 Prius and likely applicable to other Toyota models, was identified as 82998-05010.
However, the cost of this single terminal with a pigtail is relatively high. While justifiable for a critical automotive repair, the price point highlights the markup on individual components in the automotive parts supply chain.
Exploring Connector Experts and Mouser for Alternatives
For more cost-effective solutions and broader selection, companies like Connector Experts specialize in reproducing OE connectors and terminals. Their TERM86 terminal has proven to be a compatible and high-quality alternative for certain applications, matching the quality of OEM terminals at a significantly lower price point. Connector Experts, however, typically supply terminals without pre-attached pigtails.
Mouser Electronics, a broad-line electronic component distributor, also offers a wide range of automotive connectors and terminals. Navigating their extensive catalog to find the specific part can be more challenging but provides access to a vast inventory.
The Importance of Proper Crimping Tools for OBD2 Terminals
Successfully replacing OBD2 connector terminals hinges on proper crimping technique. While most mechanics own wire crimpers, standard tools are often designed for larger, traditional automotive terminal sizes, typically starting at 18 gauge wire. For the small, open-barrel terminals used in OBD2 connectors, specialized crimpers are essential to achieve factory-quality crimps. High-quality precision crimpers, such as those from Engineer (a Japanese manufacturer), are designed for these delicate terminals and produce crimps indistinguishable from original factory crimps.
Further Reading for Automotive Electronic Repairs
For those interested in automotive electronic repairs, these related articles may be of interest:
- Making Custom Battery Cables
- Mice Short Circuiting Prius High Voltage Batteries
- Prius Combination Meter Repair