In today’s connected world, even our vehicles are becoming increasingly communicative. The ability to access real-time data from your car opens up a realm of possibilities for diagnostics, performance monitoring, and even custom application development. This article delves into the fascinating world of OBD2 (On-Board Diagnostics II) and demonstrates how you can tap into your car’s data stream using Xamarin Forms and Bluetooth Low Energy (BLE) technology.
We’ll walk through the creation of a demo mobile application that reads essential vehicle parameters like speed, engine RPM (revolutions per minute), and engine temperature. This project leverages the power of Xamarin Forms for cross-platform mobile development, the standardized OBD2 system for vehicle communication, and Bluetooth for wireless connectivity.
To give you a glimpse of what’s achievable, here’s a preview of the application in action, displaying real-time vehicle data:
[Imagine a screenshot or GIF here showcasing the demo app displaying speed, RPM, and temperature gauges.]
Ready to get started? Building an application like this requires a foundational understanding of a few key areas:
- Xamarin Forms: A cross-platform UI framework for building native mobile apps with C#.
- OBD2 (On-Board Diagnostics II): The standardized system vehicles use for diagnostics and reporting.
- Bluetooth Communication: Wireless technology for connecting your mobile device to an OBD2 Bluetooth dongle in your car.
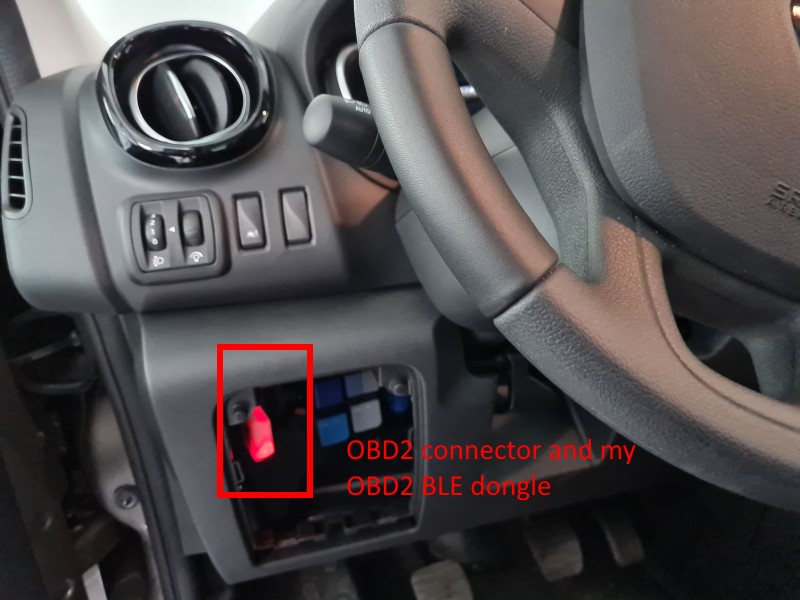
For this practical demonstration, we utilized an OBD2 Bluetooth dongle. This device plugs directly into your car’s OBD2 port, typically located beneath the steering wheel. Here’s a look at the dongle in action:
While we won’t delve deeply into the intricacies of BLE dongle communication in this article, you can find a comprehensive guide in a dedicated blog post: https://www.jenx.si/2020/08/13/bluetooth-low-energy-uart-service-with-xamarin-forms/. This resource provides detailed information on establishing BLE communication with Xamarin Forms.
Diving into the Code: Building the OBD2 App
Let’s get our hands dirty with some code. We’ll be using Visual Studio 2019 to create a new Xamarin Forms project, starting with the Shell template. To enhance our development process and application features, we’ll incorporate several essential NuGet packages:
- Prism.Forms & Prism.Unity.Forms: Powerful frameworks for building loosely coupled, maintainable, and testable Xamarin Forms applications, leveraging dependency injection and MVVM (Model-View-ViewModel).
- Xamarin.Essentials: Provides essential cross-platform APIs for accessing device functionalities, simplifying common tasks in mobile development.
- Syncfusion.Xamarin.SfGauge (Trial): A UI library offering feature-rich gauge controls for visually representing speed and RPM data. (A trial version is sufficient for development and evaluation).
- Ble.Plugin: A crucial component for handling Bluetooth Low Energy communication, enabling interaction with the OBD2 Bluetooth dongle.
Here’s a glimpse into the Visual Studio Solution Explorer once these components are integrated:
Now, let’s examine the core structure of our application, starting with App.xaml.cs and AppShell.xaml. These files define the fundamental setup and navigation of our Xamarin Forms Shell application.
My App and AppShell Structure
This App.xaml.cs file is relatively standard for a Prism-based Xamarin Forms application. The key takeaway is that our application inherits from PrismApplication. This inheritance enables us to leverage the powerful Inversion of Control (IoC) container provided by Prism.Unity, promoting modularity and maintainability within our Xamarin Forms application.
Next, let’s look at the AppShell.xaml which defines the visual structure and navigation of our application using Xamarin Forms Shell:
<?xml version="1.0" encoding="UTF-8"?>
<Shell
    x:Class="Jenx.Odb2.SpeedGauge.AppShell"
    xmlns="http://xamarin.com/schemas/2014/forms"
    xmlns:x="http://schemas.microsoft.com/winfx/2009/xaml"
    xmlns:d="http://xamarin.com/schemas/2014/forms/design"
    xmlns:local="clr-namespace:Jenx.Odb2.SpeedGauge.Views"
    xmlns:mc="http://schemas.openxmlformats.org/markup-compatibility/2006"
    Title="Jenx.Odb2.SpeedGauge"
    mc:Ignorable="d">

    <Shell.Resources>
        <ResourceDictionary>
             <Color x:Key="NavigationPrimary">#2196F3</Color>
             <Style x:Key="BaseStyle" TargetType="Element">
                <Setter Property="Shell.BackgroundColor" Value="{StaticResource NavigationPrimary}" />
                <Setter Property="Shell.ForegroundColor" Value="White" />
                <Setter Property="Shell.TitleColor" Value="White" />
                <Setter Property="Shell.DisabledColor" Value="#B4FFFFFF" />
                <Setter Property="Shell.UnselectedColor" Value="#95FFFFFF" />
                <Setter Property="Shell.TabBarBackgroundColor" Value="{StaticResource NavigationPrimary}" />
                <Setter Property="Shell.TabBarForegroundColor" Value="White"/>
                <Setter Property="Shell.TabBarUnselectedColor" Value="#95FFFFFF"/>
                <Setter Property="Shell.TabBarTitleColor" Value="White"/>
             </Style>
             <Style BasedOn="{StaticResource BaseStyle}" TargetType="TabBar" />
        </ResourceDictionary>
    </Shell.Resources>

    <TabBar Route="main-shell">
        <Tab
            Title="Connect"
            Icon="tab_settings.png"
            Route="connect-page">
            <ShellContent ContentTemplate="{DataTemplate local:ConnectPage}" />
        </Tab>
        <Tab
            Title="Kmph"
            Icon="tab_speed.png"
            Route="kmph-page">
            <ShellContent ContentTemplate="{DataTemplate local:KmphPage}" />
        </Tab>
        <Tab
            Title="Rpm"
            Icon="tab_rpm.png"
            Route="rpm-page">
            <ShellContent ContentTemplate="{DataTemplate local:RpmPage}" />
        </Tab>
        <Tab
            Title="Car info"
            Icon="tab_info.png"
            Route="info-page">
            <ShellContent ContentTemplate="{DataTemplate local:InfoPage}" />
        </Tab>
    </TabBar>
</Shell>
This AppShell.xaml defines the tab-based navigation structure of our application. We’ve defined four tabs: “Connect,” “Kmph,” “Rpm,” and “Car info,” each associated with a specific page within the application.
In contrast to previous demonstrations, this application embraces the MVVM pattern, service Dependency Injection, and other modern development practices. This approach leads to a more modular, organized, and easily extensible application architecture.
Let’s now delve into the implementation of the basic application pages, starting with the “Connect” page.
Connect Page: Establishing OBD2 Connection
The “Connect” page is the entry point for establishing communication with the OBD2 Bluetooth dongle.
View (ConnectPage.xaml):
<?xml version="1.0" encoding="utf-8"?>
<gui:BaseContentPage
    x:Class="Jenx.Odb2.SpeedGauge.Views.ConnectPage"
    xmlns="http://xamarin.com/schemas/2014/forms"
    xmlns:x="http://schemas.microsoft.com/winfx/2009/xaml"
    xmlns:d="http://xamarin.com/schemas/2014/forms/design"
    xmlns:gui="clr-namespace:Jenx.Odb2.SpeedGauge.Views"
    xmlns:mc="http://schemas.openxmlformats.org/markup-compatibility/2006"
    xmlns:mvvm="clr-namespace:Prism.Mvvm;assembly=Prism.Forms"
    Title="{Binding Title}"
    mvvm:ViewModelLocator.AutowireViewModel="True"
    mc:Ignorable="d">
    <Grid>
        <ScrollView>
            <StackLayout
                Padding="20,20,20,20"
                Orientation="Vertical"
                Spacing="5">
                <Button
                    Margin="0,10,0,0"
                    Command="{Binding ConnectToObd2DongleCommand}"
                    Text="Connect to my car" />
                <Label LineBreakMode="WordWrap" Text="{Binding Output}" />
            </StackLayout>
        </ScrollView>
    </Grid>
</gui:BaseContentPage>
ViewModel (ConnectPageViewModel.cs):
using Jenx.Obd2.Bluetooth;
using Jenx.Obd2.Common;
using Jenx.Odb2.SpeedGauge.Services;
using Jenx.Odb2.SpeedGauge.Utils;
using Prism.Services;
using System;
using System.Windows.Input;
using Xamarin.Forms;

namespace Jenx.Odb2.SpeedGauge.ViewModels
{    public class ConnectPageViewModel : BaseViewModel
    {
        private readonly IObd2BluetoothManager _obd2BluetoothManager;
        private readonly INavigationService _navigationService;
        private readonly IUartManager _uartManager;
        private readonly IPageDialogService _pageDialogService;

        public ConnectPageViewModel(
            IObd2BluetoothManager obd2BluetoothManager,
            INavigationService navigationService,
            IUartManager uartManager,
            IPageDialogService pageDialogService)
        {
            _obd2BluetoothManager = obd2BluetoothManager;
            _navigationService = navigationService;
            _uartManager = uartManager;
            _pageDialogService = pageDialogService;

            Title = "Connect to car";
        }

        public ICommand ConnectToObd2DongleCommand => new Command(async () =>
        {
            try
            {
                var hasPermission = await SecurityPermissions.CheckAndRequestLocationPermission();
                if (!hasPermission)
                {
                    await _pageDialogService.DisplayAlertAsync("Permission error",
                        "Location permission must be allowed in order to work with Bluetooth.", "OK");
                    return;
                }

                await _obd2BluetoothManager.StartScanForObd2DongleAsync();
                await _obd2BluetoothManager.ConnectToObd2DeviceAsync();

                if (_obd2BluetoothManager.Obd2BluetoothDongle.State != Plugin.BLE.Abstractions.DeviceState.Connected)
                {
                    await _pageDialogService.DisplayAlertAsync("Error", "Connection to BLE dongle failed.", "OK");
                    return;
                }

                var uartInitializationResult = await _uartManager.InitializeAsync();

                if (!uartInitializationResult)
                {
                    await _pageDialogService.DisplayAlertAsync("Error", "Error connecting to bluetooth dongle.", "OK");
                    return;
                }

                var initialCommandResult = await InitialConnectionFacade.ExecuteInitialCommandAsync(_uartManager);
                if (!initialCommandResult.Key)
                {
                    await _pageDialogService.DisplayAlertAsync("Error", "Error connecting to bluetooth dongle.", "OK");
                    return;
                }

                Output += await _uartManager.GetObdDataAsync<string>("010C") + Environment.NewLine;
                Output += await _uartManager.GetObdDataAsync<string>("010D") + Environment.NewLine;

                await _navigationService.NavigateToRouteAsync("//main-shell/rpm-page");
            }
            catch (Exception ex)
            {
                await _pageDialogService.DisplayAlertAsync("Error", ex.Message, "OK");
            }
            finally
            {
                IsBusy = false;
            }
        });

        private string output;
        public string Output
        {
            get { return output; }
            set
            {
                SetProperty(ref output, value);
            }
        }
    }
}
Visual Appearance:
The “Connect” page provides a button that, when pressed, triggers the ConnectToObd2DongleCommand in the ViewModel. This command handles the Bluetooth connection process, including requesting location permissions (necessary for Bluetooth scanning on some platforms), scanning for OBD2 dongles, connecting to the selected dongle, initializing the UART communication, and sending initial OBD2 commands. Upon successful connection, it navigates the user to the “RPM” page.
Kmph Page: Displaying Vehicle Speed
The “Kmph” page focuses on displaying the vehicle’s speed in kilometers per hour (km/h).
View (KmphPage.xaml):
<?xml version="1.0" encoding="utf-8"?>
<gui:BaseContentPage
    x:Class="Jenx.Odb2.SpeedGauge.Views.KmphPage"
    xmlns="http://xamarin.com/schemas/2014/forms"
    xmlns:x="http://schemas.microsoft.com/winfx/2009/xaml"
    xmlns:d="http://schemas.microsoft.com/winfx/2014/forms/design"
    xmlns:gauge="clr-namespace:Syncfusion.SfGauge.XForms;assembly=Syncfusion.SfGauge.XForms"
    xmlns:gui="clr-namespace:Jenx.Odb2.SpeedGauge.Views"
    xmlns:mc="http://schemas.openxmlformats.org/markup-compatibility/2006"
    xmlns:mvvm="clr-namespace:Prism.Mvvm;assembly=Prism.Forms"
    Title="{Binding Title}"
    mvvm:ViewModelLocator.AutowireViewModel="True"
    mc:Ignorable="d">
    <Grid>
        <ScrollView>
            <StackLayout
                Padding="20,40,20,40"
                HorizontalOptions="CenterAndExpand"
                Orientation="Vertical"
                Spacing="10"
                VerticalOptions="CenterAndExpand">
                <StackLayout
                    BackgroundColor="White"
                    HorizontalOptions="Center"
                    VerticalOptions="Center">
                    <gauge:SfDigitalGauge
                        CharacterHeight="200"
                        CharacterStrokeColor="Blue"
                        CharacterType="SegmentSeven"
                        CharacterWidth="80"
                        DisabledSegmentAlpha="15"
                        DisabledSegmentColor="#146CED"
                        HeightRequest="300"
                        HorizontalOptions="End"
                        SegmentStrokeWidth="12"
                        VerticalOptions="FillAndExpand"
                        WidthRequest="300"
                        Value="{Binding Kmh, StringFormat='{0,3:##0}', Mode=TwoWay}" />
                    <Label
                        FontAttributes="Bold"
                        FontSize="Large"
                        HorizontalOptions="Center"
                        Text="km/h"
                        TextColor="Black" />
                </StackLayout>
            </StackLayout>
        </ScrollView>
    </Grid>
</gui:BaseContentPage>
ViewModel (KmphPageViewModel.cs):
using Jenx.Obd2.Common;
using System;
using System.Globalization;
using System.Threading.Tasks;

namespace Jenx.Odb2.SpeedGauge.ViewModels
{
    public class KmphPageViewModel : BaseViewModel
    {
        private bool _timerRunning = true;
        private readonly IUartManager _uartManager;

        public KmphPageViewModel(IUartManager uartManager)
        {
            Title = "Car speed";
            _uartManager = uartManager;
        }

        private int kmh;
        public int Kmh
        {
            get { return kmh; }
            set
            {
                SetProperty(ref kmh, value);
            }
        }

        public override void OnActivated()
        {
            _timerRunning = true;
        }

        public override void OnDeactivated()
        {
            _timerRunning = false;
        }

        public override async void OnInitialization()
        {
            while (true)
            {
                await Task.Delay(300);

                if (!_timerRunning) continue;

                try
                {
                    if (_uartManager.IsExecuting) return;

                    var odb2SpeedData = await _uartManager.GetObdDataAsync<string>("010D");
                    if (odb2SpeedData == null) return; // response depends on OBD2 protocol of the car

                    var aParameter = odb2SpeedData.Substring(9, 2);
                    int aParameterDecValue = int.Parse(aParameter, NumberStyles.HexNumber);

                    Kmh = Convert.ToInt32(aParameterDecValue);
                }
                catch
                {
                }
            }
        }
    }
}
Visual Appearance:
The “Kmph” page utilizes a SfDigitalGauge from the Syncfusion library to visually represent the speed. The ViewModel continuously fetches speed data from the OBD2 interface using the command “010D” (which corresponds to vehicle speed PID in OBD2). The received hexadecimal data is parsed and converted to an integer representing km/h, which is then bound to the Value property of the digital gauge.
RPM Page: Displaying Engine Revolutions
The “RPM” page displays the engine’s revolutions per minute, giving a real-time view of engine speed.
View (RpmPage.xaml):
<?xml version="1.0" encoding="utf-8"?>
<gui:BaseContentPage
    x:Class="Jenx.Odb2.SpeedGauge.Views.RpmPage"
    xmlns="http://xamarin.com/schemas/2014/forms"
    xmlns:x="http://schemas.microsoft.com/winfx/2009/xaml"
    xmlns:d="http://schemas.microsoft.com/winfx/2014/forms/design"
    xmlns:gauge="clr-namespace:Syncfusion.SfGauge.XForms;assembly=Syncfusion.SfGauge.XForms"
    xmlns:gui="clr-namespace:Jenx.Odb2.SpeedGauge.Views"
    xmlns:mc="http://schemas.openxmlformats.org/markup-compatibility/2006"
    xmlns:mvvm="clr-namespace:Prism.Mvvm;assembly=Prism.Forms"
    Title="{Binding Title}"
    mvvm:ViewModelLocator.AutowireViewModel="True"
    mc:Ignorable="d">
    <Grid>
        <ScrollView>
            <StackLayout Padding="0,20,0,20" Orientation="Vertical">
                <gauge:SfCircularGauge
                    x:Name="circularGauge"
                    HorizontalOptions="FillAndExpand"
                    VerticalOptions="FillAndExpand">
                    <gauge:SfCircularGauge.Scales>
                        <gauge:Scale
                            x:Name="scale"
                            EndValue="6000"
                            Interval="1000"
                            LabelColor="Red"
                            LabelFontSize="20"
                            LabelOffset="0.55"
                            MinorTicksPerInterval="10"
                            RimThickness="1"
                            ScaleEndOffset="0.80"
                            ScaleStartOffset="0.90"
                            ShowTicks="True"
                            StartValue="0">
                            <gauge:Scale.MinorTickSettings>
                                <gauge:TickSettings
                                    EndOffset="0.75"
                                    StartOffset="0.7"
                                    Thickness="1"
                                    Color="#C62E0A" />
                            </gauge:Scale.MinorTickSettings>
                            <gauge:Scale.MajorTickSettings>
                                <gauge:TickSettings
                                    EndOffset="0.77"
                                    StartOffset="0.7"
                                    Thickness="3"
                                    Color="Blue" />
                            </gauge:Scale.MajorTickSettings>
                            <gauge:Scale.Ranges>
                                <gauge:Range
                                    EndValue="6000"
                                    StartValue="0"
                                    Thickness="15"
                                    Offset="0.90">
                                    <gauge:Range.GradientStops>
                                        <gauge:GaugeGradientStop Color="#30B32D" Value="0" />
                                        <gauge:GaugeGradientStop Color="#FFDD00" Value="2500" />
                                        <gauge:GaugeGradientStop Color="#F03E3E" Value="5000" />
                                    </gauge:Range.GradientStops>
                                </gauge:Range>
                            </gauge:Scale.Ranges>
                            <gauge:Scale.Pointers>
                                <gauge:NeedlePointer
                                    x:Name="needlePointer"
                                    KnobRadius="15"
                                    LengthFactor="1"
                                    Type="Triangle"
                                    Value="{Binding Rpm, Mode=TwoWay}" />
                            </gauge:Scale.Pointers>
                        </gauge:Scale>
                    </gauge:SfCircularGauge.Scales>
                </gauge:SfCircularGauge>
                <Label
                    FontAttributes="Bold"
                    FontSize="Large"
                    HorizontalOptions="Center"
                    Text="RPM"
                    TextColor="Black"
                    VerticalOptions="Center" />
            </StackLayout>
        </ScrollView>
    </Grid>
</gui:BaseContentPage>
ViewModel (RpmPageViewModel.cs):
using Jenx.Obd2.Common;
using System;
using System.Threading.Tasks;

namespace Jenx.Odb2.SpeedGauge.ViewModels
{
    public class RpmPageViewModel : BaseViewModel
    {
        private bool _timerRunning = true;
        private readonly IUartManager _uartManager;

        public RpmPageViewModel(IUartManager uartManager)
        {
            Title = "Engine RPM";
            _uartManager = uartManager;
        }

        private int rpm;
        public int Rpm
        {
            get { return rpm; }
            set
            {
                SetProperty(ref rpm, value);
            }
        }

        public override void OnActivated()
        {
            _timerRunning = true;
        }

        public override void OnDeactivated()
        {
            _timerRunning = false;
        }

        public override async void OnInitialization()
        {
            while (true)
            {
                await Task.Delay(300);

                if (!_timerRunning) continue;

                try
                {
                    if (_uartManager.IsExecuting) return;

                    var odb2RpmData = await _uartManager.GetObdDataAsync<string>("010C");

                    if (odb2RpmData == null) return;

                    var aParameter = odb2RpmData.Substring(9, 2);
                    var bParameter = odb2RpmData.Substring(11, 2);

                    int aParameterDecValue = int.Parse(aParameter, System.Globalization.NumberStyles.HexNumber);
                    int bParameterDecValue = int.Parse(bParameter, System.Globalization.NumberStyles.HexNumber);

                    Rpm = Convert.ToInt32((aParameterDecValue * 256 + bParameterDecValue) / 4);
                }
                catch
                {
                }
            }
        }
    }
}
Visual Appearance:
The “RPM” page uses a SfCircularGauge to visualize engine speed. The ViewModel retrieves RPM data using the OBD2 command “010C” (engine RPM PID). RPM data in OBD2 is typically returned as two bytes, so the code extracts two parameters (aParameter and bParameter), converts them from hexadecimal to decimal, and then combines them using a specific formula to calculate the RPM value. This calculated RPM value is then bound to the Value property of the circular gauge’s needle pointer.
Info Page: Displaying Additional Car Status
The “Info” page expands beyond speed and RPM to display other useful car parameters, in this case, engine coolant temperature and engine oil temperature.
View (InfoPage.xaml):
<?xml version="1.0" encoding="utf-8"?>
<gui:BaseContentPage
    x:Class="Jenx.Odb2.SpeedGauge.Views.InfoPage"
    xmlns="http://xamarin.com/schemas/2014/forms"
    xmlns:x="http://schemas.microsoft.com/winfx/2009/xaml"
    xmlns:d="http://schemas.microsoft.com/winfx/2014/forms/design"
    xmlns:gui="clr-namespace:Jenx.Odb2.SpeedGauge.Views"
    xmlns:mc="http://schemas.openxmlformats.org/markup-compatibility/2006"
    xmlns:mvvm="clr-namespace:Prism.Mvvm;assembly=Prism.Forms"
    Title="{Binding Title}"
    mvvm:ViewModelLocator.AutowireViewModel="True"
    mc:Ignorable="d">
    <ScrollView>
        <StackLayout
            Padding="20,40,20,40"
            Orientation="Vertical"
            Spacing="10">
            <Label FontSize="Medium">
                <Label.FormattedText>
                    <FormattedString>
                        <Span Text="Engine coolant temperature: " />
                        <Span ForegroundColor="Red" Text="{Binding Temperature}" />
                        <Span Text=" ºC" />
                    </FormattedString>
                </Label.FormattedText>
            </Label>
            <Label FontSize="Medium">
                <Label.FormattedText>
                    <FormattedString>
                        <Span Text="Engine oil temperature: " />
                        <Span ForegroundColor="Red" Text="{Binding OilTemperature}" />
                        <Span Text=" ºC" />
                    </FormattedString>
                </Label.FormattedText>
            </Label>
        </StackLayout>
    </ScrollView>
</gui:BaseContentPage>
ViewModel (InfoPageViewModel.cs):
using Jenx.Obd2.Common;
using Prism.Services;
using System;
using System.Globalization;
using System.Threading.Tasks;

namespace Jenx.Odb2.SpeedGauge.ViewModels
{
    public class InfoPageViewModel : BaseViewModel
    {
        private bool _timerRunning = true;
        private readonly IUartManager _uartManager;
        private readonly IPageDialogService _pageDialogService;

        public InfoPageViewModel(IUartManager uartManager, IPageDialogService pageDialogService)
        {
            _uartManager = uartManager;
            _pageDialogService = pageDialogService;
            Title = "Car status";
        }

        public override void OnActivated()
        {
            _timerRunning = true;
        }

        public override void OnDeactivated()
        {
            _timerRunning = false;
        }

        public override async void OnInitialization()
        {
            while (true)
            {
                await Task.Delay(5000); // pull data every 5 secs - these data info do not fefresh so often...

                if (!_timerRunning) continue;

                try
                {
                    if (_uartManager.IsExecuting) return;

                    await PullObd2DataAsync();
                }
                catch
                {
                }
            }
        }

        private async Task PullObd2DataAsync()
        {
            try
            {
                var odb2TemperatureData = await _uartManager.GetObdDataAsync<string>("0105");
                if (odb2TemperatureData != null)
                {
                    var aParameter = odb2TemperatureData.Substring(9, 2);
                    int aParameterDec = int.Parse(aParameter, NumberStyles.HexNumber);
                    Temperature = Convert.ToInt32(aParameterDec - 40);
                }
            }
            catch
            {
                Temperature = null;
            }

            try
            {
                var odb2OilTemperatureData = await _uartManager.GetObdDataAsync<string>("015C");
                if (odb2OilTemperatureData != null)
                {
                    var aParameter = odb2OilTemperatureData.Substring(9, 2);
                    int aParameterDec = int.Parse(aParameter, NumberStyles.HexNumber);
                    OilTemperature = Convert.ToInt32(aParameterDec - 40);
                }
            }
            catch
            {
                OilTemperature = null;
            }
        }

        private int? temperature;
        public int? Temperature
        {
            get { return temperature; }
            set
            {
                SetProperty(ref temperature, value);
            }
        }

        private int? oilTemperature;
        public int? OilTemperature
        {
            get { return oilTemperature; }
            set
            {
                SetProperty(ref oilTemperature, value);
            }
        }
    }
}
Visual Appearance:
The “Info” page displays engine coolant and oil temperatures using simple labels. The ViewModel periodically (every 5 seconds) fetches this data using OBD2 commands “0105” (engine coolant temperature) and “015C” (engine oil temperature). Similar to the speed reading, the temperature data is received in hexadecimal format, parsed, converted to Celsius, and then bound to the Temperature and OilTemperature properties for display.
The code provided for these pages clearly demonstrates the process of reading OBD2 data via a Bluetooth dongle, parsing the responses, and displaying the information within a Xamarin Forms application.
Navigation Service and ViewModel Lifecycle Management
Custom Navigation Service
Prism and Unity are valuable toolkits frequently used to enhance application development through Dependency Injection, Service Locator patterns, event aggregation, navigation, and modularity. However, at the time of writing, Prism’s navigation service wasn’t fully compatible with Xamarin Forms Shell. Specifically, navigation functionality with XF Shell was not working as expected.
To address this, a custom INavigationService was implemented as a quick workaround to enable navigation within the Xamarin Forms Shell application from ViewModels:
using System.Threading.Tasks;

namespace Jenx.Odb2.SpeedGauge.Services
{
    public interface INavigationService
    {
        Task NavigateToRouteAsync(string route);
    }
}
And here’s the concrete implementation:
using System.Threading.Tasks;
using Xamarin.Forms;

namespace Jenx.Odb2.SpeedGauge.Services
{    public class MySimpleNavigationService : INavigationService
    {
        public Task NavigateToRouteAsync(string route)
        {
            return Shell.Current.GoToAsync(route);
        }
    }
}
Usage is straightforward. After injecting this singleton service into a ViewModel, navigation can be initiated like this:
await _navigationService.NavigateToRouteAsync("//main-shell/rpm-page");This line of code navigates the application to the route defined in AppShell.xaml, in this case, the “rpm-page.”
Activation and Deactivation Aware ViewModels
In previous Prism-based applications, the INavigatedAware interface provided a built-in mechanism to track when a view is activated (navigated to) and deactivated (navigated from). However, due to the Prism/XF Shell compatibility issues, this functionality was not directly available.
To overcome this, a BaseContentPage was created to manually wire up page lifecycle events (Appearing, Disappearing) to corresponding methods in the Page’s ViewModel binding context. This provides a quick and effective alternative to Prism’s INavigatedAware.
using Xamarin.Forms;

namespace Jenx.Odb2.SpeedGauge.Views
{
    public abstract class BaseContentPage : ContentPage
    {
        public BaseContentPage()
        {
            Appearing += BaseContentPage_Appearing;
            Disappearing += BaseContentPage_Disappearing;
            BindingContextChanged += BaseContentPage_BindingContextChanged;
        }

        private void BaseContentPage_BindingContextChanged(object sender, System.EventArgs e)
        {
            if (BindingContext is ViewModels.BaseViewModel context)
            {
                context.OnInitialization();
            }
        }

        private void BaseContentPage_Disappearing(object sender, System.EventArgs e)
        {
            if (BindingContext is ViewModels.BaseViewModel context)
            {
                context.OnDeactivated();
            }
        }

        private void BaseContentPage_Appearing(object sender, System.EventArgs e)
        {
            if (BindingContext is ViewModels.BaseViewModel context)
            {
                context.OnActivated();
            }
        }
    }
}
The corresponding BaseViewModel class provides virtual methods (OnActivated, OnDeactivated, OnInitialization) that can be overridden in derived ViewModels to handle page lifecycle events:
using System;
using System.Collections.Generic;
using System.ComponentModel;
using System.Runtime.CompilerServices;

namespace Jenx.Odb2.SpeedGauge.ViewModels
{
    public class BaseViewModel : INotifyPropertyChanged
    {
        private bool isBusy = false;
        public bool IsBusy
        {
            get { return isBusy; }
            set { SetProperty(ref isBusy, value); }
        }

        private string title = string.Empty;
        public string Title
        {
            get { return title; }
            set { SetProperty(ref title, value); }
        }

        protected bool SetProperty<T>(ref T backingStore, T value,
            [CallerMemberName]string propertyName = "",
            Action onChanged = null)
        {
            if (EqualityComparer<T>.Default.Equals(backingStore, value))
                return false;

            backingStore = value;
            onChanged?.Invoke();
            OnPropertyChanged(propertyName);
            return true;
        }

        #region INotifyPropertyChanged
        public event PropertyChangedEventHandler PropertyChanged;
        protected void OnPropertyChanged([CallerMemberName]string propertyName = "")
        {
            var changed = PropertyChanged;
            if (changed == null)
                return;

            changed.Invoke(this, new PropertyChangedEventArgs(propertyName));
        }
        #endregion INotifyPropertyChanged

        public virtual void OnActivated()
        {
        }

        public virtual void OnDeactivated()
        {
        }

        public virtual void OnInitialization()
        {
        }
    }
}
This combination of BaseContentPage and BaseViewModel allows for effective control over ViewModel activation and deactivation, mirroring the functionality previously provided by Prism’s INavigatedAware.
OBD2 Communication Layer over BLE
As mentioned earlier, the details of OBD2 communication over BLE are elaborated in a separate blog post: https://www.jenx.si/2020/08/13/bluetooth-low-energy-uart-service-with-xamarin-forms/.
Here, we’ll focus on the API definitions that structure the communication handling:
IObd2BluetoothManager: This interface is responsible for managing the Bluetooth Low Energy communication aspects. It handles tasks like scanning for OBD2 dongles, connecting and disconnecting, maintaining connection persistence, and managing disconnection events.
using Plugin.BLE.Abstractions.Contracts;
using System;
using System.Threading.Tasks;

namespace Jenx.Obd2.Bluetooth
{
    public interface IObd2BluetoothManager
    {
        event EventHandler Obd2DongleDisconncted;
        event EventHandler Obd2DongleConnected;
        IDevice Obd2BluetoothDongle { get; }
        Task DisconnectFromObd2DongleAsync();
        Task StartScanForObd2DongleAsync();
        Task<bool> ConnectToObd2DeviceAsync();
    }
}IUartManager: This interface handles the higher-level communication with the ELM327 chip (commonly used in OBD2 Bluetooth dongles) and the OBD2 protocol itself, built upon the underlying BLE layer.
using System;
using System.Threading.Tasks;

namespace Jenx.Obd2.Common
{
    public interface IUartManager
    {
        bool IsExecuting { get; }
        Task<bool> InitializeAsync();

        #region generic command functions
        Task<T> GetObdDataAsync<T>(string command);
        Task<T> GetObdDataAsync<T>(string command, TimeSpan? timeOut);
        #endregion generic command functions

        #region RC currently supported OBD2 & ELM functions
        // ELM COMMANDS
        Task<bool> ElmSetDefaultsAsync();
        // code removed for brevity
        }
}
These interfaces abstract the complexities of Bluetooth and OBD2 communication, providing a clean and manageable API for interacting with vehicle data within the application.
Conclusion: Unlocking Vehicle Data with OBD2 and Xamarin Forms
While this application is a starting point and has room for further enhancements, it effectively demonstrates the potential of combining readily available technologies to create compelling applications. In this case, we’ve shown how to build a mobile application that communicates with cars using OBD2 and Bluetooth.
This project provides a solid foundation for further development and feature expansion. With this template, you can explore adding more OBD2 parameters, implementing advanced diagnostics, logging vehicle data, or even creating custom dashboards and alerts.
The world of OBD2 and vehicle data is vast and offers exciting possibilities for developers and car enthusiasts alike. By leveraging tools like Xamarin Forms and understanding the OBD2 standard, you can unlock a wealth of information from your car and create innovative applications that interact with the automotive world.
Happy coding and exploring the data within your drive!