Experiencing a P0326 error code on your vehicle? This code signals a problem with your knock sensor, a crucial component in your engine’s performance and longevity. As a DIY car repair enthusiast, tackling a knock sensor replacement might seem daunting, but with the right guidance and tools, it’s a manageable task. This guide will walk you through the process of replacing a knock sensor, focusing on addressing the P0326 trouble code, ensuring your engine runs smoothly and efficiently.
Understanding the P0326 Code and Knock Sensors
The P0326 code, as read by your OBD-II scanner, indicates a malfunction in the knock sensor circuit, specifically for sensor 1 in many vehicles. Knock sensors are designed to detect engine knocking or detonation – abnormal combustion that can damage your engine over time. When your engine control unit (ECU) receives faulty or no signals from the knock sensor due to issues like a P0326 error, it can’t effectively adjust timing to prevent knock. This can lead to reduced engine performance, fuel inefficiency, and potential engine damage if left unaddressed.
This DIY guide focuses on the practical steps to replace a knock sensor, which is often the solution to a P0326 code. While this guide is generally applicable, always consult your vehicle’s service manual for specific instructions and torque specifications.
Tools You’ll Need for Knock Sensor Replacement
Before starting, gather the necessary tools to ensure a smooth and efficient repair process. For this job, you’ll typically need:
- Torx T25 bit: Essential for removing specific screws, often found in engine components.
- Screwdriver with bits attachment or a T25 screwdriver: To handle the Torx screws.
- Small ratchet (1/4″ drive recommended): Provides better maneuverability in tight engine bays.
- Ratchet extenders (various lengths, including a 2″ and 3-5″): To reach recessed bolts and screws.
- 7mm socket: For hose clamps and small bolts.
- 10mm socket: Specifically for the knock sensor bolt in many applications.
- 13mm socket: Often used for larger bolts, like those on boost pipes.
- Oil filter wrench: May be required to remove the oil filter for better access.
- New Knock Sensor: Ensure you have the correct replacement part for your vehicle’s make and model.
Having these tools ready will streamline the knock sensor replacement and help you resolve the P0326 code efficiently.
Step-by-Step Guide to Replacing a Knock Sensor
While the exact location and accessibility may vary slightly depending on your vehicle, these steps provide a general approach to knock sensor replacement, particularly helpful when dealing with a P0326 code.
1. Accessing the Knock Sensor:
Knock sensors are often located in the engine block, sometimes under the intake manifold or other components. Visibility can be limited, but you can often spot the sensor through gaps in the engine bay.
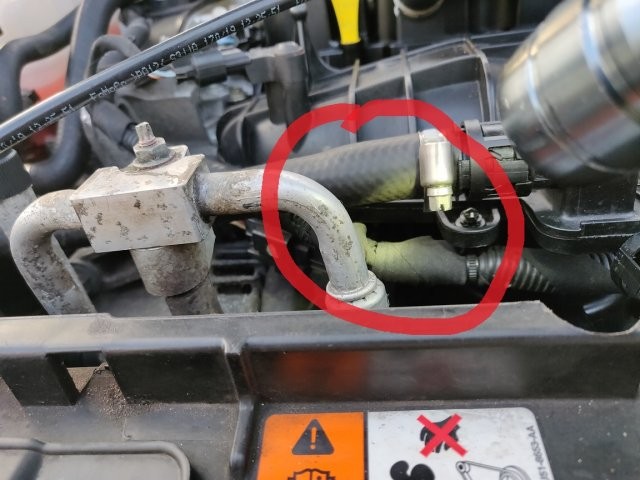
To gain better access, start by removing the cold side boost pipe. This usually involves:
- Disconnecting the vacuum hose (1): These typically have push clips. Squeeze the top and bottom and gently pull to remove.
- Loosening the top hose clamp (2): Use a 7mm socket for this clamp.
- Moving the coolant hose (3): Carefully reposition it upwards to create more working space.
2. Removing the Cold Side Boost Pipe:
From underneath the vehicle:
- Release the lower hose clamp on the cold side pipe.
- Unscrew the 13mm nut securing the pipe.
- Carefully detach the pipe, noting that there might be a vacuum line and temperature sensor connected.
- Disconnect the vacuum hose: It uses a plastic clip similar to the intake vacuum hose.
- Remove the temperature sensor: It’s usually held in place with a 7mm socket screw.
Once these are disconnected, you can fully remove the cold side boost pipe, significantly improving access to the throttle body and subsequently, the knock sensor.
3. Removing the Throttle Body (for Enhanced Access):
For even better access to the knock sensor, consider removing the throttle body. This step, while not strictly mandatory, can make the job considerably easier, especially in tight engine compartments.
- Remove the oil filter: This provides extra maneuvering room. Be prepared for a small amount of oil spillage.
- Locate and remove the two T25 screws closest to the engine block from underneath the vehicle. These screws are typically long, so be patient.
- From the top side, use a small ratchet with a T25 Torx bit and extender to remove the outer T25 screws. Accessing the inner screws from the top might be challenging.
- Disconnect the throttle body connector: It’s usually a click-on connector that needs to be detached.
With the throttle body removed, you’ll have much clearer access to the knock sensor location.
4. Replacing the Knock Sensor:
Now, with improved access, you can proceed with replacing the knock sensor itself.
- Locate the knock sensor: Using the “peephole” for guidance, if applicable to your vehicle.
- Use a ratchet with a 10mm socket and extender to reach the knock sensor bolt.
- Carefully loosen and remove the 10mm bolt.
- Once the bolt is loose, use your fingers to fully unscrew it to prevent dropping it into the engine bay.
- Disconnect the knock sensor pigtail: It might be tucked away but can usually be gently pulled out.
- Install the new knock sensor: Reverse the removal process. Ensure the new sensor is properly seated and the bolt is tightened to the manufacturer’s specified torque.
5. Reassembly and Final Steps:
Reassemble all components in reverse order:
- Reinstall the throttle body (if removed).
- Reattach the cold side boost pipe, ensuring all hoses and connectors are secure.
- Reinstall the oil filter (if removed).
- Double-check all connections and hose clamps.
After reassembly, start your vehicle and use an OBD-II scanner to clear the P0326 code. Monitor your vehicle to ensure the code does not reappear and that your engine is running smoothly.
Tips for a Successful Knock Sensor Replacement
- Patience is key: Working in tight engine bays can be challenging. Take your time and avoid rushing.
- Proper tools make a difference: Using the right tools, especially ratchets and extenders, will significantly ease the process.
- Consult your vehicle’s service manual: While this guide provides general steps, your specific vehicle might have unique procedures or torque specifications.
- Cleanliness: Keep the work area as clean as possible to prevent debris from entering engine components.
- Double-check connections: Before starting the vehicle, ensure all hoses, connectors, and bolts are securely fastened.
By following these steps and tips, you can effectively replace your knock sensor and resolve the P0326 code, restoring your vehicle’s engine performance and efficiency. This DIY approach can save you money and provide a satisfying sense of accomplishment. Remember to always prioritize safety and consult professional resources if you are unsure about any step in the process.