Experiencing a check engine light with a P2004 or P2017 code can be frustrating. Many car owners might immediately fear a costly intake manifold replacement, as indicated by some service stations. However, the issue might be simpler and more affordable to fix than you think. Before shelling out hundreds of dollars, consider this DIY tutorial to potentially resolve the P2004 code by addressing the intake manifold flap actuator. This guide is designed to help you understand the problem, diagnose it, and perform a repair yourself, saving you time and money.
Understanding the P2004 Code and Intake Manifold Flaps
The P2004 code, often accompanied by P2017, indicates a problem with your vehicle’s intake manifold runner control (IMRC) system. Specifically, it means the intake manifold flaps in bank 1 are stuck open. To understand this, let’s briefly discuss the role of the intake manifold and these flaps.
The intake manifold is a critical part of your engine, responsible for distributing air to each of the engine’s cylinders. To optimize engine performance and efficiency across different RPM ranges, many modern engines use intake manifold flaps, also known as swirl flaps or runner flaps. These flaps are designed to be closed during engine start-up and at lower RPMs. When closed, they create a swirling motion of air entering the cylinders, which improves air-fuel mixing, leading to better combustion, fuel economy, and reduced emissions at lower speeds. Above approximately 3000 RPM, these flaps are designed to open, allowing maximum airflow into the cylinders for peak power.
When the P2004 code appears, it signifies that these intake manifold flaps are stuck in the open position. This means the engine is receiving too much air at lower RPMs, disrupting the optimal air-fuel ratio. This can lead to decreased engine performance, especially at lower speeds, and trigger the check engine light.
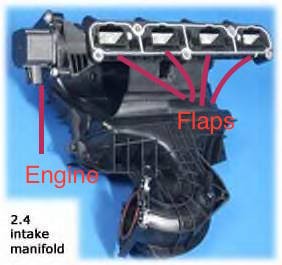
This image shows the intake manifold from the engine side, highlighting the area where the flaps are located.
This image illustrates the typical position of the intake manifold within the engine bay, giving you a general idea of where to locate it in your vehicle.
The most common culprit for a P2004 code is a malfunctioning intake manifold flap actuator motor or a sticking flap shaft. Often, the issue is not a complete intake manifold failure but rather a problem with the actuator motor’s mechanism due to dirt, grime, or lack of lubrication. This DIY fix focuses on addressing this potential actuator motor issue.
Tools You’ll Need
Before you begin, gather the following tools:
- 8mm wrench or socket
- 10mm wrench or socket
- Flathead screwdriver
- WD-40 or similar penetrating lubricant
- Pliers
- String or zip ties (optional, for securing components)
- OBD2 Scanner (for resetting the code)
Step-by-Step Guide to Fixing the P2004 Code
Follow these steps carefully to diagnose and potentially fix the P2004 code. Remember to work in a well-ventilated area and take necessary safety precautions when working on your vehicle.
-
Disconnect the Battery: Open your vehicle’s hood and locate the battery. Use the 10mm wrench or socket to disconnect the negative battery cable (usually marked with a “-” sign or black color). Secure the disconnected cable away from the battery terminal to prevent accidental contact. This step is crucial for safety and to reset the car’s computer system.
-
Remove the Engine Cover: Locate the engine cover, typically made of plastic and often bearing the manufacturer’s logo. Most engine covers are held in place by push-fit pins. Gently but firmly pull upwards on the engine cover to pop it off its pins. Set the engine cover aside.
-
Detach the Air Pipe from the Air Box: Identify the air intake pipe, which is usually a large, black plastic pipe connecting the air box to the engine. Loosen any clamps securing the air pipe to the air box and the throttle body (or intake manifold). Disconnect the air pipe from the air box.
This image shows the process of disconnecting the air pipe from the air box, a necessary step to access the intake manifold actuator.
-
Remove the Air Box: The air box, which houses the air filter, is often secured by push-fit pins similar to the engine cover. Carefully pull upwards on the air box to dislodge it from its mounting points.
This image demonstrates removing the air box to gain better access to the intake manifold area and the actuator motor.
-
Secure the Air Pipe and Air Box (Optional): If the air pipe and air box are obstructing your workspace, use string or zip ties to gently secure them out of the way. This will provide you with more room to work on the intake manifold area.
-
Locate and Disconnect the Intake Manifold Actuator Motor Connector: Now you should be able to clearly see the intake manifold actuator motor. It’s usually a small electric motor with a wiring connector attached to it. Carefully inspect the connector. Most connectors have a locking mechanism that needs to be disengaged before you can pull the plug off. In this example, there’s an orange switch. Pull the orange switch downwards (away from the motor) to unlock the connector. Once unlocked, gently pull the connector straight off the actuator motor.
This image highlights disconnecting the electrical connector from the intake manifold actuator motor. Note the orange locking switch that needs to be disengaged.
-
Inspect the Connector: Examine the electrical connector and the pins on the actuator motor for any signs of corrosion, dirt, or damage. If you find any, clean them gently with an electrical contact cleaner or a soft brush. This ensures a good electrical connection.
-
Remove the Intake Manifold Actuator Motor: The actuator motor is typically held in place by a combination of 10mm and 8mm bolts. Use the appropriate wrench or socket to remove the bolts securing the actuator motor to the intake manifold. Carefully remove the actuator motor.
-
Check the Intake Manifold Flap Shaft: With the actuator motor removed, you can now manually check the movement of the intake manifold flap shaft. Use a flathead screwdriver to gently try to rotate the shaft. It should rotate smoothly within a limited range (approximately 30 degrees) and spring back to its original position. It should not feel sticky, stiff, or excessively loose and rattling.
This image illustrates checking the intake manifold flap shaft movement using a screwdriver to ensure it rotates freely and smoothly.
-
Inspect and Lubricate the Actuator Motor Mechanism: Examine the actuator motor itself. In many cases, the internal spring mechanism within the motor can become jammed or stiff due to lack of lubrication or debris.
-
Lubricate and Free Up the Actuator Motor: Apply WD-40 or a similar penetrating lubricant to the moving parts of the actuator motor’s spring mechanism and pivot points. Let the lubricant soak in for a few minutes. Then, use pliers to gently grasp the actuator motor’s axle and carefully wobble and rotate it back and forth. Repeat the lubrication and wobbling process until the spring mechanism moves freely and returns to its starting position smoothly without sticking or jamming. This step might take some time and patience.
This image shows lubricating the actuator motor mechanism with WD-40 and using pliers to free up any sticking points in the spring mechanism.
-
Reinstall the Actuator Motor: Place the actuator motor back onto the intake manifold. You might need to apply slight counter-clockwise pressure (about 30 degrees) to the actuator motor shaft to align it with the intake manifold flap shaft and the bolt holes, as there is spring preload. Secure the actuator motor with the 2x 10mm and 1x 8mm bolts you removed earlier. Reconnect the electrical connector to the actuator motor, ensuring the orange locking switch clicks back into place to secure the connection.
-
Reassemble Air Box and Air Pipe: Place the air box back onto its mounting points, pushing down firmly to secure it. Reconnect the air pipe to the air box and the throttle body/intake manifold, ensuring all clamps are tightened securely.
-
Reconnect the Battery and Engine Cover: Reconnect the negative battery cable to the battery terminal and tighten the 10mm bolt. Replace the battery cover if applicable. Place the engine cover back on top of the engine, pressing down firmly to re-engage the push-fit pins.
-
Turn Ignition to “ON” (Engine Off): Insert your car key into the ignition and turn it to the “ON” position, but do not start the engine. This will power up the car’s electrical system without starting the combustion process.
-
Reset Error Codes with OBD2 Scanner: Plug your OBD2 scanner into the OBD2 port, typically located under the dashboard on the driver’s side. Turn on the scanner and follow its instructions to connect to your vehicle’s computer. Use the scanner to read and then reset the stored error codes, including the P2004 code.
-
(Optional) Monitor Intake Manifold Pressure (with OBD2 Scanner): Some OBD2 scanners and software allow you to monitor live engine data, including intake manifold pressure. If your scanner has this capability, check the intake manifold pressure at engine idle. It should be relatively constant. Then, rev the engine and observe if the intake manifold pressure drops. This can help confirm the intake manifold flaps are now functioning correctly.
Conclusion
Congratulations! You have potentially fixed the P2004 code and addressed the intake manifold flap issue yourself. This DIY repair can save you a significant amount of money compared to a full intake manifold replacement. By understanding the function of the intake manifold flaps and following these step-by-step instructions, you can tackle this common problem and get your car running smoothly again. Remember to monitor your vehicle after the repair to ensure the check engine light does not reappear and that your engine performance has returned to normal. If the P2004 code returns, further diagnosis might be needed, potentially indicating a more complex issue within the intake manifold or related systems.