Keeping your car’s navigation system up-to-date is crucial for optimal performance and access to the latest features. If you own a Volkswagen, Skoda, or SEAT equipped with the RNS 510 radio navigation system, you might be looking to upgrade its firmware and maps. This guide provides a detailed walkthrough of the process, ensuring your Radio Rns 510 is running smoothly with the newest software and map data.
Just like any computer system, your radio rns 510 benefits from regular updates. Firmware updates can introduce new functionalities, resolve bugs, and enhance the overall speed and responsiveness of your unit. Map updates, on the other hand, ensure you have the most current road information, points of interest, and navigation accuracy. Outdated maps can lead to frustration with incorrect routes and missing new roads.
This guide is designed to help you navigate the update process for your radio rns 510. We’ll cover both firmware and map updates, providing step-by-step instructions based on successful user experiences. While this guide is based on a UK/ROW (Rest of World) RNS 510 unit, the general principles are widely applicable. Let’s dive in and bring your radio rns 510 up to speed.
Updating Your RNS 510 Firmware: A Step-by-Step Guide
Before attempting any firmware upgrade, it’s essential to understand your current system and prepare accordingly. Incorrect firmware can cause issues, so proceed with caution and follow each step carefully.
1. Identifying Your Current RNS 510 Version
Knowing your current firmware and hardware revision is a good starting point, although not strictly mandatory for the popular firmware 5238 upgrade we’ll discuss. There are two primary methods to identify your RNS 510 version: physically checking the unit or using a hidden menu.
Accessing the hidden menu is generally easier. To do this, press and hold the “SETUP” button on your radio rns 510 for approximately 10 seconds. A “radio service menu” should appear, offering a “Version info” option. However, be aware that this hidden menu may not be accessible on older firmware versions. If this method fails, you might need to consider the less convenient option of physically removing the unit to check the part number label.
If the hidden menu is unavailable, don’t be discouraged. Many users have successfully updated their radio rns 510 without knowing their exact current version, especially when using the widely compatible firmware 5238.
2. Sourcing the Correct Firmware (5238 Example)
Finding the right firmware is crucial. Firmware 5238 is widely recommended and reported to be compatible with a broad range of RNS 510 hardware revisions (C3-C12, manufactured from 2005 to October 2013 with HDD). It’s often touted as a universal firmware for these units, eliminating the need for intermediate updates. This firmware also often includes desirable features like video-in-motion (VIM).
While specific download links can become outdated quickly, searching online forums and reputable websites dedicated to radio rns 510 upgrades is your best bet. Be cautious of download sources and ensure they are trustworthy to avoid corrupted files.
Disclaimer: Firmware updates carry inherent risks. Incorrect firmware or a failed update process can potentially render your radio rns 510 inoperable. Proceed at your own risk, and ensure you have a backup plan, such as a recovery ISO, before starting.
3. Preparing for the Firmware Upgrade
Once you’ve sourced the firmware (typically as an ISO image), you’ll need to burn it onto a CD-R. A CD-R is recommended over DVD-R for firmware updates due to the smaller file size and potentially better compatibility with the RNS 510’s optical drive.
Use a CD burning software like CyberLink Power2Go, Nero, or similar. Crucially, burn the ISO image at the slowest speed your burner allows. This reduces the chance of errors during the burn process and improves readability for the radio rns 510 unit, which can be sensitive to disc quality.
Before starting the firmware update, it’s also wise to prepare a recovery ISO. In the unlikely event of a failed firmware update, a recovery ISO can potentially revive your radio rns 510. Search online for “RNS 510 recovery ISO” to find a suitable image and burn it to a CD-R using the same slow-speed burning method. Having this prepared provides peace of mind.
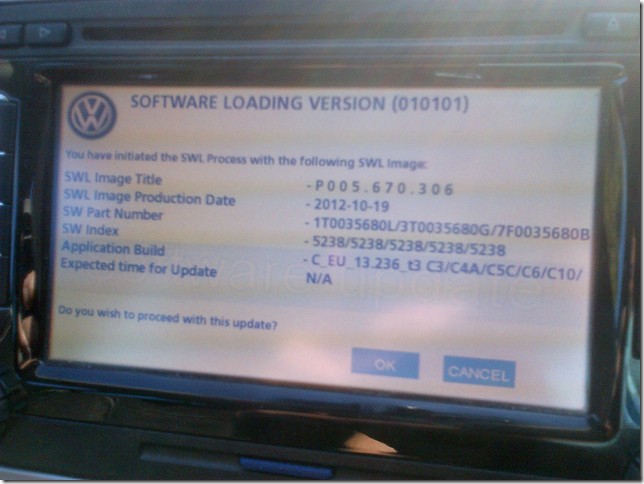
4. Performing the Firmware Update
Now you’re ready to update your radio rns 510 firmware. Follow these steps carefully:
- Ensure your car is unlocked, but the ignition is OFF, and the key is NOT in the ignition.
- Insert the CD-R containing the firmware ISO into the radio rns 510 unit. The unit should power on and begin reading the disc. If it doesn’t power on automatically, press the power button.
- Be patient. The update process can take around an hour and involves multiple reboots. Follow any on-screen prompts carefully. Avoid interrupting the process.
WARNING: Firmware updates can sometimes result in data loss, including your maps and music stored on the hard drive. While firmware 5238 is often reported to wipe the HDD, this can depend on your previous firmware version. Be prepared to reload your maps and music after the update. Ensure you have a map DVD or SD card ready if needed.
Image showing the initial screen of the RNS 510 firmware update process, indicating the start of the software upgrade.
Image displaying the RNS 510 screen during the firmware update, showing progress bars and system messages.
Image illustrating a stage in the RNS 510 firmware installation, possibly showing component updates or system checks.
Image showing the RNS 510 screen nearing completion of the firmware update, indicating the final stages of installation.
Image depicting the RNS 510 unit rebooting after a firmware update, a normal part of the installation procedure.
5. Verifying Successful Firmware Update
After the radio rns 510 reboots, check if the firmware update was successful. First, observe if your map data and music files are still present. In many cases, especially with firmware 5238, the hard drive is wiped during the update process. Don’t be alarmed if your HDD appears empty.
To confirm the firmware version, use the hidden menu again (press and hold “SETUP” for 10 seconds, then “Version info”). You should now see the updated software version, ideally 5238 if you used that firmware. The hardware revision might also be displayed.
If your HDD was wiped, the music icon in the media player may be greyed out. To restore it, copy some MP3 files from an SD card to the radio rns 510. This will also allow you to check the available space on the music partition. Users have reported varying music partition sizes after firmware updates, sometimes smaller than before. This is related to how the firmware partitions the hard drive for maps, music, and POI data.
Image showing the available space on the music partition of the RNS 510 after a firmware update, indicating potential changes in storage allocation.
Image displaying the “Version info” screen on the RNS 510, confirming the successful installation of firmware version 5238.
With the firmware updated, the next crucial step is to bring your maps up to date.
Upgrading Your RNS 510 Maps to the Latest Version
Having the latest maps ensures accurate navigation and access to new points of interest. The map update process for the radio rns 510 can be done via DVD or, more conveniently for newer, larger maps, via SD card.
6. Obtaining the Latest RNS 510 Map Data
The latest maps for the radio rns 510 are typically available on DVD. You can purchase these DVDs from dealerships or online retailers. However, ISO images of these map DVDs are also available online through various (sometimes less official) channels.
Newer map versions, like V12 Western Europe, are often too large to fit on a single-layer DVD-R. Dual-layer DVD-Rs can be used, but burning and reading them on the RNS 510 can be problematic. A more reliable and increasingly popular method is to use an SD card for map updates.
7. Preparing an SD Card for Map Update
Updating maps via SD card requires a special tool and a custom loader CD. The “maps-tool” software, often found in online forums related to radio rns 510 updates, is designed for this purpose. This tool prepares an SD card and creates a loader CD that enables the RNS 510 to read map data from the SD card.
To prepare your SD card:
- Use an SD card with a minimum of 8GB capacity.
- Format the SD card using FAT32 with default allocation unit size. Give it a volume label for easy identification.
- Download and run the “maps-tool” software.
- In “maps-tool,” specify the source ISO image of your map DVD and the destination directory (which can be your SD card directly, or a local folder for faster processing).
- Select the option to “prepare for SD card copy.” Avoid the DVD compression option as it’s less relevant for modern, large map datasets.
- Click “build.” The tool will process the map ISO and create necessary files.
After processing, the destination folder will contain:
- MAPS (folder)
- MAPSDVD (folder)
- test.mp3 (file)
- sd_to_hdd_fw.iso (file)
- help.html (file)
Copy the MAPS, MAPSDVD folders, and the test.mp3 file to the root of your formatted SD card. Burn the sd_to_hdd_fw.iso file to a CD-R at the slowest possible speed. This CD-R will be your custom map loader CD.
Image showing the interface of the RNS 510 maps-tool software, highlighting options for preparing an SD card for map updates.
8. Installing New Maps via SD Card
With your prepared SD card and loader CD, you’re ready to install the latest maps on your radio rns 510:
- Ensure your car’s engine is OFF and the key is NOT in the ignition. Power on the radio rns 510.
- Insert the prepared SD card into the unit. Listen for the test.mp3 file to play briefly, confirming the SD card is recognized.
- Restart the radio rns 510 in “Software Upgrade Mode” by pressing and holding the SETUP + EJECT + MIC (INFO) buttons simultaneously.
- Wait for approximately 20 seconds, then insert the custom map loader CD (sd_to_hdd_fw.iso) into the unit.
- The unit will restart and display a message about the upgrade/copy process. Confirm the upgrade and wait.
- The radio rns 510 will begin copying map data from the SD card to its internal HDD. This process typically takes around 30 minutes. The progress bar may appear stuck at 31% – this is normal; be patient and allow the process to complete.
- Once the map copy is finished, the unit will restart and display a success message. It will then eject the loader CD.
After the unit reboots, your new maps should be installed. Verify the updated maps by checking the version in the hidden menu (“SETUP” for 20 seconds, then “Version info”). The map version should reflect the latest maps you installed (e.g., 8195 for V12 maps).
Image displaying the “Version info” screen after a successful map update via SD card, showing the updated map version (8195).
Congratulations! You have successfully updated both the firmware and maps on your radio rns 510. Enjoy the enhanced performance and up-to-date navigation in your Volkswagen, Skoda, or SEAT.
This guide aims to provide a comprehensive resource for updating your radio rns 510. Remember to proceed cautiously, double-check your steps, and enjoy the benefits of an updated system.