Is your Ford key fob looking worn out or damaged? Before you consider expensive replacements, think about a simple and effective solution: a Replacement Ford Key Fob Case. This DIY upgrade can refresh your key fob’s appearance and protect its internal components without needing to replace the entire unit. Let’s dive into how you can easily replace your Ford key fob case and give your keys a brand new look.
Why consider a replacement Ford key fob case? Over time, the plastic casing of your key fob can become scratched, cracked, or even break. This not only looks unappealing but can also compromise the protection of the delicate electronics inside. A replacement case offers a cost-effective way to restore your key fob to its former glory. In this guide, we’ll walk you through the process using an aftermarket case, similar to the popular AJT Designs injection molded key fob case, to demonstrate how straightforward this upgrade can be.
Before starting, it’s wise to have a spare, unbranded key fob on hand. This way, you avoid disassembling your primary, branded key immediately. You can find affordable replacement fobs online, which are perfect for practicing this process. Once you have a replacement fob, ensure it’s programmed to your vehicle. If you have two existing programmed keys, you can easily program a third one yourself. There are many online resources and videos that detail the Ford key programming procedure. Having a working, but less valuable, fob allows you to proceed with the case replacement without risking damage to your original, branded key during your first attempt.
Now, let’s get into the steps for replacing your Ford key fob case.
Step 1: Disassembling Your Old Ford Key Fob
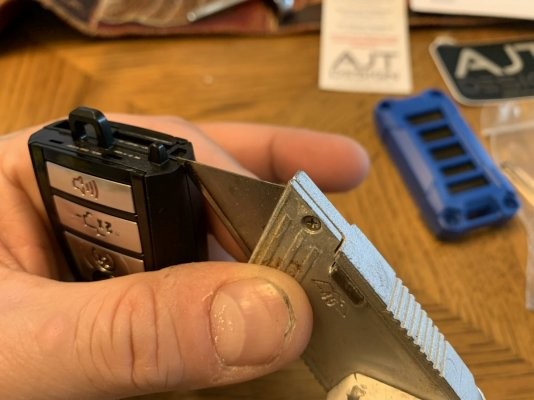
The first crucial step is to carefully open your existing key fob. Start by removing the battery cover, usually located on the back of the fob. Once the battery is out, you’ll need to separate the two halves of the fob casing. Ford fobs are typically glued together, requiring a bit of patience and the right tool.
For this, a sharp utility blade, like a Dewalt carbide blade, works well. Gently trace the seam where the two halves of the fob meet. Apply steady, even pressure, going around the entire perimeter multiple times. The goal is to slowly cut through the adhesive without damaging the internal circuit board. In the corners, you might need to press the blade slightly deeper to help initiate separation. Be extremely cautious not to insert the blade too far, as the circuit board is directly beneath the plastic.
With enough careful cutting, the fob will begin to split open. You might need to gently pry the halves apart once the glue is sufficiently cut through. Exercise caution when separating the case to avoid accidentally launching the circuit board. Take note of how the internal components are arranged as you open the fob; this will be helpful when assembling the new case.
Step 2: Preparing and Assembling the New Replacement Ford Key Fob Case
With your old fob disassembled and the circuit board safely removed, it’s time to prepare your new replacement Ford key fob case. Most aftermarket cases, like the universal kit mentioned earlier, come with various button configurations to accommodate different Ford models.
Begin by placing the individual button pads into their designated slots in the front half of the new case. These kits are generally designed to be intuitive, making it difficult to install the buttons incorrectly. Many kits also offer customization options, such as colored panic buttons, allowing you to personalize your key fob. Once the buttons are in place, test fit the circuit board onto the back half of the new case to ensure it aligns correctly.
Next, take the rubber sealing gasket, usually a large black piece included in the kit. This gasket is crucial for weatherproofing and protecting the buttons. Place the gasket over the back of the installed buttons in the front case half. Press it firmly to ensure it sits flush and seals properly. This gasket prevents dust and moisture from entering the key fob, prolonging the life of the electronics.
(To be continued in the next section for final assembly and tips)