Understanding your Audi Q7 is crucial for its maintenance and longevity. One of the most fundamental components, the battery, sometimes requires attention, whether it’s for a replacement or a jump start. A common question for Audi Q7 owners, especially new ones, is: Where Is The Battery On An Audi Q7? Unlike many vehicles where the battery is conveniently located under the hood, the Audi Q7, along with several other modern cars, has a less conventional battery location.
In this detailed guide, brought to you by the automotive experts at keyfobprog.com, we will not only answer the question of the Audi Q7 battery location but also walk you through the process of accessing and replacing it. While the task might seem daunting due to the advanced technology in Audi vehicles, changing the battery is quite manageable for a DIY enthusiast with the right instructions and tools. The main difference from older cars lies in the battery’s location and the potential need for electronic reprogramming after replacement. Let’s dive in.
Materials Needed
Before you start, gather these materials for a smooth battery replacement:
- New battery (Ensure it’s the correct type for your Audi Q7 model)
- VAG-COM cable (optional, for reprogramming)
- Phillips head screwdriver
- Flat head screwdriver
- Ratchet and standard size socket set
- Airbag adapter (VAS 6235 or 6280), crucial for safely disconnecting the seat
Step 1 – Accessing the Battery: Removing the Driver’s Seat
The battery in an Audi Q7 is strategically placed beneath the driver’s seat. This location optimizes weight distribution and component placement within the vehicle. To get to it, you’ll need to safely remove the driver’s seat. Here’s how:
- Initial Seat Positioning: Begin by moving the driver’s seat as far forward as it will go. This will give you access to the rear bolts securing the seat.
- Remove Assembly Cover: Locate the assembly cover on the side of the seat, near the floor. Use a flat head screwdriver to carefully pry it off. This cover conceals some of the seat bolts.
-
Remove Rear Seat Bolts: With the cover removed, you’ll see the rear bolts. Use your ratchet and socket set to unscrew and remove these bolts.
-
Adjust Seat and Remove Front Bolts: Now, move the seat as far back as possible to access the front bolts.
-
Outer Seat Belt Anchorage: Locate and remove the outer seat belt anchorage point. This is often bolted to the seat frame and needs to be detached for seat removal.
-
Safety First – Turn off Ignition and Disconnect Battery Ground: Crucially, turn off the ignition completely. Before disconnecting any seat wiring, it’s a safety precaution to disconnect the main battery ground wire. However, since we are accessing the battery itself, you may skip disconnecting the main ground wire at this stage but ensure the ignition is OFF.
-
Disconnect Wiring Harnesses: Carefully disconnect all wiring harnesses connected to the seat. These are typically for seat adjustments, heating, and airbags. Important: Airbag connectors are usually yellow and require extra care.
-
Airbag Adapter Connection: This is a critical safety step. Connect the airbag adapter (VAS 6235 or 6280) to the airbag connector you just disconnected. This tool is designed to safely manage the airbag system during seat removal and prevent accidental deployment or error codes.
-
Tip and Remove Front Screws: After connecting the adapter, carefully tip the seat back into its normal upright position. This will reveal the front screws of the seat. Remove these screws.
-
Lift and Remove Seat: With all bolts and wiring disconnected and the airbag adapter in place, carefully lift the entire driver’s seat out of the car. It’s advisable to have someone assist you, as seats can be heavy and awkward to handle.
Step 2 – Battery Exposure and Removal
With the driver’s seat removed, you now have access to the battery compartment. Follow these steps to expose and remove the old battery:
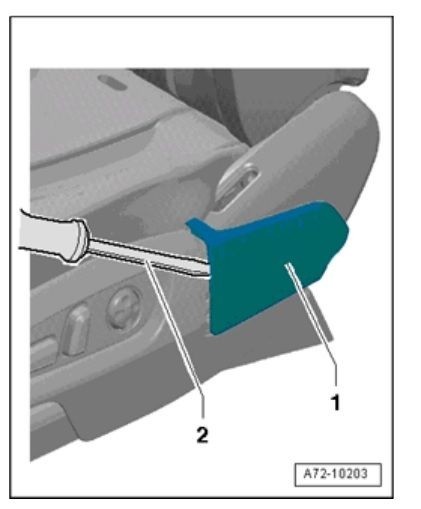
- Floor Vent Screw and Removal: Locate the screw on top of the battery compartment cover (labeled #2 in Figure 3 of the original article, though we are not re-using figure numbers directly to create a unique article). Remove this screw. Then, pull up the floor vent (#1 in Figure 3 of the original article) to improve access.
- Cover Retaining Clamps and Removal: Release the retaining clamps located at the back of the battery compartment cover. Once released, remove the cover.
- Floor Covers and Console Screws: Pry out the covers from the floor around the console area. Next, find and remove the front screws on the driver’s seat console.
-
Battery Cover Removal: You’ll now see the battery cover itself. Release its retaining clamps and remove the cover to fully expose the battery.
-
Disconnect Power Wire: Disconnect the battery’s power wire. Start with the negative terminal first to prevent accidental shorts.
-
Central Venting Hose: Disconnect the hose for the central venting system. This hose is important for venting battery gases outside the vehicle.
-
Battery Bracket Pins and Screw: Remove the threaded pins on the battery bracket and then the screw from the upper battery bracket. These secure the battery in place.
-
Lift Out Old Battery: Carefully lift the old battery straight up and out of the car. Batteries are heavy, so use proper lifting techniques or get assistance.
Step 3 – Installing the New Battery
With the old battery removed, installing the new one is a reverse process, with a few key points:
- Position New Battery: Carefully insert the new battery into the battery mount. Ensure the base strip of the battery engages properly with the retaining clips in the mount. The battery should sit firmly and securely.
- Install Upper Bracket and Screw: Install the upper battery bracket and tighten its screw to secure the battery from the top.
- Battery Bracket and Pins: Insert the battery bracket and tighten the threaded pins. Ensure the battery is now firmly held in place and cannot move.
- Connect Positive Terminal First: Connect the positive battery terminal first, followed by the negative terminal. Make sure connections are tight and secure.
- Reconnect Venting Hose: Reconnect the central venting hose to the new battery. This is vital for safety and proper battery function.
- Reprogramming (Crucial Step): Audi Q7, like many modern vehicles, requires battery replacement to be registered with the car’s computer system. This is typically done through reprogramming the Energy Management Control Module (J644).
- VAG-COM Option: If you have a VAG-COM cable, you can perform the reprogramming yourself. Consult your VAG-COM device instructions for the specific procedure.
- Dealer Reprogramming: Alternatively, you will need to take your Audi Q7 to a dealership or a qualified independent mechanic to have the battery replacement programmed. This ensures correct charging and battery life management by the vehicle’s systems.
Step 4 – Reinstalling the Driver’s Seat
The final step is to reinstall the driver’s seat:
- Seat Placement and Bolts: Carefully place the driver’s seat back into its position in the car. Align the seat rails and tighten the front and rear screws you removed earlier.
- Airbag Adapter Removal and Connector: Remove the airbag adapter (VAS 6235 or 6280). Ensure the original airbag connector is correctly and securely re-engaged. This is crucial for the airbag system to function correctly.
- Reconnect Wiring: Reconnect all the seat wiring harnesses you disconnected in Step 1. Make sure no wires are pinched or will be pinched when the seat moves.
- Replace Side Trim: Replace the side trim piece/assembly cover you removed at the beginning.
- Testing and Checks: Test the driver’s seat to ensure it moves and adjusts properly. Start your Audi Q7 and check the dashboard for any warning lights, especially related to airbags or battery management. If any warning lights persist, consult a professional.
By following these steps, you can confidently locate and replace the battery in your Audi Q7. Remember, while DIY is possible, certain steps, like reprogramming, might require professional equipment or expertise. Always prioritize safety and ensure you have the correct tools and knowledge before undertaking car maintenance tasks. For more guides and expert advice on maintaining your vehicle, visit keyfobprog.com.