Are you tired of your keys scratching your phone or getting lost in the depths of your bag? Or perhaps you’re looking for a quick and satisfying crochet project? Look no further! Inspired by a cherished handmade gift, this Crochet Key Fob Cover pattern is perfect for beginners and experienced crocheters alike. It’s a fun and functional way to personalize your keys and makes a thoughtful small gift for friends and family.
Just like the original creator, many of us have experienced the wear and tear of everyday key fobs. A simple fabric key fob, lovingly sewn by her sister, became a long-lasting treasure until it began to fray. This inspired the creation of a durable and stylish crochet key fob cover as a replacement – and now you can make one too! This pattern is designed to be easy to follow, using basic crochet stitches, and allows for endless color combinations to match your personal style.
This isn’t just another complicated crochet pattern. If you’re looking for a project that’s:
- Simple and Straightforward: Easy-to-understand instructions perfect for crochet beginners.
- Quick and Satisfying: Whip up a key fob cover in no time.
- Customizable: Experiment with colors and yarns to create unique designs.
- Practical and Giftable: A useful accessory for yourself or a thoughtful handmade gift.
- Great for Craft Fairs: A small, popular item to sell at craft events.
Then you’ve come to the right place! Let’s dive into this free crochet key fob cover pattern and create something beautiful and functional.
Free Crochet Key Fob Cover Pattern
A Friendly Note: You are welcome to use this crochet key fob pattern to create items for personal use or to sell. However, please do not republish or distribute the pattern itself in any way. We kindly ask that you do not use our photos when selling your finished items. Sharing blog links is always appreciated as a free way to support Whistle and Ivy and helps us bring you more free crochet patterns in the future! Please also take a moment to read our Disclaimer before starting any of our free patterns.
Materials You Will Need: (These are affiliate links which help support this blog)
- Medium Weight Yarn: Choose your favorite colors! The example uses a mix of Comfy Worsted and Shine Worsted by Knit Picks, both cotton blends, for a soft and durable finish. Cotton or cotton blends are recommended for key fobs as they hold up well to daily use.
- G Hook (4.0 or 4.25 mm): Adjust hook size if needed to achieve a tight stitch.
- Metal Key Hooks: Key hooks like these are readily available online and in craft stores.
Gauge is not crucial for this project, but aim for tight stitches to create a sturdy key fob cover.
Crochet Abbreviations (US Terms):
- Ch – chain
- Sc – single crochet
- Hdc – half double crochet
- Sl st – slip stitch
- St – stitch
Crochet Key Fob Cover Tutorial: Step-by-Step Instructions
Follow these simple steps to crochet your own key fob cover:
-
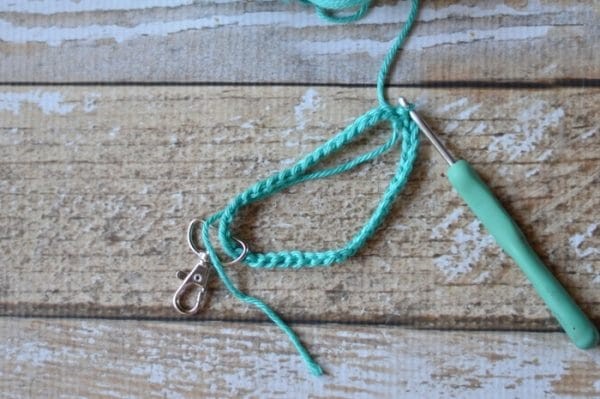
Foundation Chain: Ch 40. Slip the end of your chain through the bottom of the metal key hook ring. Sl st into the first ch to form a loop, being careful not to twist the chain. (See Photo 1)
-
Row 1 (Layer 1 – Color 1): Ch 1. Hdc in the same stitch. Hdc in each of the next 39 chains. Join with a sl st to the first hdc. (40 sts total). (See Photo 2)
-
Row 2 (Layer 1 – Color 1): Ch 1. Sc in the same stitch. Sc in each of the next 39 stitches. Join with a sl st to the first sc. (40 sts total).
-
Row 3 (Layer 1 – Color 1): Ch 1. Sc in the same stitch. Sc in each of the next 39 stitches. Join with a sl st to the first sc. (40 sts total). If your first color is intended to be the accent color and bottom layer, do not break the yarn.
-
Layer 2 (Color 2): Using your second color of yarn, ch 40. Pull the end through the key ring and join with the first ch, forming a loop. (See Photo 3)
-
Rows 1-3 (Layer 2 – Color 2): Repeat rows 1-3 as described for Layer 1, using your second color. You will now have two crocheted layers attached to your key ring. (See Photo 4)
-
Joining the Layers: Position the two layers so that the right sides are facing outwards and carefully line them up. Taking the loop from your first layer (color 1), pull it through the corresponding loop on the 2nd layer (color 2) and slip stitch them together along the side edge to join the two layers securely. (See Photo 5)
-
Finishing: Tie off the yarn and weave in the ends for a clean finish. Using the same yarn color as Layer 1 (or your preferred color), slip stitch around the bottom edge of the key fob cover to create a neat border. (For ease, you can stuff most of the loose yarn ends in between the layers before slip stitching around the bottom to avoid excessive weaving). (See Photo 6 & 7)
-
Securing to Key Ring: To further secure your crochet key fob cover and prevent it from shifting, use two strands of yarn on a darning needle. Sew a horizontal line just below the key ring, securing it firmly at each end. (See Photo 8)
Congratulations! You have completed your crochet key fob cover!
Color and Design Variations
Get creative and personalize your crochet key fob covers! Experiment with different color combinations to match your keys, bags, or personal style. The creator of this pattern loved a navy blue version with pink accents. Consider using complementary colors for the outside stitching to make it pop!
You can also add embellishments to your key fob covers. Embroidery is a great way to personalize them further. As shown in the original example, simple star designs can be added before slip stitching the layers together. Buttons, beads, or small appliqués could also be incorporated to make your key fob covers truly unique.
Perfect for Craft Fairs and Gifts
These crochet key fob covers are not only practical and stylish but also make fantastic items for craft fairs or small handmade gifts. They are quick to make, use minimal yarn, and are always a popular item. Consider making a batch of these in various colors and designs for your next craft fair or to have on hand for last-minute gifts.
Enjoy crocheting your key fob covers! They are a fun, easy, and rewarding project that you’ll be sure to love and use every day.