Crochet keychains are fantastic projects for many reasons! They are incredibly easy to make, serve a practical everyday purpose, and work up quickly – perfect for when you need a fast crafting fix. Plus, crochet keychains are a wonderful way to practice and master new crochet stitches. Inspired by the beauty of simple, functional designs, I’ve created a stunning keychain pattern as a delightful addition to the Ocean’s Breath Collection.
This pattern is available for free on my website, allowing you to easily create your own charming crochet key fobs. For those who prefer a detailed, ad-free PDF version, you can find it in my Etsy or Ravelry shops. All rights for this pattern are reserved.
This site contains affiliate links to products I recommend. I may receive a commission if you make a purchase through these links. This helps support my small business and allows me to continue providing free patterns for you to enjoy!
Discover the Charm of Crochet Keychains
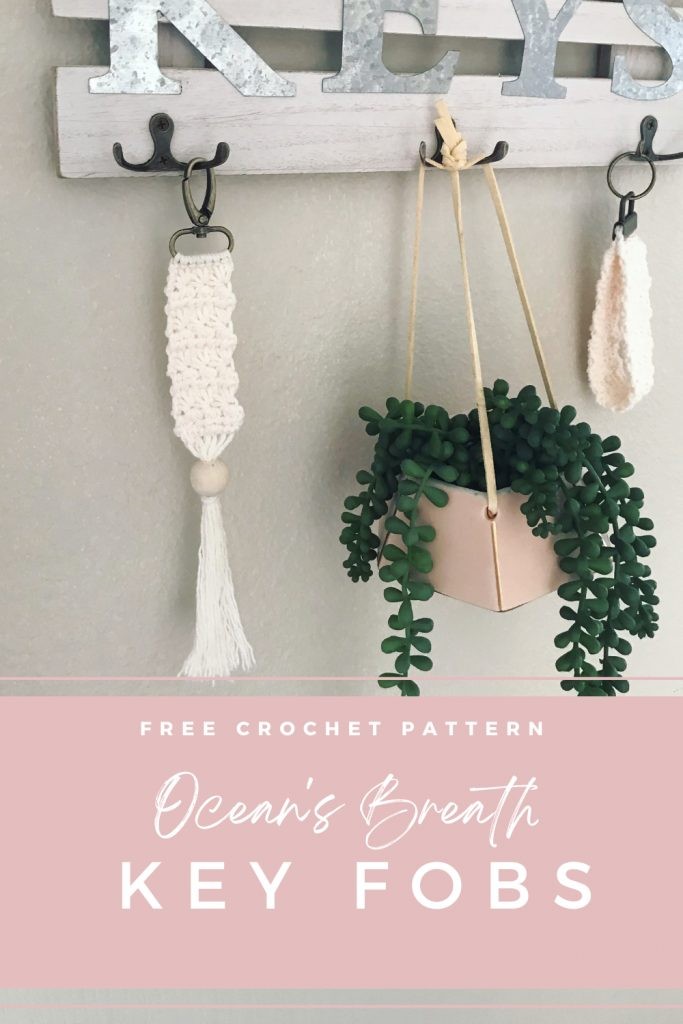
When I first envisioned the Ocean’s Breath Key Fobs, my initial thought was to incorporate the delicate lace elements that define the other pieces in the collection. However, through experimentation, I realized that the star stitch alone provided the perfect texture and visual interest for a keychain. Its unique appearance makes these key fobs stand out while remaining beautifully simple.
Two Stylish Keychain Styles
This Crochet Key Fob Pattern offers instructions for creating two distinct styles, catering to different preferences and needs:
-
Simple Crochet Keychain: This classic design begins with star stitches and allows for personalization through the addition of beads and fringe. It’s a fantastic option for expressing your creativity and crafting unique, personalized keychains. The simplicity of the base design makes it a great canvas for embellishments.
-
Wristlet Key Fob: For those who prefer hands-free convenience, the wristlet key fob is an ideal choice. This style offers a more straightforward design while providing the practicality of wearing your keys securely on your wrist. I personally love wristlet key fobs and often make them from interesting fabric scraps. I was thrilled to adapt this concept to crochet, bringing a handmade touch to this functional accessory.
Quick, Easy, and Incredibly Functional
I am genuinely excited about this third addition to the Ocean’s Breath Collection. It’s a project that works up quickly and effortlessly, making these crochet keychains perfect for craft markets or as last-minute gifts. Beyond their aesthetic appeal, they are incredibly functional. If you’re like me and often find yourself rummaging through a bag while managing other tasks, having a distinctive and easy-to-grab keychain is a lifesaver.
The Ocean’s Breath Collection Inspiration
The Ocean’s Breath Collection is inspired by the airy, openwork style of macrame. It began with the Ocean’s Breath Yoga Bag, which featured simple lace and textured star stitches. This was followed by the Ocean’s Breath Wall Hanging, which expanded on these elements with the addition of beautiful drop stitches. My aim for the key fobs was to create a final piece that was quick and easy to make, yet still captured the essence of the collection’s macrame-inspired style.
Since launching the initial designs, I’ve expanded this collection to include even more pieces. Explore them all through the links below or browse the complete Ocean’s Breath Collection to discover coordinating patterns:
- Ocean’s Breath Market Bag
- Ocean’s Breath Table Runner and Placemat
- Ocean’s Breath Cardi (Coming Soon!)
Choosing the Right Yarn for Your Crochet Keychain
For these crochet keychains, I recommend using 100% cotton yarn. Cotton yarn is an excellent choice because it is generally more durable than other fibers, which is essential for an item that will be used daily and potentially exposed to wear and tear. This pattern is designed for worsted weight yarn, but feel free to experiment with different yarn types if you desire. Here are a few of my favorite worsted cotton yarns that work wonderfully for keychains: [Add specific yarn recommendations here, if available from original site research].
Step-by-Step Guide to Making Your Crochet Keychains
Crocheting Around the Swivel Clasp (Keychain Version)
When creating the keychain version, you will crochet the first row directly onto the swivel clasp. These clasps, often called Lobster Swivel Hooks, can be found in the sewing section of most craft stores like Hobby Lobby, or online.
To attach your yarn to the hardware, insert your crochet hook through the bottom loop of the clasp. Then, work single crochet stitches around the bar of the clasp to create a secure foundation. Once you have completed the first row of stitches around the clasp, you can continue following the pattern as written.
Adding Key Fob Hardware (Wristlet Version)
For the wristlet key fob, the hardware is added at the end of the crocheting process. You will need key fob hardware and pliers to complete this style. Regular pliers can be used, but be careful not to scratch the metal hardware. Pro Tip: Applying a bit of hot glue to the tips of your pliers can provide a protective cushion and prevent scratches.
I often purchase my key fob hardware from I Love Big Buttons on Etsy. If you plan to make key fobs regularly, consider investing in specialized key fob pliers sold at I Love Big Buttons. They are a worthwhile investment for frequent key fob making.
To attach the hardware, insert both ends of your crocheted strap into the key fob hardware, ensuring they are fully inserted for a secure grip. Then, use pliers to firmly clamp the hardware closed, securing the strap within.
Creative Finishing Touches for Your Crochet Keychains
The simple design of these crochet keychains makes them perfect for adding fun embellishments like fringe or beads. These details can really personalize your keychains and add extra flair.
Adding Tassels and Beads for a Personalized Touch
To add fringe, simply pull a loop of yarn through a stitch at the bottom of the keychain and then pull the yarn tails through the loop to create a knot. Repeat this across the bottom edge to create a fringe. Trim the fringe to your desired length for a neat finish.
Once the fringe is added, you can incorporate beads for even more detail. Look for wooden beads or similar with holes large enough to fit your crochet hook through. To add a bead, place it on your crochet hook, catch a strand of fringe with the hook, and slide the bead from the hook onto the fringe. You can add multiple beads to each fringe strand or space them out as desired.
Let’s Start Crocheting!
Materials Needed:
- 5 – 25 yards of cotton worsted weight yarn (depending on keychain style and desired length)
- Size G (4.5mm) crochet hook
- Tape Measure
- Tapestry needle
- Scissors
- 1 1/4” Key Fob hardware (for wristlet) or Swivel Lobster Hook hardware (for keychain)
- Wooden beads (optional)
- Pliers (for Key Fob wristlet only)
Finished Measurements (without hardware):
- Key Fob Wristlet: 1 1/4” wide x 10” long
- Key Chain: 1 1/4” wide x 3 1/2” long (excluding fringe)
Special Stitches Used in this Pattern
This pattern utilizes the star stitch. If you are unfamiliar with this stitch, I have a detailed blog post with both photo and video tutorials to guide you.
Star Stitch Tutorial
Crochet Pattern Instructions
Wristlet Key Fob Pattern
Row 1: Chain 8. Single crochet in the 2nd chain from the hook and in each chain across. (7 single crochet stitches)
Row 2: Chain 3. Complete a row of 3 star stitches: [Insert hook in 2nd chain from hook, pull up a loop. Insert hook into next chain, pull up a loop. Insert hook and pull up a loop over the next 3 single crochet stitches. (6 loops on hook) Yarn over and pull through all loops on hook. Chain 1 to close star stitch (eye of star stitch)]. Repeat the bracketed sequence three times across the row.
Row 3: Chain 1 and turn. 2 Half double crochet in the eye of each star stitch across. Half double crochet in top of last star stitch. (7 half double crochet stitches)
Rows 4-25: Repeat Rows 2-3.
Row 26: Single crochet in each stitch across. Tie off and weave in ends. (7 single crochet stitches)
Finishing: Fold the crocheted piece in half lengthwise with the star stitches facing outward. Place the two ends inside the key fob hardware and clamp closed with pliers to secure.
Key Chain Pattern
Row 1: Single crochet 7 stitches around the base of the Lobster Swivel Hook. (7 single crochet stitches)
Row 2: Chain 3 and turn. Complete a row of 3 star stitches, following the instructions in the Wristlet Key Fob pattern for Row 2.
Row 3: Chain 1 and turn. 2 Half double crochet in the eye of each star stitch across. Half double crochet in top of last star stitch. (7 half double crochet stitches)
Rows 4-11: Repeat Rows 2-3. Tie off and weave in ends.
Adding Fringe:
- Cut 7 strands of yarn approximately 16” long each.
- Fold each strand in half. Insert hook into the first stitch and pull up the center of the strand.
- Using the hook, pull the two ends of the strand from the back and through the loop you just pulled up. Tighten the loop to secure the fringe.
- Repeat in each stitch across.
- Once fringe is added, trim as necessary to make it even.
Adding Beads:
Place a bead onto a crochet hook, hook the end of the fringe, and then slide the bead off the hook and onto the fringe. Wrap a piece of yarn around the fringe beneath the bead to hold it in place, if desired.
Final Thoughts and Sharing Your Creations
I sincerely hope you enjoy crocheting this pattern! I would absolutely love to see your finished crochet keychains. Please share your work on Instagram and tag me @craftingforweeks. Use the hashtag #oceansbreathkeyfobs so I can find and admire your beautiful creations!
Be sure to explore some of my other free accessory patterns for more crochet inspiration:
I-Cord Wrap Bracelets
Herringbone Clutch
Summer Headband
Happy Crafting until next time!