Installing a hood switch on your Mazda CX-5 might seem straightforward, but factory instructions can sometimes be unclear. This guide aims to simplify the process, providing step-by-step instructions to help you successfully install your hood switch. While the original Mazda instructions might lead you to the glove box prematurely, we’ll focus on the under-hood components first for a smoother installation. The factory drawings for the hood switch installation can also be confusing, but we’ll clarify the positioning with detailed descriptions and images. This guide will help you navigate those tricky steps and ensure a correct installation.
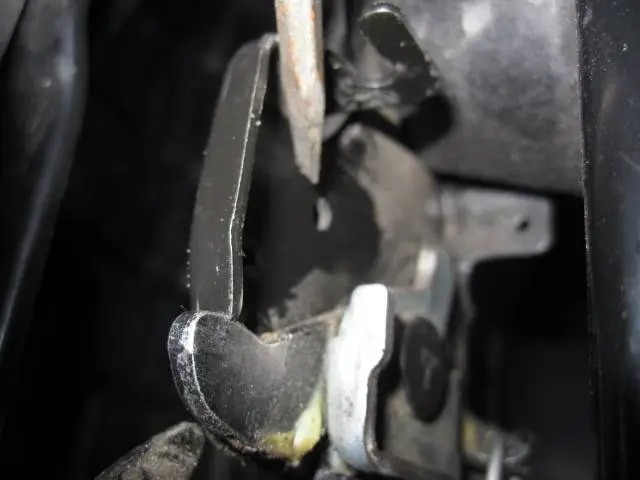
Let’s start by understanding the hood latch area. Looking at the front of the hood latch, you’ll see a designated spot for a screw. However, the precise placement of the switch itself can be ambiguous. If you examine the switch, you’ll notice tabs on both sides. Interestingly, the Mazda CX-5 utilizes only one of these tabs, suggesting the switch’s broader compatibility across Mazda models. The image below illustrates the backside of the hood latch and clarifies where this tab should be inserted.
The switch will sit at an unconventional angle. When you’re ready to place the switch, carefully maneuver it into the area. You’ll feel a distinct ‘pop’ when it securely locks into the correct position. Ensure the thin metal prong of the switch is oriented towards the fuse panel side of your vehicle. The wiring should then be directed into the groove located at the top, as shown in the image. Secure the switch using the provided screw.
Next, prepare the metal panel behind the latch. Thoroughly clean this area to ensure good adhesion for the wire-tie tabs. You’ll use two of the three provided wire-tie tabs in this kit. Route the wire bundle as depicted in the image below. Fasten the wire ties snugly, but avoid overtightening them. Once secure, trim any excess length from the wire ties for a clean finish.
Guide the wiring bundle underneath the duct and panel that you loosened in the earlier steps. It’s crucial to ensure the wire bundle isn’t pinched or restricted once everything is re-fastened. To check for free movement, you should be able to gently grasp the bundle from either side of the duct and move it back and forth slightly.
The wiring bundle will emerge in this area, not at the far end of the panel. Clean the surface where the third wire-tie tab will be placed and mount it as illustrated. Then, secure the wires to this tab.
This image shows how the components should look once properly tucked in. The installation should appear neat, with only a minimal glimpse of the wire visible before the duct. The bundle will also be noticeable near the hood prop holder.
Route the wiring bundle around the existing factory wiring harness as indicated in the following image.
Continue routing the wiring bundle downwards along the factory harness. Use zip ties at intervals to keep it securely in place.
As you approach the fuse panel, refrain from zip-tying the bundle just yet. Leaving some slack will make connecting to the fuse panel easier. However, be mindful not to obstruct the air filter cover, ensuring it can be removed in the future for maintenance.
To simplify the next steps, you might find it helpful to detach these two connectors. However, for this installation, we’ll primarily focus on the connector with a larger number of wires, not the one with only three wires (or more, depending on your specific Mazda CX-5 fuse panel model). Important Note: Fuse panel configurations can vary across different CX-5 models. Refer to your factory instructions to confirm the correct connector for your vehicle.
Regardless of your CX-5’s fuse panel type, the white wire from the hood switch will be inserted into the empty slot indicated in the image. In this example, it’s located behind the red wire, although the color of this wire might differ in your car. Again, always consult your factory instructions to ensure correct wire placement.
Gently push the white wire into the designated slot as far as it will go without applying excessive force. This initial insertion prepares it for the next step.
Utilize a small screwdriver or a similar tool to slightly loosen the retainer clip. Access the clip through the two small slots on the connector’s side. It’s only necessary to loosen it slightly, not to remove it completely.
Now, push the white wire in firmly until it is fully seated. You might hear a faint click, but verify that it’s completely inserted with no metal conductor visible. Then, push the retainer clip back into its original position. It should require only minimal pressure to snap back into place. If you encounter significant resistance, double-check that the wire is correctly positioned.
If you see the black wire in the position shown in this image, you have the same fuse panel model (Type A) as in this guide. This is the black wire you’ll need to tap into using the provided red ‘electro tap’. If you don’t see a black wire in this slot and it appears empty, you likely have a Type B fuse panel. In that case, refer to your factory instructions to identify the correct black wire to use from the other connector. Regardless of the fuse panel type, the subsequent steps for using the electro tap will be the same.
Remove the factory black tape that binds the wires of the two connectors together. Then, carefully separate the black wire to provide easier access for the electro-tap connection.
Connect the black wire from the hood switch to the factory black wire using the electro-tap. The factory wire should pass straight through one side of the electro-tap, and the hood switch wire is inserted into the other side, pushing it in until it stops. Use pliers to firmly press down the metal tab on the electro-tap until you can completely close the plastic flap. The flap might not stay closed on its own, so be sure to secure it with black tape by wrapping it completely.
You can now reconnect the connectors, replace the fuse panel cover (carefully positioning it to accommodate the new wires), and finish securing the wiring bundle with zip ties as needed in a few locations.
By following these steps, you should have successfully installed your hood switch on your Mazda CX-5. Remember to always double-check your connections and consult the factory instructions for any model-specific variations.