Do you find yourself constantly setting off your car alarm or popping the trunk unexpectedly just by having your key fob in your pocket? Many car owners experience the frustration of an overly sensitive key fob. If you’re tired of your keyless entry remote acting up at the slightest touch, you’re not alone. Fortunately, this is often a simple issue you can resolve yourself at home. This guide will walk you through the steps to fix your overly sensitive key fob, saving you time and potentially a trip to the dealership.
Identifying the Issue: Overly Sensitive Key Fob
Before diving into the repair, let’s confirm the problem. An overly sensitive key fob exhibits symptoms like:
- Accidental locking or unlocking of doors while in your pocket or bag.
- Unintentional opening of the trunk or tailgate.
- Frequent triggering of the panic alarm with minimal pressure on the buttons.
These issues often arise gradually, becoming more pronounced over time. If your key fob is behaving erratically with just light touches, it’s likely suffering from the sensitivity problem we’ll address.
DIY Fix: Step-by-Step Guide to Repairing Your Key Fob
This repair focuses on a common cause of key fob sensitivity: loose metal discs within the button assembly. This guide is based on a repair for a Ford key fob (FCC ID: M3N5WY8609), commonly found in models like Ford Escape, Focus, and Explorer from the 2011-2018 range, but the general principle can apply to other key fobs with similar internal конструкции.
Step 1: Open the Key Fob
The first step is to carefully open your key fob casing.
- Remove the Valet Key: Locate the small switch or button that releases the valet key. Remove the valet key from the fob.
- Pry Open the Casing: Using a small flat-head screwdriver or even the valet key itself, gently pry open the key fob casing. Start at the seam where the valet key was housed and carefully work your way around the fob. The case should split into two halves.
Step 2: Access the Button Pad and Metal Discs
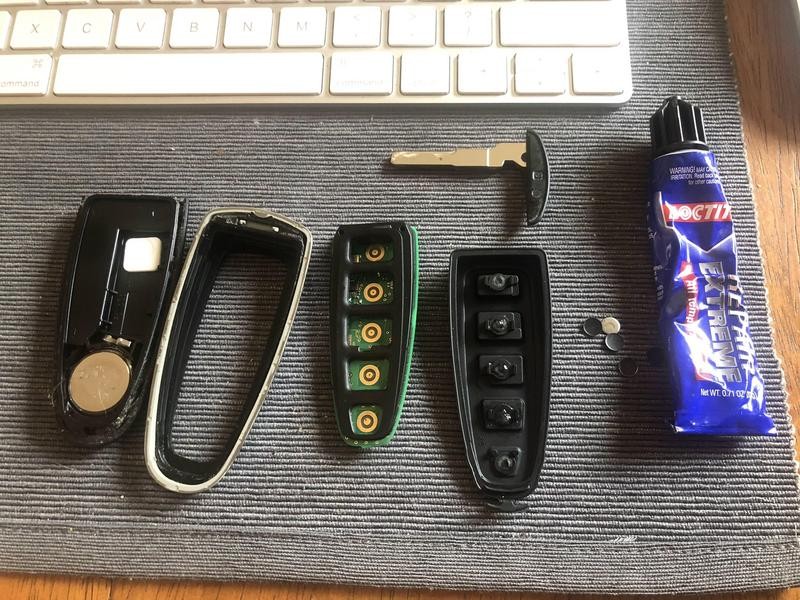
Once the casing is open, you’ll see the internal components.
- Remove the Circuit Board (If Necessary): Some key fobs may have a circuit board that needs to be gently lifted out to access the button pad. Note its orientation for reassembly. In other designs, the button pad may be directly accessible.
- Locate the Rubber Button Pad: The button section is usually a flexible rubber piece. Carefully remove it from the casing.
- Inspect for Metal Discs: On the back of the rubber button pad, you should see small metal discs. These discs are designed to make contact with the circuit board when you press a button. The problem often arises when the adhesive holding these discs weakens, causing them to become loose or detach.
Step 3: Address Loose Metal Discs
Now, it’s time to deal with the loose metal discs. You have a couple of options:
- Remove All Metal Discs (Partial Disable): If you want to simplify things or disable certain buttons (like panic or remote start, as in the original example), you can remove all the metal discs entirely. This will require more deliberate pressing of the buttons to activate them, reducing sensitivity.
- Re-glue the Metal Discs: For full button functionality but reduced sensitivity, carefully re-glue the metal discs.
- Remove Loose Discs: If any discs are still attached, gently remove them.
- Clean Surfaces: Clean off any old adhesive from both the metal discs and the rubber button pad.
- Clip Button Nubs (Optional): Some users clip the small nubs on the rubber buttons where the discs attach to further reduce sensitivity. This is optional but can be helpful.
- Re-glue Discs: Use a small amount of adhesive like Loctite repair adhesive to re-glue the metal discs back onto the correct positions on the button pad. Ensure they are securely attached. For buttons you wish to disable, simply leave the metal discs off.
Step 4: Reassemble the Key Fob
Once you’ve addressed the metal discs, it’s time to put everything back together.
- Replace Battery (Optional): This is a good opportunity to replace the key fob battery, especially if it’s been a while. The CR-2032 battery is a common size for these remotes.
- Reassemble Components: Carefully place the rubber button pad back into the key fob casing. If you removed the circuit board, ensure it’s correctly positioned.
- Close the Casing: Snap the two halves of the key fob casing back together until they are securely closed.
Step 5: Test Your Repaired Key Fob
Finally, test your key fob to ensure the repair was successful.
- Test Button Functionality: Press each button to confirm it performs its intended function (lock, unlock, trunk, etc.).
- Check Sensitivity: Ensure the buttons now require a deliberate press and are no longer overly sensitive to accidental touches.
Battery Replacement (Optional)
While you have your key fob open, consider replacing the battery. A fresh CR-2032 battery can improve signal strength and overall key fob performance. Simply pop out the old battery and insert the new one, ensuring correct polarity (+ side up).
Compatibility and Part Numbers
This guide is based on the Ford Smart Key with FCC ID M3N5WY8609 and OE part number 164-R8091. This type of remote is commonly found in Ford models like:
- Ford Escape (2013-2019)
- Ford C-Max (2013-2018)
- Ford Focus (2012-2018)
- Ford Flex (2013-2019)
- Ford Explorer (2011-2019)
- Ford Expedition (2015-2017)
- Ford Taurus (2010-2019)
If your key fob has a similar design, this repair method is likely applicable. Always double-check your vehicle’s manual or key fob for specific part numbers and battery types.
Conclusion
Fixing an overly sensitive car key fob can be a straightforward DIY task. By addressing the common issue of loose metal discs within the button assembly, you can restore your key fob’s proper function and eliminate those frustrating accidental button presses. This simple repair can save you the cost and inconvenience of replacing the entire key fob. For more car key fob repair guides and information, visit keyfobprog.com.